
Hummingbirds are amazing little creatures. They’re the only birds capable of flying backward, their wings flap between 15-200 times per second, and they look incredible. However, their lightning speed and small size make them extremely difficult to photograph – unless you know a few secrets, that is!
In this article, I share my top hummingbird photography tips, including:
- The slowest shutter speed you can use for sharp shots
- The setting that’ll ensure consistently accurate focusing
- An easy way to dramatically increase your keeper count
- Much more!
Read this article, practice these techniques, and with a little patience, I promise that you, too, will capture some amazing hummingbird shots.
So let’s dive right in, starting with my first tip:
1. Learn how hummingbirds behave
Understanding your subject is a key part of any type of photography, but it’s absolutely essential if you’re photographing hummingbirds. Hummingbirds are fast, they’re agile, and they don’t respond to commands – so if you want to be in the right place at the right time, you need to know those tiny birds like the back of your hand.

That said, you don’t need to become a PhD-level expert in hummingbird behavior. I’d recommend learning a few basic facts to start:
- What’s the name of the species you’d like to photograph? If you’re not sure, do some Googling and find out which hummingbirds live in your area.
- Where are your local hummingbirds often found? What is their habitat?
- What time of the year are they most active?
- What’s their diet like? Where do they get their sweet nectar from?
- What do they sound like? It’s helpful to know both their song and the sound of their wing flaps.
Once you know the basics, start making a list of possible hummingbird photo locations (based on the habitat types). You might also consider reaching out to local birders or checking for sightings on eBird.

And make sure you always keep in mind the hummingbirds’ active months. Nothing is more frustrating than finding the right habitat and lying in wait only to realize that you’re a month early!
In my experience, learning to recognize your target species’ song is highly useful; their small size and rapid speed make them difficult to notice if you’re not looking in the right spot. About 80% of the time, I only find a hummingbird because I first heard their song and then started looking around more carefully.
2. Choose a location and wait
Once you have a few target locations in mind (based on habitat preferences and, hopefully, sightings by other birders), you’ll need to position yourself and simply wait. Look for the right flowers, set up your tripod (yes, I do encourage you to use a tripod!), and start watching and listening.
This will require patience. Sometimes, you’ll sit for hours and come home with nothing. After all, in bird photography, there’s never any guarantee of success. But when things come together and you capture a great shot, all the failures will seem worth it!

While you’re waiting, make sure you adjust your camera settings so you have the best chances of nailing the shot (see my recommended focusing modes and shutter speeds below!). Note that the ideal settings may change throughout the day depending on the quality and intensity of the light, so check your aperture, shutter speed, ISO, and (if you use it) exposure compensation regularly.
And if you can find additional behavioral information on your target hummingbird species, use it! When I was photographing this Anna’s hummingbird, I relied on a combination of luck and knowledge:
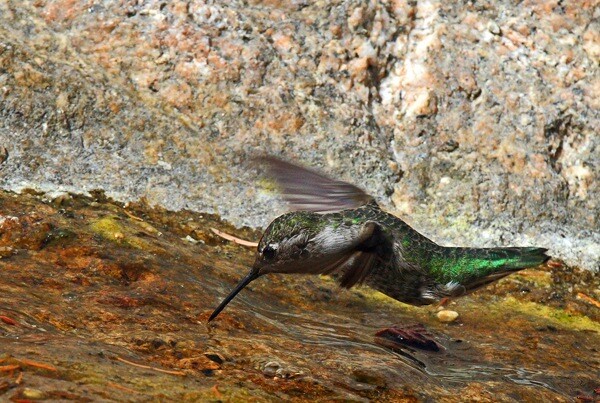
You see, I was sitting on a rock along one of my favorite streams in the San Gabriel Mountains when I noticed a bunch of hummingbirds diving toward the water, taking quick sips, and then retreating to a nearby tree. I watched them from about twenty feet away, but I was unprepared and only had a 200mm lens, so I knew I had to get a lot closer if I wanted a frame-filling shot.
Fortunately, I’d gained a sense of these hummingbirds’ behavior, and I knew that, while they would initially retreat from approaching humans, if I waited, they would come right back.
So I decided to get a lot closer. This initially scared them away – but after about 10 or 15 minutes, they returned and continued to drink from the stream, and I managed to capture some photos!
3. Use the right focus modes
These days, focus modes vary from manufacturer to manufacturer and camera to camera, so I can’t give you an exact focusing setting that will apply in all situations. However, I do have a few key pieces of advice:
First, when in doubt, simply switch your camera to a single-point AF area mode, make sure the center point is selected, and when a hummingbird comes into the frame, constantly move your camera to keep that center point over its head. (You’ll need to leave some room around the hummingbird so you can crop for a better composition, but that’s okay.)

Second, make sure you have your camera set to its continuous focusing mode. This is often referred to as “AF-C” or “AI-Servo,” and it’ll ensure that your lens constantly refocuses even as the hummingbird moves. So while the hummingbird may move forward and backward, as long as you keep the center AF point trained on its head, your lens will maintain perfect focus.
If you use a camera with next-level AF capabilities, it’s worth experimenting with tracking and even special bird eye AF options. But hummingbirds are tiny and difficult to spot – even for cameras – so if your intelligent AF modes aren’t working, just follow the suggestions I shared above.
4. Use a blazing-fast shutter speed
Hummingbirds flap their wings at extremely high speeds, so if you want an ultra-sharp shot, you’ll need to use a correspondingly fast shutter speed.
To freeze (or nearly freeze) the wings, set your camera to 1/2000s and above (1/4000s is even better). Working at such a fast shutter speed is often tough unless you’re shooting in extremely bright light, so it may be worth bringing a flash along. An alternative is to boost your ISO to 400, 800, and beyond, but this will degrade image quality, so make ISO adjustments with care.
You might also aim to freeze the hummingbird’s body and eyes but let the wings blur, like this:

If that’s your goal, you can get away with shooting at 1/800s, though higher is always better. (For reference, I used a 1/800s shutter speed to capture the image displayed above.)
Of course, if the hummingbird is perching rather than flying, you can drop your shutter speed even lower, but be careful: as soon as the wings start to flap, you’ll need to boost that shutter speed right back up.

(It can also help to know the speed at which your target species can flap its wings. This varies from 15 to 200 times per second, and for slower hummingbirds, you can get away with a slower shutter.)
A couple more settings tips to bear in mind:
- I’d encourage you to use Manual mode or Shutter Priority mode when shooting; that way, you can specify the shutter speed you need, and use your ISO (and, if in Manual mode, the aperture) to adjust the exposure as necessary.
- Start with a low ISO, but then increase it if necessary. It’s better to capture a sharp, noisy image than a blurry but high-quality shot.
- Make sure the aperture is narrow enough to keep the entire hummingbird body in focus (and the hummingbird wings, if possible). A good starting point is f/5.6, but you can widen or narrow the aperture if necessary.
5. Take lots of photographs
My final hummingbird photography tip is a simple one:
When a bird flies in front of your lens, take as many shots as you can.
You see, when you’re working with hummingbirds, the only way to guarantee a good photo is to simply shoot. If you only capture a single photo when a hummingbird appears, you’ll often fail to get anything usable; your lens might miss focus, you might use a too-slow shutter speed, the exposure might be off, and so on.

Set your camera to its highest burst mode, and don’t be afraid to waste shots. If you think you might have a good opportunity, don’t worry about failing. Photograph fast; ask questions later!
To get some of the photos in this article, I took over 400 photos in 10 minutes, and I only got a handful of keepers. Hummingbirds move so fast that most of my shots were blurry, and some didn’t even have a hummingbird in the frame.
Hummingbird photography: final words
Hummingbird photography isn’t easy; it involves a lot of skill, patience, and luck. But if you know the habits of hummingbirds, you follow these tips, and you put in the effort, you’re bound to be successful!
Now over to you:
What type of hummingbirds do you want to photograph? What is your plan? Share your thoughts in the comments below!
About the author: Steve Berardi is a naturalist, photographer, and computer scientist. You can usually find him hiking in the San Gabriel Mountains or the Mojave Desert, both located in the beautiful state of California. You can read more of his articles on nature photography at the Photo Naturalist.


Some Older Comments