
Discover the secrets of stunning motion blur photography. Learn how to add a sense of dynamism and energy to your shots!
Are you looking to capture motion blur in your photography? While photographing motion blur might seem difficult, it’s actually pretty easy; with a bit of camera know-how, you’ll be taking stunning photos like a pro.
And that’s what this article is all about: giving you the tools and techniques you need to get beautiful results!
Note that motion blur can look great in any photography genre, so don’t try to limit yourself. Instead, embrace the power of the blur!
What is motion blur photography?
Motion blur photography is all about embracing blur for artistic impact. While photographers typically strive for sharpness and clarity, motion blur photography takes a different approach. It’s about intentionally incorporating blur caused by fast-moving subjects to create a sense of action and movement in your photos.

Imagine freezing a moment in time where the subject is a streak of motion, but everything around it is in sharp focus. That’s the essence of motion blur photography. It allows you to convey the speed at which a subject was moving while highlighting the stillness of the background; it also allows you to capture the dynamic energy of scenes teeming with movement, whether it’s cars speeding by, people walking briskly, or sports players in action.
Motion blur photography may not work in every situation or with every subject, but when you find the right moment and context, it can result in captivating and visually striking photographs.
The best settings for motion blur shots

Creating stunning motion blur shots requires careful control over your camera settings. Remember, we’re aiming to capture that beautiful blur caused by a fast-moving subject. So here’s what you need to know:
First things first, set your camera to Shutter Priority mode. This mode gives you control over the most important setting for motion blur: the shutter speed. You want to be able to adjust it according to your creative vision.
Now, let’s talk about the shutter speed. It’s all about finding the right balance between freezing the subject and creating that desired blur. A fast shutter speed like 1/1000s will freeze the action, leaving no trace of motion. But if you want that sense of movement, go for a slower shutter speed, such as 1/2s or even longer.
Finding the perfect shutter speed will depend on the specific subject and the effect you want to achieve. In general, aim for shutter speeds below 1/60s to capture a pleasing motion blur. Anything faster tends to result in sharper images that may lack the artistic touch.
After adjusting the shutter speed, pick an ISO setting. Using the camera’s base ISO (usually 100) allows you to have a slower shutter speed without overexposing the image.
As for the aperture, your camera will select this automatically, but keep an eye out and make sure it doesn’t start narrowing too much. An aperture in the range of f/16-f/22 can introduce blur due to diffraction, so if you do notice the aperture creeping upward, increase the shutter speed or consider using a neutral density filter (discussed below).
By setting the right combination of shutter speed, ISO, and aperture, you’ll be well on your way to capturing mesmerizing motion blur photographs. Don’t be afraid to experiment and adjust these settings until you achieve the desired effect.
How to take motion blur photos: the basics

To start, you’ll need to find a subject in motion. Consider scenes with cars whizzing by or people bustling through a crowded street; these scenarios provide excellent opportunities to experiment with motion blur. When you’re just beginning, it’s helpful to choose subjects that move predictably, making it easier to anticipate their path.
Note: While motion blur photography can be practiced at any time of day, working during the early morning or late evening can be advantageous. These times offer softer lighting conditions, allowing you to slow down your shutter speed and avoid overexposing your images.
Though not always necessary, using a tripod can be invaluable when aiming to capture a sharp background with a blurry subject. Mount your camera securely to the tripod and thoughtfully compose your shot.
Now it’s time to adjust your camera settings. Recall the previous discussion on shutter speed (the key to the whole technique!). Select a shutter speed that will render your subject as a blur, taking into account the subject’s speed and your artistic vision. As a starting point, around 1/30s for fast-moving subjects and 1s for slower subjects often yield pleasing results.
Then, when your subject moves through the frame, take the shot! To prevent blur caused by camera shake, consider using a remote release or activating the two-second timer. After capturing an image, review it on your camera’s LCD screen. Identify any areas for improvement, make necessary adjustments, and continue shooting. Remember, motion blur photography is an experimental process, so don’t hesitate to test different shutter speeds until you achieve the desired effect.
Creating outstanding motion blur shots requires practice and exploration. Predicting precisely how a blurred subject will appear is challenging, so be prepared to capture a multitude of images and select the best ones later. Embrace the joy of experimentation and trust your creative instincts as you refine your motion blur photography skills.
Tips and tricks for outstanding motion blur shots
Now that you know how to capture motion blur, you’re ready to head out and start creating some beautiful shots. For even better results, however, follow these tips:
1. Use a neutral density filter

If you find yourself shooting in bright light conditions, like during a sunny day at noon, you may struggle to use a slow shutter speed without pushing the aperture to f/22 and creating unpleasant diffraction effects. Fortunately, there’s a nifty tool that can come to your rescue: the neutral density filter.
Think of a neutral density filter as a pair of sunglasses for your lens. It works by reducing the amount of light that enters your camera, allowing you to extend your shutter speed and achieve a well-exposed image with a beautiful sense of motion while keeping your aperture at a reasonable setting.
Neutral density filters come in different strengths, giving you flexibility in adjusting the amount of light reduction. For instance, a 3-stop neutral density filter is handy when you only need a slight extension of your shutter speed. On the other hand, a more powerful 10-stop neutral density filter can be a game-changer when you want to really stretch that shutter or shoot in extremely bright conditions.
Having a couple of neutral density filters in your kit can give you the versatility to adapt to various lighting situations, opening up new possibilities for creating stunning motion blur shots. So don’t forget to pack one on your next photography adventure!
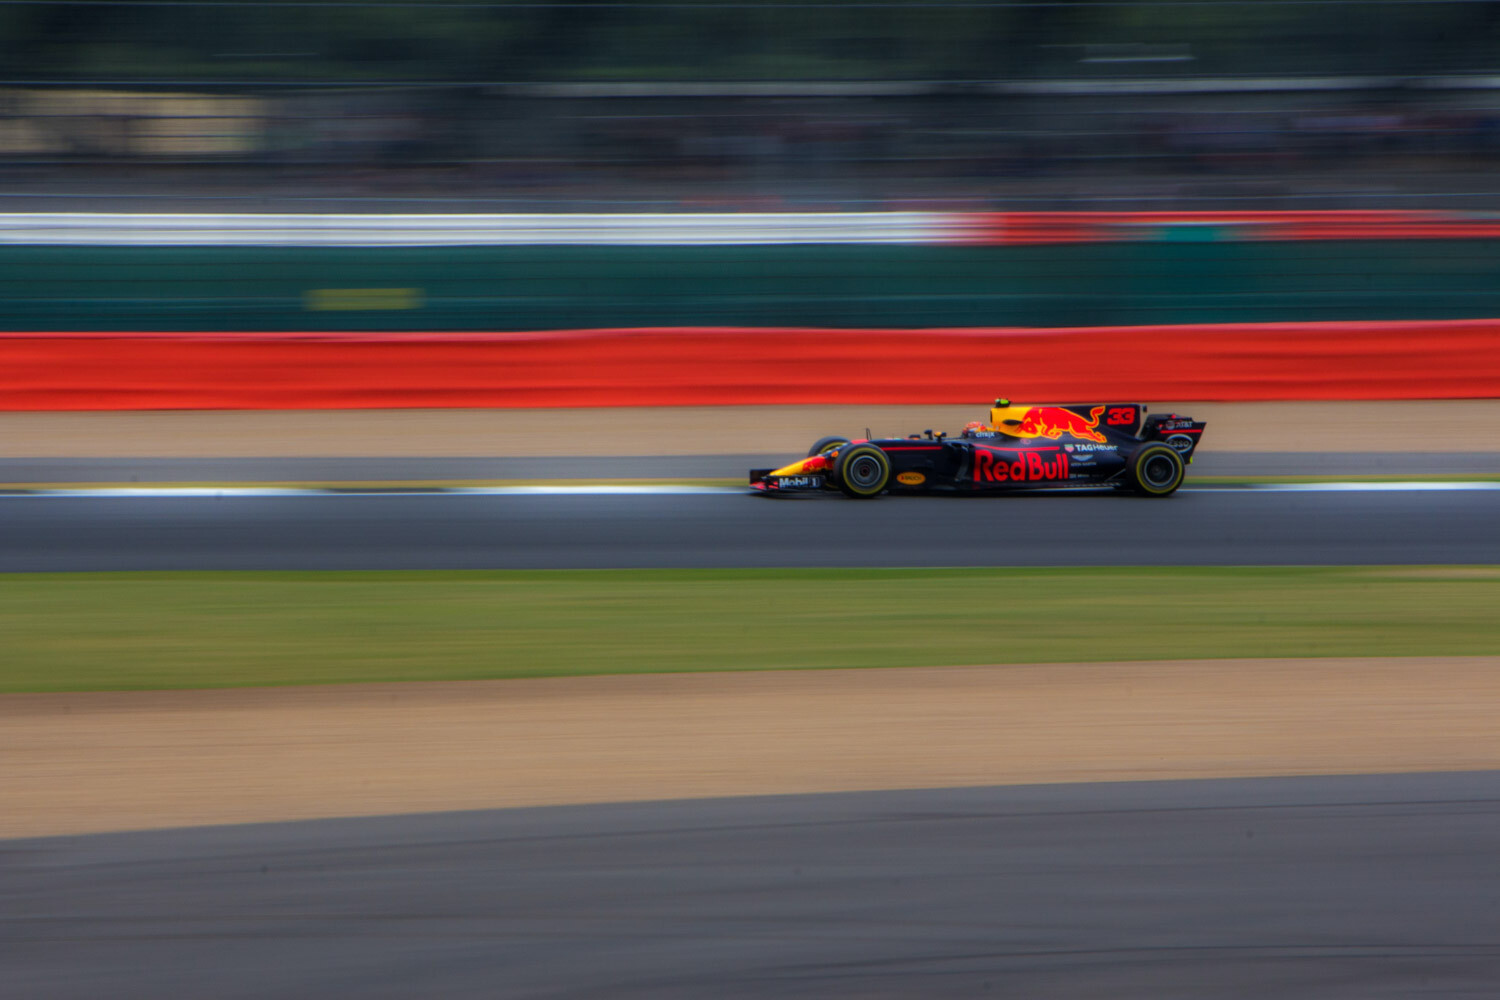
2. Try a panning approach when shooting action

One exciting technique you can try when capturing motion blur in photography is called panning. This technique allows you to create stunning shots that showcase a sharp subject against a beautifully blurred background.
Panning involves capturing the movement of your subject by following it with your camera as it moves across your frame. By using a slower shutter speed and smoothly tracking the subject, you can create a sense of dynamism and speed while keeping the subject relatively sharp.
To start, choose a moving subject such as a cyclist, a car, or a runner. Set your camera to a shutter speed that allows for a longer exposure, around 1/30s or even slower depending on the speed of the subject. Keep in mind that practice and experimentation will help you find the perfect shutter speed for different situations.
Now, with your camera in hand, follow the subject’s movement while pressing the shutter button. The key is to keep the subject in the same position in your viewfinder as it moves across the frame. Maintain a smooth and steady movement, almost as if you’re dancing with the subject.
As you pan, the background will blur due to the slower shutter speed, creating a sense of motion and energy. If done correctly, your subject will stand out sharply against the blurred surroundings, making for an eye-catching and dynamic photograph.
Panning takes practice to master, so don’t get discouraged if your first attempts don’t turn out as expected. Keep refining your technique, adjusting your camera settings, and experimenting with different subjects and speeds.
3. Combine sharp and blurry elements

To create captivating motion blur shots, it’s crucial to strike a balance between sharpness and blur. The magic happens when you have both elements coexisting in your image. Imagine a scenario where your subject is in motion, streaking across the frame with a mesmerizing blur, while the background remains crisp and sharp.
By juxtaposing the blurred subject against a static backdrop, you engage the viewer’s attention and create a visually dynamic effect. This technique allows the viewer to anchor their gaze on the sharp areas while also appreciating the mesmerizing motion conveyed by the blurs.
To achieve this, it’s essential to use a tripod. Without a stable base, your entire image will suffer from unwanted blurriness. So, set up your camera on a tripod and compose your shot thoughtfully. Consider the path your subject will traverse and frame your image accordingly.
Remember, a successful motion blur shot combines the graceful movement of your subject with the solidity of the background. It’s a delicate dance between capturing fleeting moments and preserving stillness. So, take your time, experiment, and let your creative vision guide you.
4. Try adding a flash

If you’re doing motion-blur photography with a wide-angle lens and lots of distant subjects, using a flash won’t do much for you – it won’t light up the whole scene. But here’s where things get interesting: when you’re working with a model or a subject up close, adding a flash can have a remarkable impact!
Here’s the deal: you slow down your shutter speed, and then you fire the flash either at the beginning or the end of the exposure. It’s called front-curtain sync or rear-curtain sync, respectively. The magic happens because the flash is incredibly fast, freezing the subject in mid-action. But since the shutter speed is slow, the subject still shows that motion blur in the direction they were moving. When you do it right, the results can be absolutely stunning.
So, if you’re up for some experimentation and want to add an extra dimension to your motion blur shots, grab that flash and give it a go. You might be amazed at the creative possibilities it brings to your photography!
Motion blur photography: final words
And there you have it! We’ve dived headfirst into the captivating world of motion blur photography, and now that you’re armed with the knowledge and techniques shared in this article, you’re ready to unleash your creativity and add a sense of motion to your photos like never before.
So, go out there and find your moving subjects. Whether it’s cars zooming by, athletes in action, or the ebb and flow of bustling city streets, let the blur tell a story of dynamic energy and vibrant motion.
Keep shooting, keep experimenting, and most importantly, have fun along the way!
Now over to you:
Have you tried taking motion blur photos? Did it go well? Do you have any tricks or tips? Share your thoughts (and images!) in the comments below!
Motion blur photography FAQ
What are the different types of motion blur in photography?
The most common approach is capturing a sharp background while blurring the subject, but you can also experiment with panning techniques to blur the background while keeping the subject (relatively) sharp. Additionally, using flash creatively can render a subject both blurry and sharp simultaneously.
What aperture setting is right for motion blur?
While there is no one-size-fits-all answer, a narrower aperture is generally preferred in motion blur photography to ensure sufficient depth of field (and therefore a sharp background).
What shutter speed is used to blur motion?
To achieve motion blur, you need a slower shutter speed that allows enough time for the subject to move within the frame. The specific shutter speed depends on your desired effect and the speed of the subject. Experimentation will help you find the perfect balance.
Should you use motion blur in photography?
Absolutely! Motion blur is a fantastic tool for creating unique and captivating images. It adds a sense of dynamism, action, and artistic flair to your photos, setting them apart from static and conventional shots.

Some Older Comments