
Sun-kissed skin, crashing waves, and gorgeous light; if you’ve ever shot on a beach before, you know that the location comes with an undeniable allure. Capturing the magic of the seaside in a portrait photograph, however, is no easy feat. The ever-changing lighting conditions, unpredictable weather, and the dangers of the elements can make it tricky to achieve top-notch results.
But while doing beach portrait photography can be tough, don’t worry. As I share in this article, there are plenty of effective approaches you can use to overcome these obstacles and create stunning beach shots that’ll impress your friends, your family, and your clients!
Let’s dive right in.
1. Know where the sun is at all times
To capture stunning beach portraits, you need to know where the sun is, no matter the time of day. That way you know when to schedule your photoshoot, where to set up your camera, where to position your subject, and how the light will change over the course of your session.
The easiest way to do this is to use an app (I personally use this one). It’s a tool that can help you see where the sun will be at all times. Note that these apps can show you the position of the sun anywhere in the world, so simply plug in the location of your photoshoot, and you can see all of the important details.

So before – or even while – you’re scheduling your session, quickly check this tool to see the sunrise, midday, and sunset positions and times.

This is especially helpful since no beach is alike and the direction of light differs from one side of the world to another. For example, in California, the sun sets behind the beach, whereas on the East Coast, the sun sets in the opposite direction. Also, different beaches face different directions, so it’s good to know where the sun will be during your session.
2. Use the morning light
Morning light on a beach is magical. It has a whole different color temperature than evening golden hour, and it can provide a nice soft glow if you have your session early enough.

The light is a little bluer in the mornings, and depending on the beach where your session is taking place, the sun can rise over the ocean or peek through the trees. A beach on the East Coast may let you catch the sunrise while photographing.

Alternatively, on a beach in California, you’ll catch the sun hitting the water from the land side. This will give you a beautiful yellowish-blue glow on the water if your session is within a few hours of sunrise.

Pro tip: If the morning light is causing unwanted shadows, use a simple reflector to bounce the light back onto your subject. This is especially useful if sunrise is behind the water at the beach.
3. Use a short-telephoto prime for flattering results
When it comes to beach portrait photography, selecting the right lens can make all the difference. While you can technically achieve great shots with any lens, starting with a short-telephoto prime lens can set you on the path to photographic excellence.
Short-telephoto lenses offer a flattering perspective with minimal distortion, making them an ideal choice for beach portraits. Their focal lengths, typically ranging from 85mm to 135mm, allow you to capture a mix of full-body, half-body, and headshots with beautiful detail and pleasing compression.
Short-telephoto primes also have a knack for producing exquisite bokeh. The creamy background blur they create will add a touch of enchantment to your beach portraits, helping to isolate your subject and create a captivating focal point.
One additional advantage of using prime lenses is their affordability and exceptional image quality. They often offer significant bang for your buck, allowing you to achieve professional-grade results without breaking the bank. However, if you crave more flexibility, you can consider a zoom lens, provided it has a wide maximum aperture of f/2.8 to achieve that desirable background blur.
4. Experiment with wide and narrow apertures
As a portrait photographer, you’re likely familiar with the allure of wide apertures. They allow you to achieve that dreamy shallow depth of field effect, isolating your subject beautifully against a blurred background.
However, beaches tend to offer uniquely stunning surroundings. So here’s a suggestion: Go beyond the usual background bokeh and explore the possibilities of sharp, deep depth of field effects.
When your subject is surrounded by a stunning stretch of sand or water, consider dialing down the aperture to f/8 or even narrower. This allows you to capture the grandeur of the horizon and the sweeping beauty of the environment, creating a sense of scale and capturing the essence of the beach itself.
Of course, there will be moments when you encounter distracting elements behind your subject. That’s when a wide aperture, such as f/2.8, will become your trusty ally, gently blurring the background and keeping the focus firmly on your subject. It’s all about finding the right balance between incorporating the beach’s splendor and maintaining the desired visual impact.

5. Use flash or reflectors to deal with midday light
Midday light at a beach is pretty harsh. Therefore, it’s good to have some kind of additional lighting equipment to help with shadows. You can use an external flash, a pop-up flash, or a reflector.

You can also go without an additional light source. If you choose this route, however, it’s good to underexpose your photos a bit so you can bring up the shadows in your editing software. Otherwise, you’ll end up with blown-out skies. Of course, this all depends on your style of photography.
When the sun is at its highest point during the day, it might be a good time to take your clients under the shade of some trees or opt to capture playful photos of the family. Have your clients walk, run, splash in the water, build sandcastles, or just have a bit of fun together.
The sun is at its highest at different times around the world, so make sure to check your app to know exactly when to expect high noon.

6. Keep your portrait subjects facing away from the sun just after midday

Light after midday can be different in the winter compared to the summer, but the sun will always sit lower in the sky compared to high noon. I recommend you position your clients so they’re looking away from the sun; that way, the sun starts to fall behind them.
Why is this effective? For one, it’ll prevent the subjects from squinting, which is an easy way to ruin a portrait. Plus, it’ll help prevent harsh shadows from forming under their eyes, noses, and chins.
After midday is actually a pretty great time to do beach portraits. Depending on the angle of light, you can get some really interesting light, and it’ll get more and more golden as you approach sunset.

If you angle your subjects away from the sun but you’re still getting harsh, unflattering light, you may want to consider using a reflector or some fill flash to deal with those unwanted shadows.

7. Try some minimalist portrait images
When it comes to beach portrait photography, sometimes less is more. Enter the power of minimalist portraits – those captivating images filled with negative space that effortlessly draws the viewer’s attention to the subject in a serene and impactful way.
To create these breathtaking shots, start by finding an area of the beach that offers a clean and uncluttered backdrop. Look for stretches of sand or calm waters that extend uninterrupted, providing a sense of serenity and simplicity.
Step back or use a zoom lens to capture your subject in the frame while keeping them relatively small. This technique will emphasize the vastness of the beach environment, showcasing the beauty of both the subject and the surrounding landscape. Consider using the rule of thirds to position your subject within the composition or experiment with placing them closer to the edge of the frame for a more daring and edgy result.

To maintain sharpness and clarity throughout the entire image, try dialing in a narrower aperture setting. That way, both the subject and the background remain in focus, allowing the viewer to appreciate the entirety of the minimalist composition. By carefully balancing negative space and the visual impact of your subject, you can create stunning minimalist portraits that evoke a sense of tranquility.
8. Use a flash or a silhouette technique during the golden hours
The actual sunset only lasts about 5-10 minutes. However, golden hour begins about an hour before the sun dips below the horizon, which means the angle of the light is pretty low and directional. And while golden hour light is beautiful and warm, it also makes it difficult to capture your clients evenly against the background.

It can be especially troublesome if the sun sets over the water because you’ll struggle to capture the beautiful colors while also lighting your clients.

So to light your clients while including the sunset in the background, bring along a flash or external light source. You can also underexpose your photos a bit, then bring up the shadows later without compromising the sunset.

You can also try silhouetting your clients with the sunset light to offer a different look to the final images:

One more quick tip: Golden hour is the perfect time to turn your clients toward the setting sun. That way, you can capture that beautiful golden color cast on their skin and hair, plus it’ll contribute to the overall look of the photos.
9. Bring some fun beach props
In portrait photography, creativity goes a long way. And what better way to infuse a dash of fun and personality into your shots than by incorporating beach props? By bringing along some carefully chosen accessories, you can add a touch of whimsy and create images that truly stand out.
Think outside the box and consider a range of beach-focused props that resonate with your subject’s personality and the overall theme of the shoot. Sunglasses, umbrellas, beach chairs, picnic baskets, or even colorful beach balls can instantly inject a sense of playfulness or even nostalgia into your compositions. The key is to strike a balance and use props selectively, allowing them to complement the natural beauty of the beach without overpowering the main subject.

Remember, incorporating props is not about overwhelming the scene; it’s about enhancing the narrative and creating visual interest. You don’t need to include props in every shot – sometimes simplicity is the key to creating powerful portraits. Instead, consider introducing a prop or two strategically throughout the session. This will add variety to your images and allow you to capture different moods and expressions.
Take the time to brainstorm and plan ahead, ensuring that the chosen props align with your subject’s style and the overall vision for the shoot. Additionally, consider scouting the beach location in advance to determine if there are any natural elements that can be incorporated as props to enhance the overall composition.
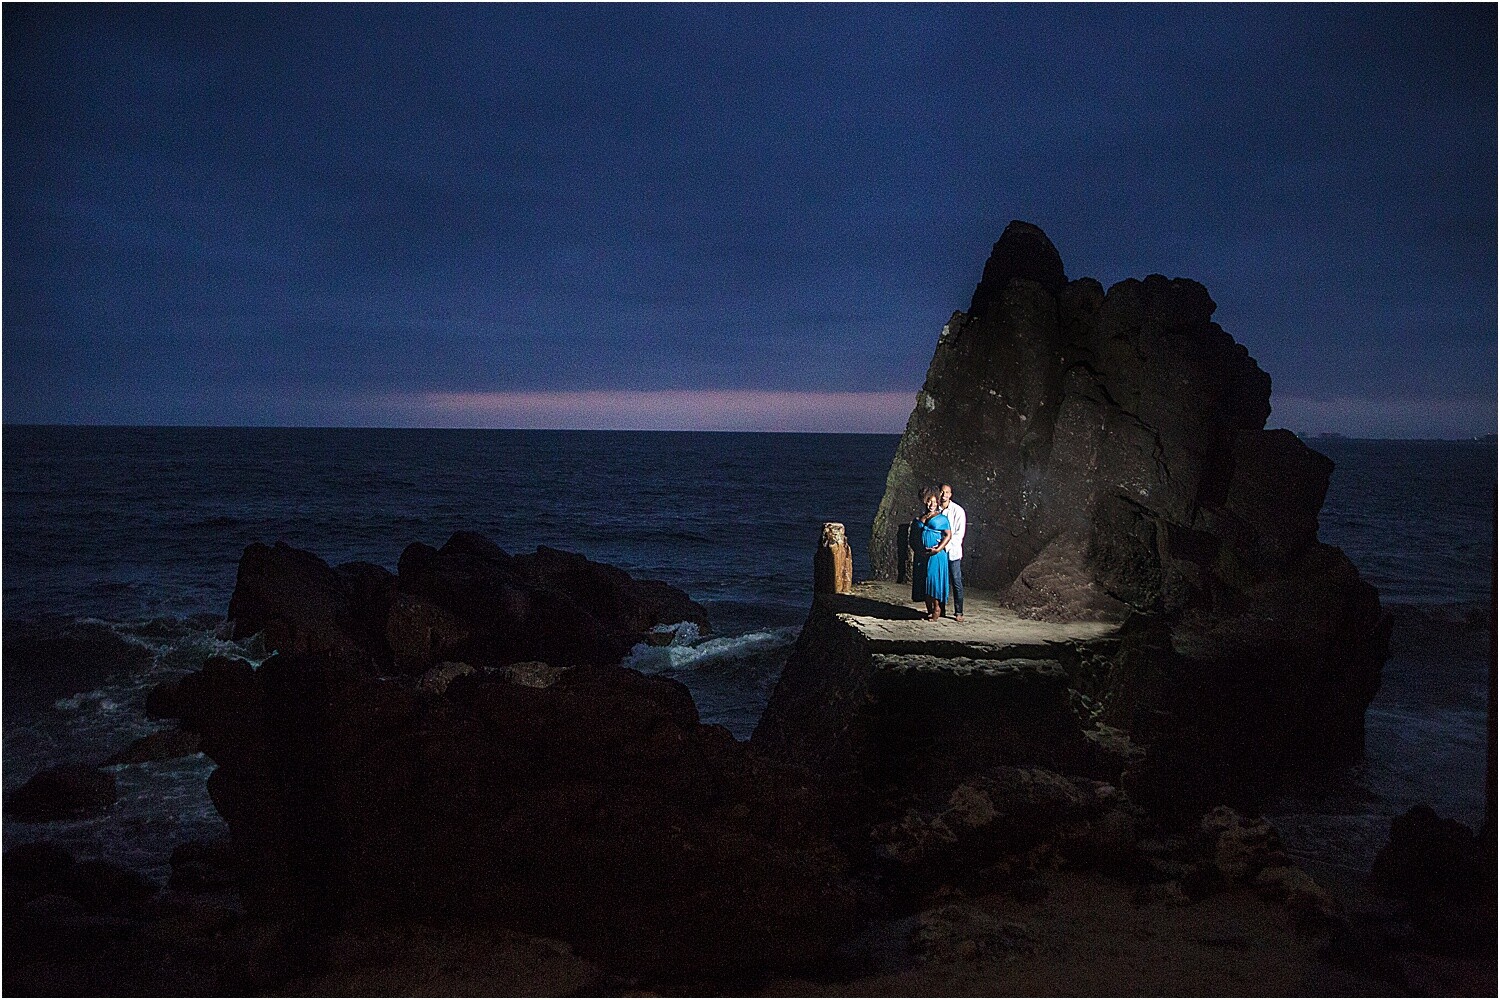
10. Use a slow shutter speed (and potentially a tripod) during blue hour
Blue hour is the 20 to 30 minutes (sometimes less) after the sun has completely disappeared from view. Blue hour is a great time to photograph because of the beautiful colors like blue, orange, pink, and purple that come out after sunset. The lighting is a bit darker, so you may need a tripod.

Ask your clients to hold still and attempt some slow shutter speed photos. Capturing movement in water can create a more fine-art beach portrait result, though you’ll need to take a few shots to ensure you get one sharp result. Also, you’ll need to be careful with the timing of the waves – try shooting as a wave first comes in for maximum effect.
11. Encourage your subjects to interact with the environment
To truly elevate your beach portraits from ordinary to extraordinary, it’s essential to go beyond simply using the beach as a beautiful backdrop. By encouraging your subjects to interact with the environment, you can infuse your images with a sense of dynamism and capture your subjects’ connection to the natural surroundings.
Have your subject lean against weathered beach rocks or simply stare across the water. Alternatively, you can ask them to hold a handful of sand while letting it gently slip through their fingers.

For those who are adventurous and don’t mind getting a little wet, consider guiding your subjects into the water. The interplay between the ocean’s gentle waves and your subject’s presence can create captivating scenes that exude a sense of serenity and freedom. However, it’s crucial to be mindful of their comfort level, and I highly recommend doing any water portions of the shoot toward the end so they’re not sopping wet for the entire session.
12. Protect your gear against sand and sea spray
The beach, with its salty air and swirling sea spray, can pose a significant threat to your equipment. Corrosion from the saltwater can wreak havoc on delicate electronics, while sand particles find their way into every nook and cranny, causing damage to lens mechanisms. To safeguard against these potential risks, here’s what I’d recommend:
First, if possible, opt for a weather-sealed camera and lenses that can withstand the elements. These units are from from perfect, but they will offer an extra layer of protection against moisture and dust.
When shooting near the water, consider using a protective cover for your setup. There are various options available, ranging from specialized rain covers to simple plastic bags. Find one that fits your needs and provides reliable protection against sea spray.
Additionally, it’s crucial to exercise caution when handling your gear on the beach. Never set your camera or lenses directly on the sand, as the grains can easily make their way inside the mechanisms. And try to minimize direct contact between your hands and the sand as much as possible.
After completing your beach portrait session, take the time to thoroughly clean your camera, lenses, and camera bag. Use a soft brush or blower to remove any sand or debris, and consider wiping down your gear with a microfiber cloth.
Beach portrait tips: final words
Capturing great beach portraits can be a challenge, especially for beginners. But armed with the right techniques and a keen eye, you can elevate your photography skills and create breathtaking shots that will transport viewers to the sun-drenched shores.
Remember to embrace the golden hour – the magical time shortly after sunrise or before sunset – when the light is soft and warm. Experiment with different poses and compositions, making use of the vast beachscape as your canvas.
With a dash of practice and perseverance, you can master the art of beach portrait photography and create images that stand the test of time!
Now over to you:
Do you have any tips for shooting beach portraits? Share your thoughts in the comments below!
Table of contents
Portrait Photography
- GENERAL
- PREPARATION
- SETTINGS
- LIGHTING
- POSING
- COMPOSITION
- GEAR
- ADVANCED GUIDES
- How to Take Better Beach Portraits at Any Time of Day
- 1. Know where the sun is at all times
- 2. Use the morning light
- 3. Use a short-telephoto prime for flattering results
- 4. Experiment with wide and narrow apertures
- 5. Use flash or reflectors to deal with midday light
- 6. Keep your portrait subjects facing away from the sun just after midday
- 7. Try some minimalist portrait images
- 8. Use a flash or a silhouette technique during the golden hours
- 9. Bring some fun beach props
- 10. Use a slow shutter speed (and potentially a tripod) during blue hour
- 11. Encourage your subjects to interact with the environment
- 12. Protect your gear against sand and sea spray
- Beach portrait tips: final words
- CREATIVE TECHNIQUES
- POST-PROCESSING
- BUSINESS
- INSPIRATION
- RESOURCES

