
This article was updated in November 2023 with contributions from Gavin Hardcastle, Simon Bond, and Jaymes Dempsey.
Want to capture beautiful photos of trees? I’ve often struggled with the challenge of photographing trees in a way that captures the imagination and takes the viewer on a journey.
Fortunately, I’ve been capturing trees for years, and in this article, I explain how to photograph trees like a pro! Along the way, I share plenty of tree photography tips and tricks, including:
- Simple creative techniques you can apply to your tree photos
- Interesting perspectives for beautiful images
- How to get a great “lone tree” shot
- Much more!
I also include a handful of tree photography ideas so that you never run out of inspiration.
So take a deep breath, fill your lungs with tree-produced oxygen, and learn how to take stunning tree images!
How to take tree photos: getting started
I’ve learned that for me, there is a simple and highly effective approach to photographing trees. Upon finding a beautiful tree/forest scene, try asking yourself these two questions:
- Which tree is the leading actor?
- Which elements (trees or otherwise) are the supporting actors?
(I have to my mother to thank for this interesting perspective. As a boy, I was dragged to many a theatrical play, so I tend to look at my images as stages on which characters play out a scene. There’s always a lead character, some supporting roles, and some cool props. Understanding the hierarchy of your characters will really help to improve your compositions – and not just for tree photography; for photography more generally!)
Anyway, with the answers to those questions in mind, you should proceed in two different directions depending on the scene:
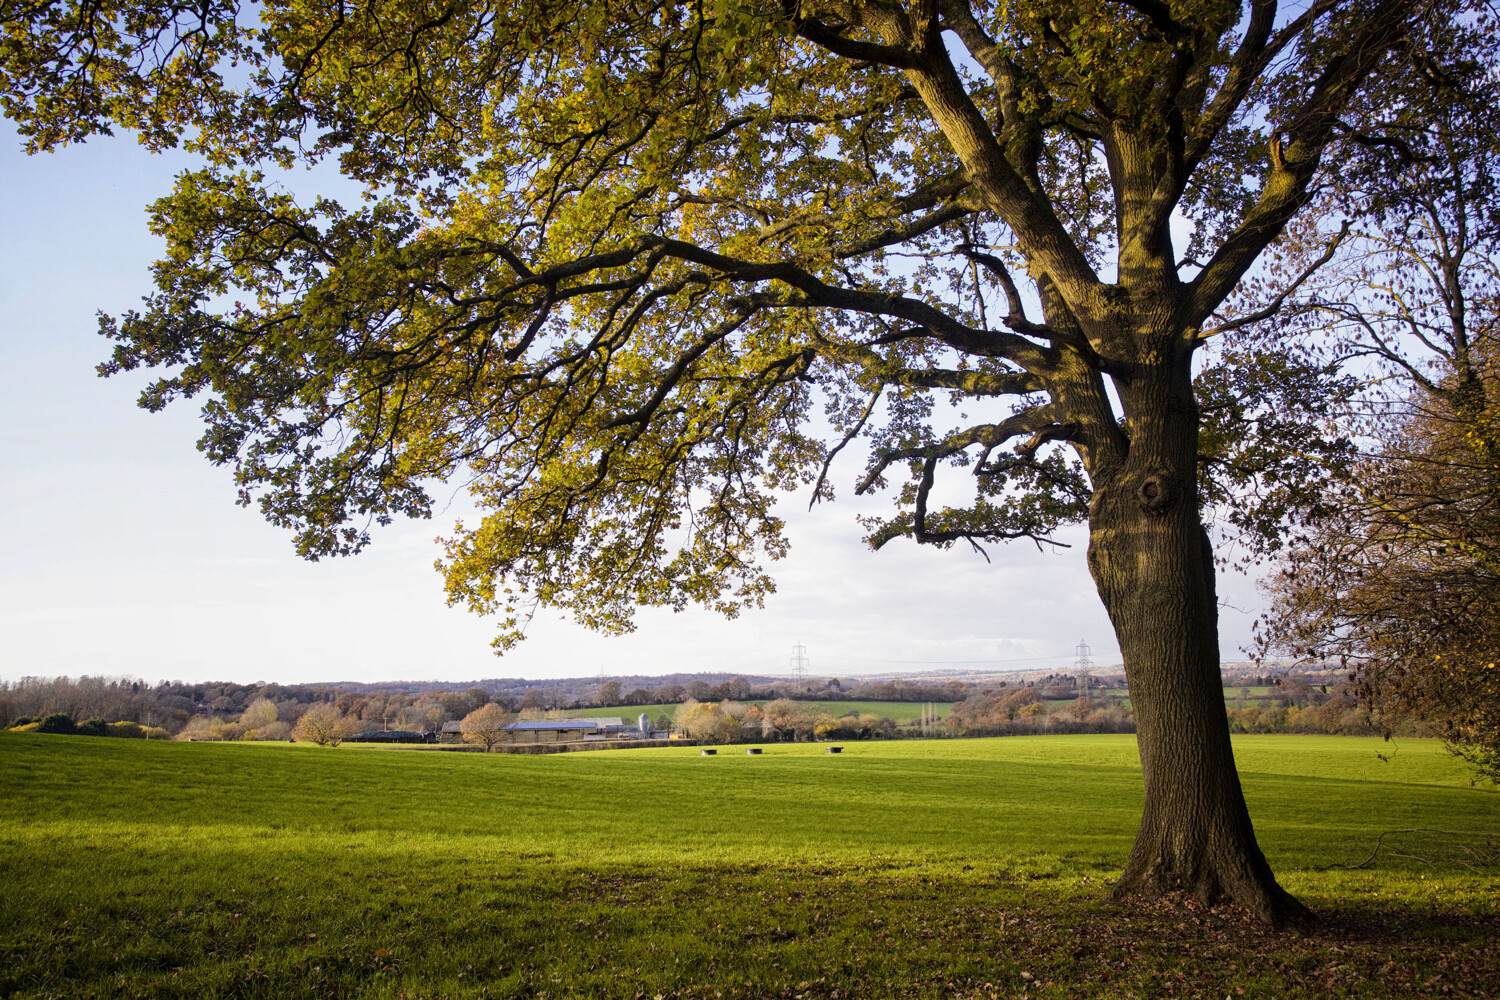
When a single tree grabs your attention

Start by identifying the lead actor – the most eye-catching part of the scene! – and make that your most important subject. In the image above, the lead is obvious. That huge knotted cedar tree is wonderfully compelling, so I placed them center stage and adjusted my composition so all the other trees became supporting elements.
I used an aperture of f/22 to ensure that my entire image was in focus, and I could get away with this because my central character was so obvious that I didn’t need to accentuate his presence with a shallow depth of field.
Here’s another example of a very obvious leading actor in a tree scene:

The scene is pretty much all one tree, and the supporting actors are the sun flare, the shadows in the foreground, and the pond in the background. As with the shot above, I used a very narrow aperture of f/16 to ensure maximum sharpness throughout the image.
When trees play supporting roles
Let’s face it: not all trees are A-list actors. Fortunately, they don’t need to be! You can use trees to frame other, more interesting characters in your image.
When you’ve found an interesting subject such as a waterfall, a lake reflection, or a sea stack, take a look around and see if there are any trees that would make a nice frame or provide a leading line that directs the eye toward your main subject. If there are, place them in your foreground.
For this next image, I used the trees and shrubs to create a frame for my sea stack. The f/8 aperture produced a subtle softening effect in the foreground shrubs, but that was deliberate; I wanted to push the viewer’s eye toward the central sea stack.

Here’s another example where the tree was used as a supporting actor in my scene. Once again, the tree created a frame, and although I didn’t include the entire tree in the frame, the image would be nothing without it.

Tips and ideas for beautiful tree photos
Now that you’re familiar with the basics, let’s take a deep dive into some tree photography tips and ideas:
1. Find a single tree standing on its own
The lone-tree-in-the-field shot is a nature photography classic, and for good reason: You get a strong main subject, you get a beautiful background, and you can often frame the tree against a beautiful sky.
Note that you’ll need to carefully position the lone tree in your composition. If the tree is symmetrical, putting it smack-dab in the middle of the frame can work. Otherwise, you’ll want to consider the rule of thirds, which encourages you to put the tree a third of the way into the frame.
If you can get close, try using a wide-angle lens to show the entire tree in all its glory. You can also zoom out to create interesting minimalist images (with the tree framed by the beautiful background).

And if you can’t get close to the tree, consider using a telephoto lens. You’ll get a more compressed look, but that’s not necessarily a bad thing (and it can help you blur the background, too).
So the next time you’re driving, look around for potential subjects. Make sure you check out the background, too, as you don’t want the viewer to be distracted by elements positioned off in the distance.
2. Look for tree tunnels
This is another classic tree photo: The tree tunnel, which features two rows of trees leading off into the distance:

Here, it’s important that you find two unbroken, symmetrical rows of trees. You need a strong leading line in the center, and the tighter the tree lines, the better.
You can experiment with different depth of field approaches for creative images. A deep depth of field will show lots of detail, while a narrow depth of field has the potential to create highly artistic images.
If you can, include a person or two in the background; that way, the viewer has an obvious place to rest their eyes.
The tough part is actually finding the tree tunnel. I’d recommend doing some Googling for “tree tunnels,” “fall foliage walks,” and the like. You might also check out Instagram; see if you come across any great tree tunnel images taken in nearby areas.
Speaking of which: If you can shoot during the fall – when the colors are looking amazing – or even in the winter when the snow is falling, your results will be truly legendary.
3. Photograph the same tree for a year
Trees change over the course of the year, which gives you a fantastic tree time-lapse opportunity. This works best away from the equator, but you can try it pretty much anywhere (if you’re working in the tropics, the changes will be more subtle).
First, find a tree and carefully determine your composition. I recommend using a tripod to maintain consistency; take photos of the exact position of the tripod and its height, then store them on your phone so you can easily reference them when you come back.
(If you can’t pick a single composition, feel free to come up with three or four. But you’ll need to carefully document each setup so you can return later on.)
Next, determine your settings. Make sure to record the aperture so you can keep the depth of field consistent. And if you’re using a zoom lens, record the focal length.
Finally, take the same shot several times over the next twelve months! You can come back once during each season, or – if you want to create a more intensive time-lapse series – come back every month or even every week.
Once the cycle is complete, you’ll have a beautiful set of images documenting the changing seasons.

4. Try some creative techniques
If your tree images look a bit bland, then why not try out a fun creative technique?
For instance, you might capture a:
- Tree silhouette. This works great with trees featuring beautifully shaped branches! Head out around sunset, make sure your tree is framed against the bright sky, and expose for the brightest part of the scene.
- Refraction shot. Bring along a lensball, hold it up in front of the tree, and shoot through the glass. You’ll get an interesting inverted image inside the small glass sphere (see the example below).
- Infrared scene. Go shooting on a sunny summer day with some clouds in the sky. Find a tree with plenty of green leaves, and use either an infrared filter or an IR-converted camera. You may need to experiment with the settings, but you’ll end up with a beautiful dreamscape shot.
- Long-exposure photo. If you can find a tree near a river or framed against a partly cloudy sky, you can create a beautiful long-exposure blur. Slow down your shutter speed (you may need a neutral density filter), use a tripod, then photograph the tree surrounded by movement.

5. Think about showing scale

How big do you think that tree above is? Well, let’s just say that only a toddler could stand under the canopy without bumping their head. In other words, the tree is very small! In fact, it’s so small that I had to lie on the ground in order to get the shot.
However, that’s not apparent in the image, because I didn’t include a reference object to show scale.
And in some situations – such as when photographing the tree above – showing scale isn’t a good idea. In general, a sense of scale works great when the subject is large, but it tends to fall flat when working with a smaller tree.
So for the shot above, I didn’t want to include a sense of scale. But if I were photographing an unusually large tree, such as a California redwood, I would definitely consider including a reference object, and I suggest you do the same. Often, the simplest approach is to ask someone to stand beneath the tree (or to use a remote release and go stand under the tree yourself!). The resulting image would really emphasize the immense size of the subject!
6. Use shallow depth of field (but only sparingly!)
Many photographers try to keep tree photos sharp from front to back by using a narrow aperture (such as f/8 and beyond). And this approach is perfect when you want to highlight the entire scene – the tree(s), the sky, the foreground, the background.
Other times, however, you’ll want to bring attention to a specific tree or a feature of a tree. When that’s the case, you can use a wide-open aperture such as f/2.8 to create a shallow depth of field effect.
This is a creative decision; there’s no right or wrong, only what works for your vision. I myself rarely use shallow depth of field in my tree landscape photography, but occasionally I’ll want to bring attention to a certain feature of a tree, like with this shot below:

7. Focus on the details
Compositions that include the entire tree are nice…
…but tree detail images can be beautiful, too! In fact, trees offer all kinds of potential for amazing detail shots. Here are some items to consider:
- Leaves. You can focus on a single leaf and widen the aperture for a beautiful bokeh background. Or you can grab a macro lens and focus even closer (so you highlight the leaf’s veins).
- Bark. Trees offer beautifully textured bark, so get up close and use a deep depth of field for plenty of detail. For maximum texture, position yourself so the bark is sidelit.
- The trunk. Observe the root system around the trunk. See what patterns you can photograph at the foot of the tree.
- Branches. Take a minute to look up. Interlocking branches can create beautiful patterns, especially when they’re silhouetted against a bright sky.

8. Use trees as portrait backgrounds
Not every tree image needs to use the tree as the main subject; you can also use trees as stunning backgrounds.
Portrait photos, in particular, benefit from tree backdrops. You can use tree tunnels to frame your subject, or you can position a lone subject near a lone tree for a minimalistic effect.
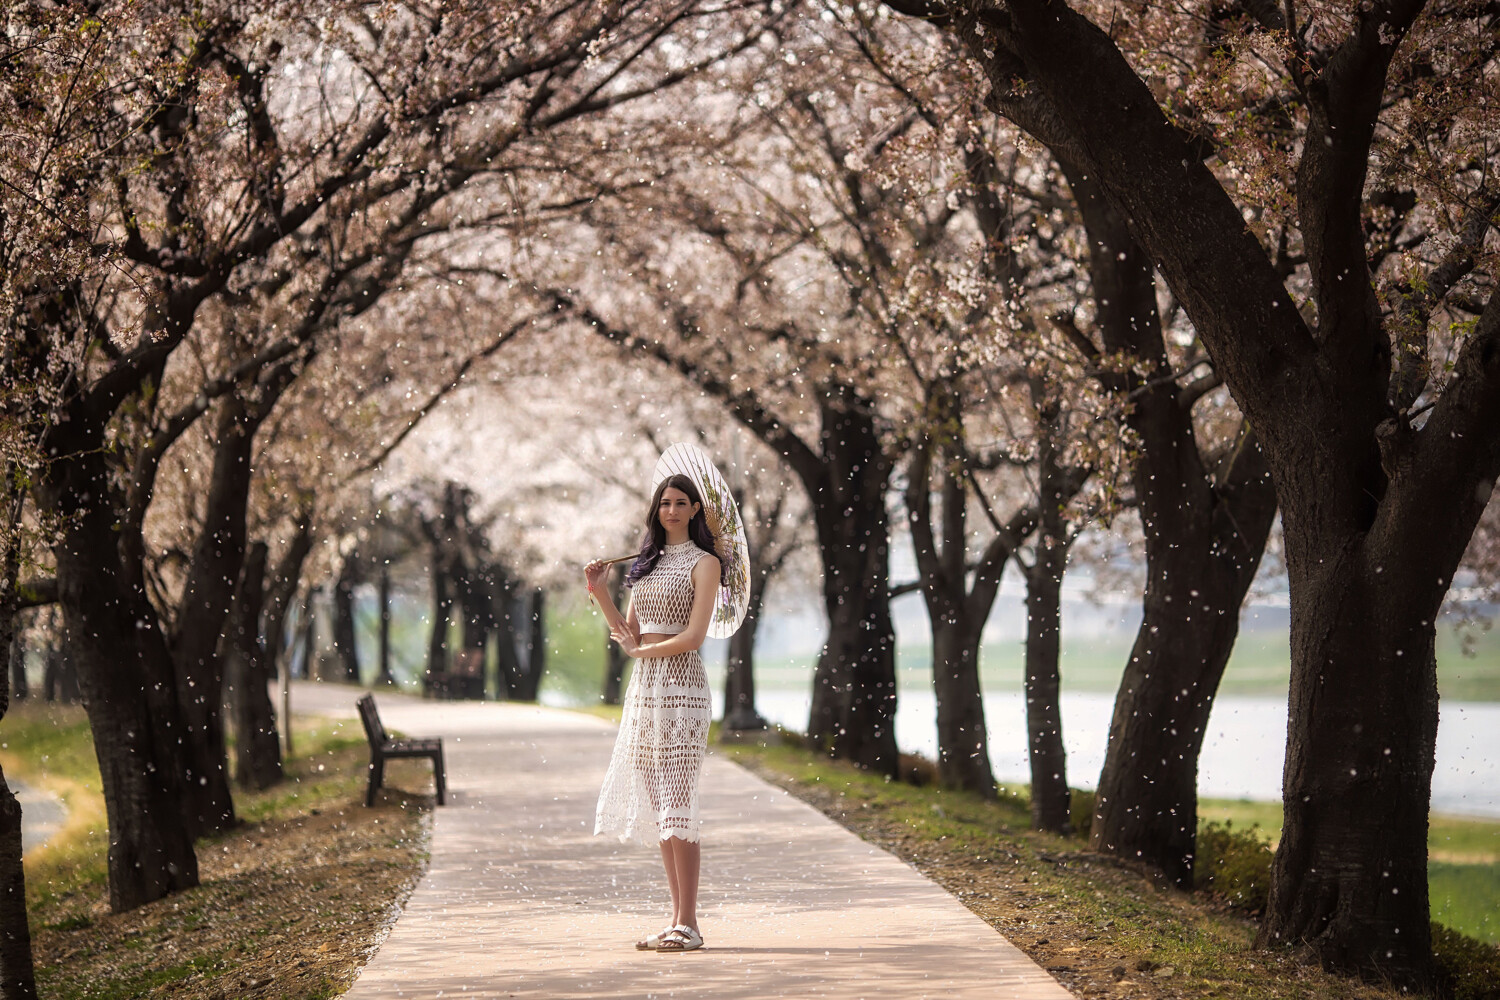
Plus, in summer and fall, tree leaves make gorgeous background bokeh. Just put your subject in front of a leafy tree, widen the aperture, and watch as you create jaw-dropping portraits! This approach works especially well if you shoot during the golden hours and the background leaves are lit by the setting sun.
9. Try different vantage points
Most photographers shoot trees from the most obvious angle: Standing and looking straight ahead.
But if you want unique tree photos, why not mix it up a little? Here are a few fun perspectives you can use for more original tree images:
- Low angle. Get down low and shoot from the perspective of a four-legged creature. This will create an intimate image that emphasizes the height of the surrounding trees. You might consider adding in a foreground subject; try placing flowers in the foreground while keeping the tree in the background.
- Worm’s-eye view. Get down low on the forest floor, but instead of pointing the lens straight ahead, point it up at the treetops. See if you can shoot from the middle of a clearing with a wide-angle lens; that way, the trees will seem to be reaching for the sky.
- Bird’s-eye view. For this angle – looking down from above – you’ll need a drone, a helicopter, or some other way of getting high above the trees. It might take some work (and money), but the results can be spectacular!
10. Include wildlife in your tree photos
Do you like to photograph mammals, birds, or insects? Try combining the wildlife with the trees for spectacular forest images.
You can start small. Grab a close-focusing lens, then see if you can find some ants, beetles, caterpillars, or butterflies to capture.
And if you have a telephoto lens, try creating some portraits of the local wildlife. Depending on your location, squirrels, chipmunks, and even monkeys will make stunning subjects.

Want to photograph birds? You can, though unless you’re shooting near a feeder or working in a blind, you’ll need a very long lens. I’d recommend 300mm as an absolute minimum, but 400mm, 500mm, or even 600mm is ideal.
How to photograph trees: final words

Trees make amazing subjects, plus they’re everywhere!
So remember my advice. Take some of these tree photography ideas to heart. Then head out with your camera and have fun. You’re bound to capture some stunning photos!
Now over to you:
What type of tree images do you plan to take? Share your thoughts in the comments below!
