
This article was updated in December 2023 with contributions from Jim Hamel, Amy Renfrey, and Darren Rowse.
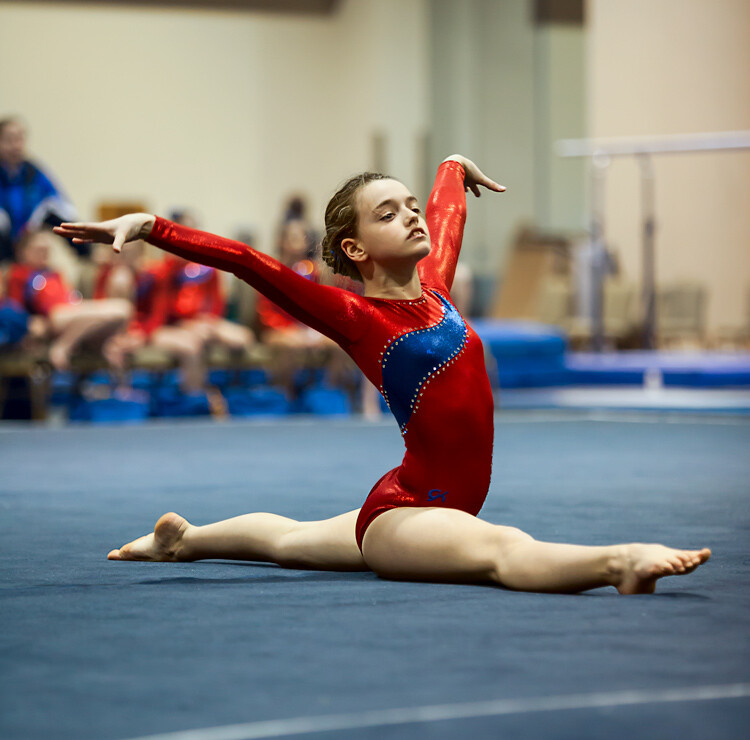
Sometimes, I feel cursed. Like any parent, I want to take pictures of my kids doing their activities – but my daughter is a gymnast, which means I’m stuck dealing with a toxic combination of very fast action and generally poor light.
If you’ve ever tried to capture low-light sports games or dance recitals, you’ll understand my frustration. Action plus bad light generally leads to one of three things:
- Blurry photos
- Noisy/grainy photos
- A deer-in-the-headlights flash look
And when I first started photographing my daughter, I was constantly plagued by these problems. Fortunately, however, I didn’t give up, and I developed a handful of tips and techniques that allow you to capture stunning action shots when the light is terrible. That’s what I share in the article below.
So if you’re ready to learn how to photograph basketball, swimming, ballet, gymnastics, or any other fast-paced indoor activity, then prepare yourself for 16 hands-on tips, starting with:
1. Understand the event
Capturing the essence of an indoor sports event or a dance recital in low light isn’t just about having the right equipment or knowing the right settings. And while I talk about those in detail below, I want to start with something even more critical:
Understanding what you’re photographing. The more you know about the event, the better your shots will be.
Start with the basics: learn the rules of the game. If it’s basketball, know when the key plays happen. If it’s a dance performance, understand the sequence of movements. This knowledge lets you anticipate the action. You’ll know where to position yourself and when to press the shutter.
But don’t stop there. If you’re photographing a team or group for a full season, get to know the players or the performers. Each athlete, each dancer has their unique style. Learning about them can help you predict their movements, allowing you to capture more compelling and personal images.
One of the best ways to get a feel for the event is to attend rehearsals or prior games. Observe how the action unfolds. Note the lighting conditions. Plan out potential shots – and then, when the big game occurs, you’ll be able to envision amazing images just before the action heats up.
2. Use Manual mode
Before you even think about pressing that shutter button, make sure your camera is set up for success – starting with your shooting mode.

No matter the mode you normally use, in low-light scenarios, you need a lot of control over your camera’s settings. That’s where Manual mode comes in; it gives you complete control, so it’s generally a good choice. But if you’re not comfortable using Manual or you’re dealing with changing light conditions, use Aperture Priority instead.
3. Use fast lenses
Next, you’ll need to decide which lens to use. It’s a simple process, fortunately: Choose your longest and fastest (i.e., wide-apertured) lens. The low-light environment means that you’ll need a fast lens to let in plenty of light. And since action subjects tend to be far away, you’ll also need a longer focal length. I personally use a 70-200mm f/2.8 lens and it works great, though you could also go longer (or wider) depending on the scenario.

If your lens is on the shorter side, you may be inclined to use a teleconverter to get some extra reach. (If you aren’t familiar with teleconverters, they are extensions that fit between your camera and lens; they’re designed to increase the magnification of the lens). In certain contexts, teleconverters work great, but in a low-light environment, they don’t; you see, teleconverters actually sacrifice light, which will magnify the problems caused by dark interiors.
So if you need extra reach, purchase a longer lens or shoot wider and crop the image in post-processing.
4. Shoot wide open
Once you’ve chosen your shooting mode and your lens, it’s time to prepare the shot. The first exposure setting is the aperture, and when it comes to photographing in low light, picking an aperture is easy:
Set it to its widest available option (i.e., the smallest f-number, which is generally f/4, f/2.8, or even wider).
This will let in the most light (which in turn will allow you to keep your shutter speed fast and your ISO low). The downside, however, is that you’ll get a very shallow depth of field, so the area of sharpness within your images will be very narrow.
In this context, however, that shouldn’t matter. You’ll only need to keep your subject in focus, and having some background blur should be fine (or even preferable).
5. Set a fast shutter speed
Next, you’ll need to set your shutter speed, and the trick here is to make sure it’s fast. If your subject is not moving, then you can use the Reciprocal Rule (which states that you should choose a shutter speed that’s the inverse of your lens’s focal length).
However, if your subject is moving, you’ll need to crank your shutter speed upward. I find that 1/200s is the minimum you need for a moving subject if you want to avoid blur. I’d recommend starting there, then increasing it if you can.
And try hard to avoid using a slower shutter speed unless you are deliberately hoping to convey a sense of movement. Otherwise, even if your images look tack-sharp on the camera LCD, you may be very disappointed when you get back to your computer to find you have a card full of blurry files.
6. Set the ISO as high as necessary (but no higher!)
So you’ve chosen your aperture and shutter speed; now you need to dial in an ISO.
While picking an ISO may seem complex, it’s actually pretty easy. Just set the ISO to the value you need to achieve a proper exposure!
Don’t be alarmed if you need to give the ISO a significant boost. I routinely use ISO 1600 or 3200, and sometimes I even set it to ISO 6400. In most other scenarios, I wouldn’t even think about using such a high ISO value, but they’re often necessary when photographing low-light action.

7. Test the exposure before the action begins
Once the action starts, you’ll often need to start shooting with abandon, and you won’t have any time to test out your exposure and make modifications.
That’s why I encourage you to arrive early for any scheduled events, find your seat (or a good vantage point), and spend some time taking exposure test shots.
Since you’ll generally be indoors, the light probably won’t change over the course of the event, so you can generally just set your exposure settings and forget about them while you concentrate on the action. (Of course, if the light is changing, you’ll need to frequently take breaks to test your exposure.)
8. Do plenty of experimentation
When you’re trying to capture fast-paced action in low light, it’s easy to make mistakes, to mess up, to end up with images that are blurry or poorly composed or slightly behind the moment. The key to dealing with this? Experimentation.
Your first few shots might be a bit off. Maybe you chose a shutter speed that’s too slow, causing blur. Or perhaps your AF mode wasn’t quite right, leading to focus issues. That’s perfectly normal. The trick is to keep trying different settings. Play around with your shutter speed. Adjust your ISO. Change your focus mode.
And don’t be afraid to take loads of photos. Review them on the spot. See what works and what doesn’t. This hands-on learning is invaluable. You’ll start to understand what settings work best in the specific lighting you’re dealing with. And before you know it, you’ll be capturing those dynamic, sharp action shots with ease.
9. Zoom in
This is a quick tip, but an important one:
If you want to create impactful action shots, it’s important that you zoom your lens (or physically move) until the subject fills the frame.
In other words, don’t leave a lot of background. Your subject is the most important part of the composition, so they should dominate. You don’t want to leave room for major distractions.
(The one exception is if you’re aiming to create an environmental, scene-setting shot; in these situations, it can help to zoom out to capture the entire area.)
10. Wait for peak action

Once the action begins, you may be tempted to start holding down the shutter button so you don’t miss any critical moments.
But while this can be a successful method of capturing action, I prefer to take a more deliberate approach. Instead of machine-gunning my camera, I set my camera to its continuous shooting mode, then I anticipate moments of peak action.
When the action arrives, I quickly capture a burst of 2-4 shots, then I recompose. I wait for more action, and when something else of interest happens, I’ll take another burst, and so on.
These days, camera burst modes are so fast that – if you’re not choosy in your shooting approach – you can easily fire off hundreds or even thousands of shots in a couple of minutes, which will be a pain to sort through later.
11. Use a monopod
When you’re on the sidelines of an indoor sports event, camera in hand, ready to capture every thrilling moment, stability is key. But here’s the catch: a tripod might be too bulky or simply not allowed. That’s where a monopod comes in.
Think of a monopod as your portable stabilizing buddy. It’s like a tripod, but with just one leg. This simplicity is its strength. A monopod gives you that essential stability for crisp shots, without the bulk. It’s easy to carry around, quick to set up, and doesn’t take up much space.
Now, you might wonder, how do you pick a good monopod? Look for one that’s sturdy yet lightweight. Adjustable height is crucial, as it allows you to quickly adapt to different shooting angles. And don’t worry about the cost; monopods are generally quite affordable.
12. Don’t ignore breaks in the action
It may seem odd, but breaks in the action are often great times to take some photos.
By “break in the action,” I’m referring to two times:
- A momentary pause during the event. For example, after a difficult gymnastic move, there is typically a momentary pose. The same holds true in singing and dancing; the performers often hold a pose after finishing a part of the routine. This pose often makes for a great shot – plus, since the subjects are frozen, you won’t have as big an issue with blur.
- An actual break, like the end of a period in sports. During these breaks, there are often warm-up drills that lend themselves to great shots. And you’re typically allowed a bit more latitude in terms of your own movements, so you can potentially walk around and find some interesting angles. The best part? Even if you shoot during a break, no one will know whether you took the shot during a drill or the real game/match/meet. In fact, after a year or two, you probably won’t remember, either!

13. Nail the focus
Because you are shooting with your aperture wide open, you’ll have a very shallow depth of field. That means the focus will be unforgiving, and if you miss it, there will be no leeway.
So what should you focus on? Well, the subject, of course! If your subject is a person, then always focus on the eyes. If the eyes are on different planes, focus on the nearest eye.
This is why it pays to be comfortable with your camera’s autofocus modes. Your camera will have a mode designed to focus on stationary points (Canon calls this One-Shot and Nikon and Sony call it AF-S). Your camera will have another autofocus mode designed to track moving subjects (Canon calls this AI Servo and Nikon and Sony call it AF-C). In the case of a moving subject, this mode will continuously track your initial focus point and readjust as it moves. Most photographers use this mode in the case of a subject that is moving. I personally almost always use the stationary autofocus, but use whichever one you are comfortable with!

Another decision you should make to help with your focusing is whether to use back-button focus. Normally, your camera focuses when you press your shutter button halfway down. You can, however, set your camera to focus when you press a button on the back of the camera instead. I prefer this method because the focus will not automatically reset with each picture. Either way is fine, but back-button focus gives you slightly more control over your camera’s focus, so you might want to give it a try.
14. Chimp!
That’s right, I want you to chimp. This refers to the act of looking at your photos on the camera’s LCD screen.
Some photographers look down on this practice and referred to it as chimping (supposedly because the people looking at the LCD make “ooh, ooh!” noises while looking at their pictures, similar to chimpanzees). I actually think you should look at your LCD in any shooting context, but in this situation, it is especially important to do so.
There is just too much that can go wrong, and you need to make sure you’re getting the shots. You might have the exposure wrong, your focus might be off, the action might be too fast for your shutter speed, and so on. You don’t want to get home and discover you were doing something wrong that could have been corrected while you were shooting.
15. Add some noise reduction
You will have your own workflow for post-processing your pictures, so I won’t dwell on that too much here. There are a few things, however, that are particularly important in this context and that I want to pass along.
The first is that you will need to do some noise reduction; you’ll be using high ISOs for these shots, and you should probably do it in a manner that is a little different than you are used to.
Start off by using Lightroom’s noise reduction in the usual manner. Push the Luminance slider to the right. (There is an equivalent slider in Adobe Camera Raw if you use Photoshop or Photoshop Elements.) Keep the increase moderate at this point, usually in the range of 10-15.
After that, reduce the noise in the background further. The background of your picture will usually be blurry because you used a large aperture, so the loss of detail from the additional noise reduction will not hurt anything. In Lightroom, use the Brush and paint the noise reduction selectively. You can do the same in Adobe Camera Raw, or you can head into Photoshop, create a new layer with noise reduction, and mask the subject.
16. Sharpen the subject

Next, sharpen your photo, but not all at once; instead, like the noise reduction discussed above, you should tailor it to the image. To start off, apply a slight amount of sharpening to the whole file.
Then apply sharpening to the subject only. In Lightroom, use the Brush again. This time increase the Clarity and Sharpening amounts. Apply the effect only to your subject, while leaving the background alone.
You can do the same thing in Adobe Camera Raw, or you can take the file into Photoshop, create a new layer, sharpen the layer, then mask out everything but your subject. The extra sharpening will help make your subject stand out a little bit better, and it’ll also emphasize the tension produced by the action.
Action photography in bad light: final words
Photographing action in low light is a severe test of your camera equipment and your photography skills. It pays to have fast glass and a camera that performs well in low light, but gear isn’t everything!
Using the tips in this article, you should be able to set up your camera and create the proper exposure settings. It will take practice to consistently nail the focus, but once you get really good, you’ll be unstoppable!
Now over to you:
Do you have any other tips or tricks that you use when shooting action in bad or low light? Share your thoughts in the comments below!
