
What is the Lightroom Brush tool? How does it work? And how can you use it to enhance your photos?
The Adjustment Brush is one of Lightroom’s most powerful tools; it can help you improve image crispness, add stunning colors, adjust tonality, and much more.
In this article, I explain everything you need to know about the Brush tool in Lightroom. I discuss the Brush’s primary applications, I share step-by-step instructions for ensuring great results, and I offer plenty of tips and tricks along the way.
So if you’re ready to level up your editing, then let’s dive right in!
What is the Lightroom Brush tool?
The Lightroom Brush tool, also known as the Adjustment Brush tool, works just like a regular old paintbrush: You use it to “paint” across your image. And where the Brush touches, edits are applied.

In other words, the Brush tool is designed for targeted editing. You use it to make adjustments to small portions of the frame, not to the entire image. (If you want to alter the whole image – that is, apply a global edit – you can adjust Lightroom’s sliders.)
Note that you can use the Brush tool to add many different edits to an image. A Brush lets you:
- Apply exposure adjustments
- Change the white balance
- Add or reduce contrast
- Adjust the texture, clarity, and dehaze
- Adjust sharpness and noise
- Shift colors
- And more!

However, you cannot use the Brush tool to selectively apply all of Lightroom’s adjustment options. For instance, the Brush tool doesn’t let you add color grading to portions of an image, nor does it let you make targeted color calibration adjustments.
When is the Brush tool useful?
The Brush tool applies edits to parts of an image while leaving other areas untouched. This can come in handy if you want to:
- Darken or desaturate distractions in the background
- Brighten or saturate your main subject
- Dodge and burn for improved three-dimensionality
- Selectively sharpen portions of the image
- Selectively soften portions of the image
- Selectively darken the sky
Really, the applications of the Brush tool are limitless, and you can often get great results simply by experimenting. For instance, you might use the Brush to warm up just the sky. Or you might use the Brush to modify the color of a flower or to make the irises pop in a portrait photo.
How to use the Brush tool in Lightroom: step by step
Working with the Brush tool is pretty simple. Start by opening an image in the Lightroom Develop module, then click the Masking option:

The dropdown menu will offer a bevy of options, including Linear Gradient and Radial Gradient, but you should click the Brush option:

You’ll see the Lightroom Brush panel appear, and your cursor will morph into two concentric circles with a “+” inside:

At the top of the Brush panel, you can adjust your Brush properties: Size, Feather, Flow, and Density. The Size slider makes the Brush larger and smaller, while the Feather slider softens or hardens the Brush edges. The Flow slider determines how much of the editing effect is applied on each stroke, while the Density reduces the overall editing effect.

(If you want to apply very subtle edits, then set the Feather to 100 and drop the Flow below 50. On the other hand, if you’re after a heavy-handed effect, keep the Feather low and the Flow high.)
Below the Brush properties, you’ll find your editing sliders. These work like standard Lightroom sliders, except they’ll only be applied in places you paint with your Brush. Go ahead and tweak the sliders as desired. Then paint over the areas you want to adjust.
If you mess up, go ahead and click the Erase option (or hit the Alt/Opt key) and go back over the offending areas.

Once you’ve finished using a Brush, you simply click the Done button at the bottom of the screen, and you can continue editing your image as normal. If you later decide you want to edit your brushwork, you can select the Masking option again, then click on your Brush edit in the Masking panel. You’ll instantly gain access to your Brush panel – with all of your original edits intact – and you can tweak the sliders or paint on the image as needed.

You also have the option to create additional Brushes; just click the Plus icon in the Masking panel, select the Brush option, and follow the process detailed above!
5 tips for outstanding Brush tool results
Now that you know how to work with Brushes, let’s delve into some tips and tricks to enhance your edits:
1. Use the A/B option to alternate between different Brush versions
Each time you select a new Brush (or a Brush Mask), you actually have the option to create multiple Brush versions: an A version and a B version.

These Brush versions don’t affect your actual editing sliders; instead, they let you create two different Brushes with two distinct sets of Brush properties.
In my experience, this A/B Brush option is insanely useful. I often need more than one Brush to make the necessary adjustments, so I simply create an A Brush and a B Brush, then I switch back and forth as I work.
(Pro tip: You can toggle between the two Brush versions by hitting the slash key: /.)
For instance, I might create one small, hard-edged Brush to edit the little details in my image. And I might create one large, soft-edged Brush to handle the bigger subjects.
For this next image, I used a large Brush to adjust the background, and I used a smaller Brush on the flower petals:

2. Create custom Brush presets
Brush presets let you save editing effects for future use. And they’re a great way to speed up your workflow if you find yourself making the same Brush edits time and time again.
Lightroom already offers a handful of default Brush presets, which you can access by clicking the Effect flyout menu. For instance, there’s a preset to soften skin, a preset to whiten teeth, and a preset to enhance irises.

But if you want to create your own presets – which I highly recommend! – simply create a Brush and adjust the sliders. Click the Effect flyout menu, then choose Save Current Settings as New Preset.
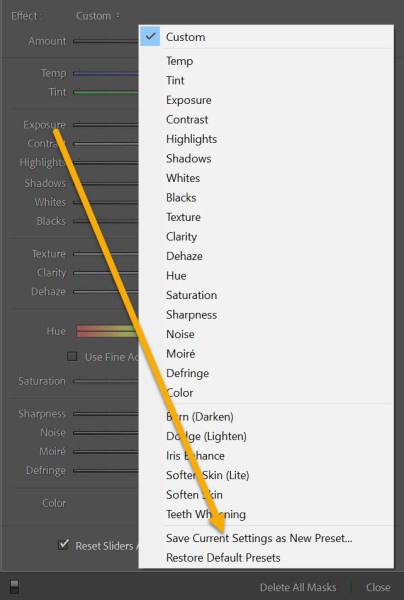
You’ll have the option to name your preset. Then click Create and you’re done!
For example, I often like to brush in some sharpness while reducing noise, so I created a custom preset that increased the Sharpness slider while decreasing the Noise slider. I’ve also created custom skin smoothing and teeth whitening presets that are different from the Lightroom defaults. That way, I can switch over to the Brushes as required, and I don’t need to configure the sliders from scratch every single time.
3. Use a Brush to add color to your photos
If you want to enhance your photos with creative edits, then you’re going to love this trick.
Create a Brush, then select a color:

And brush the color directly onto your image!
For a realistic effect, I’d recommend keeping the color saturation low (in other words, select an area near the bottom of the color menu). And it’s a good idea to experiment with different colors, so try selecting a handful of different colors – with various saturation levels – and see what you think!
I used this technique to add a subtle splash of color to the baby’s face:

But you can also use it on a much more significant scale – to change the color of flower petals or to dramatically alter the eyes of a portrait subject, for instance.
4. Use Auto Mask to restrict the Brush to specific areas
One of the most frustrating things about the Adjustment Brush tool is that, unlike regular paintbrushes, it only comes in one shape: a circle.
And when you’re editing photos with hard lines and edges, this can present a bit of a problem. How do you confine your Brush edits to a specific area?
Enter the Auto Mask feature! Hit the Auto Mask checkbox, and Lightroom will do its best to identify edges and keep the Brush strokes from straying outside the lines. It’s hugely useful when editing portraits, wildlife, birds, and more.

For this next image, I used the Auto Mask option to keep my Brush edits inside the flower petals:

Check out the red overlay, which corresponds to my Brush strokes:

5. Use handy shortcuts to speed up your workflow
The Adjustment Brush is powerful, but it can be slow going; after all, you need to set all your brush parameters, adjust your editing sliders, and carefully paint across your image. That’s why I encourage you to speed things up with a few useful Lightroom shortcuts:
- To create a new Brush, hit K on your keyboard
- To reset all your sliders, double-click on the word Effect at the top of the panel
- To quickly change the size of the Brush, adjust your mouse scroll wheel up and down
As I mentioned above, you can also create Brush presets, which you can rely on as needed. And don’t forget about the A/B Brush switching, either!
The Lightroom Brush tool: final words
Well, there you have it:
Everything you need to know to create beautiful edits with the Adjustment Brush.
If you struggle to use the Brush at first, don’t give up. Just test out different options, play around with new edits, and create all sorts of wild results. Pretty soon, you’ll be a Brush master!
How do you plan to edit your photos with the Lightroom Brush tool? Share your thoughts in the comments below!
