
On-camera flashes are surprisingly capable tools. Sure, many photographers prefer to work with natural light or an off-camera strobe, but natural light is unpredictable, while off-camera strobes are clunky and inconvenient. You can carry an on-camera flash in your bag at all times, and in my experience, you can capture pro-level, refined photos using a flash mounted to the top of your camera – if you know the right techniques.
Because here’s the thing: When you flash a subject directly, the result is almost always harsh. It’s your job to soften the light with modifiers and clever angles, and while this is doable, it does take a bit of extra knowledge.
In this article, I offer eight tips to improve your on-camera flash photography. None of them require any additional gear, so as long as you have a speedlight that mounts on top of your camera, you’re good to go.
Ready to dramatically enhance your flash shots? Then let’s dive right in, starting with my first tip:
1. Bounce the flash
When it comes to on-camera flash techniques, bouncing should be your number-one secret weapon. If you’re shooting indoors, a typical room with light-colored walls and ceilings will provide you with all the surfaces you need to make beautiful pictures. You just have to angle your flash so it hits the surfaces before it impacts your subject:
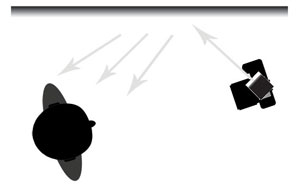
Using a bounce technique, you can achieve gorgeous softbox-style lighting without carrying around a softbox or a strobe. You see, although flash units are relatively small, when you point one at a wall or ceiling, it will reflect off like a much larger light source. The larger the light source, the softer the light, and the more flattering (generally speaking) the result.

To create a portrait with the bounce technique, I generally tilt my flash unit to hit the ceiling and wall, though the positioning depends on the effect I’m trying to achieve. The technique is very versatile as it can give you everything from very dramatic split lighting to soft, even illumination; before you fire your camera, make sure that you carefully select a flash angle, and pay attention to the angle of reflection off the bounce surface.
If you’re struggling to capture a nice directional light effect, you can always angle your flash up and behind you to fill a small to normal-sized room with beautiful light.
2. Flag the light
Most people don’t realize this, but the light comes out of your flash in a wide pattern, not a straight beam. So while most of the light is focused forward, there is also a good amount spilling out perpendicular to the flash head.

Therefore, if you’re trying to bounce your flash off a wall or ceiling, direct light can still hit your subject – even if your flash is pointed off to the side. This isn’t always a bad thing, but it can result in unpleasant shadows, especially if there is a wall or other flat surface just behind your subject.
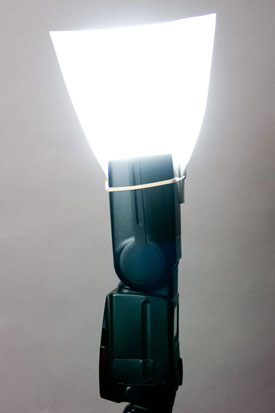
To eliminate this effect, simply place a small piece of opaque material or black foam on the relevant side of your flash. It should be just long enough to block the “edge” light from hitting your subject. You can hold it in place with one hand, or you can lock it in position using a rubber band (see the image above). This adjustment involves very little effort, but it’s one change that can make a huge difference to the overall look of your shot.
3. Make your flash bigger
As I mentioned above, naked flashes produce harsh light because they’re small, while softboxes help produce flattering light because they’re much larger. Basically, larger light sources create smoother transitions between light and shadow (i.e., softer light), so the larger you can make your flash, the better.

One way to boost your flash size is to bounce the light off the walls and ceilings. But what if you don’t have a wall or other surface to use? Or if the wall is painted a dark color and doesn’t offer much bounce potential?
Fortunately, there’s another easy way to make the light bigger: add a simple bounce card, which is basically a piece of white card that reflects light around the scene. Because the bounce card will be at least twice as large as the flash head, you’ll get far more coverage. And as long as you’re not too far away from your subject, it’ll result in far more pleasing illumination.
Simply grab a piece of white cardboard or crafting foam, and attach it to the flash head using a rubber band:
Of course, you can orient the flash in different directions to achieve different effects.
One item to bear in mind: Indoors, a bounce card will have the added benefit of throwing light onto your subject from two directions (forward and bounced off the ceiling), so even if you do have the option to bounce the light off the walls, there’s no need to put away that card!
4. Use TTL mode
Most modern flash units offer a variety of shooting modes. When I’m working with off-camera flash in the studio, I often use my flash units in manual mode, which allows me to maintain consistent manual control over the flash’s output power in relatively static shooting situations (e.g., traditional portraiture).
TTL (through-the-lens) mode, on the other hand, gives control of the flash unit’s output to the camera and flash. Your equipment essentially works to decide how much light the flash should emit to properly expose the subject, and most modern TTL systems are really great at what they do.

In fact, TTL mode can be used in just about every shooting situation – even if you’re using your camera’s Manual mode, you’re working outdoors, or you’re using bounce techniques. And since TTL can make life a whole lot easier for you, especially when you’re faced with fast-paced shooting scenarios, there’s no reason not to use it extensively for on-camera flash work.
So set your flash to its TTL mode. Then, when you’re ready, consider learning to apply more advanced techniques, such as flash exposure compensation, in conjunction with TTL flash. They’ll allow you to make easy adjustments to your overall exposure while still letting the TTL system do most of the thinking for you.
5. Use high-speed sync
If your flash unit has a high-speed sync setting, turn it on.
You see, most normal sync speeds for your flash will be limited to about 1/250s. That’s fine for situations where you’re in a dimly lit environment, but when you’re shooting outdoors or under bright light, you’ll often want to push the shutter speed higher than 1/250s to freeze the action or prevent overexposure.
And if your exposure does require a higher shutter speed, you’ll find yourself limited by the 1/250s sync speed, which is where high-speed sync comes in handy. You see, high-speed sync will allow you to shoot at virtually any shutter speed, generally up to 1/8000s, so you can capture action and/or stop your highlights from blowing out completely. It’s especially helpful when you’re capturing outdoor portraits, where the ambient background light is rather bright and you’d like a little fill flash on your subject. High-speed sync to the rescue!
One note: Leaving your high-speed sync mode on all the time doesn’t mean it’s always in use. It’ll only activate if you’re shooting beyond the normal flash sync speed. Otherwise, the flash will behave normally.
6. Try some gels
DSLRs and mirrorless cameras allow you to control the overall color cast by adjusting the white balance – and if you’re shooting in RAW, you can always tweak the white balance after the fact using almost any standard post-processing program.
But there are times when it’s good to make sure the light coming off your flash is close to the same color as the ambient light. It’ll ensure that most of the light in your images looks similar, and it’ll result in greater harmony throughout the scene. You’ll still want to make adjustments during post-processing, but it’ll give your shots a more consistent color overall.
To bring your flash into the tungsten range of color in most ambient situations, you can add a Color Temperature Orange (CTO) filter over the flash head. Then set your camera’s WB to tungsten and fine-tune the white balance when editing as necessary.
Note that you can also use flash gels to produce interesting creative effects. For instance, you can create interesting blue, green, or purple effects – just by applying a handy little gel.
7. Use the ambient light
What’s a sign of a misused on-camera flash? The dark tunnel effect. This happens when you expose for the flash-illuminated subject but fail to record light on the environment, resulting in a bright subject on a black background.
In my view, allowing the ambient light and the surroundings to appear in your images will give your shots valuable context and give each scene a sense of atmosphere. What’s important here is that you deliberately drop your shutter speed and dial back your flash’s power; that way, your camera captures some of the ambient light, and the final image includes plenty of background detail:

One tip: If you’re comfortable with it, switch your camera over to Manual mode, then play with different shutter speed settings. That way, you can manually determine the perfect shutter speed for achieving the exact amount of ambient light you want in the shot.
I find that shutter speeds of 1/15-1/40s work great in most environments, including outdoors at night. Your flash’s TTL mode should still be employed to achieve a good exposure, but the critical difference is that you’ll be able to control the ambient light by raising and lowering the shutter speed.
8. Turn your flash off
No, it’s not exactly an on-camera flash photography tip. Sometimes, however, the best thing you can do with your on-camera flash is nothing at all.
As you become more proficient with flash, you might be tempted to use it all the time. But you don’t want to become dependent on it. After all, most situations do have plenty of good light available, and there is a real difference between a flashed and an unflashed image. There’s nothing wrong with using flash, but in scenarios where you’re after a different look, it’s important that you know how to take a step back and turn that flash off.
Of course, make sure you don’t get rid of the flash completely; when you do need a bit of extra light here and there, it’s nice to know you can always slap on that flash and get great shots on demand.
On-camera flash photography: final words
On-camera flash is a great way to light your subjects, whether you’re shooting indoors and need to add a lot of light, or you’re working outdoors and just want a bit of fill.
So bring out that on-camera flash and start by practicing the techniques I shared above. Learn to bounce the flash well, learn to adjust your shutter speed to account for ambient light, and see what you can create!
Now over to you:
How do you plan to use on-camera flash? Do you have any tips that I missed? Share your thoughts in the comments below!


Some Older Comments