
What is the golden hour in photography? When is the golden hour? And how can you use it to capture beautiful photos?
Golden hour is a special time for photographers. The sun is low in the sky, and the light looks soft, warm, and absolutely magical. By combining proper photographic technique with golden hour lighting, you’re practically guaranteed to capture stunning images – which is what this article is all about.
Below, I’m going to share everything you need to know about golden hour photography. I’ll answer all your burning questions, and I’ll explain how to improve your golden hour images with a few expert tips and techniques.
Let’s dive right in!
What is the golden hour in photography?
The golden hour refers to (roughly) the first hour after sunrise and the last hour before sunset. It’s a time that’s great for photography; hence, the golden hour is also referred to as the magic hour.
During the golden hour, the sun hits the world at a lower angle – and because the light must travel a greater distance to reach the Earth, it looks softer, more flattering, and redder. (Compare this to sunny midday lighting, which beams down from directly overhead to produce hard, generally unflattering illumination.)
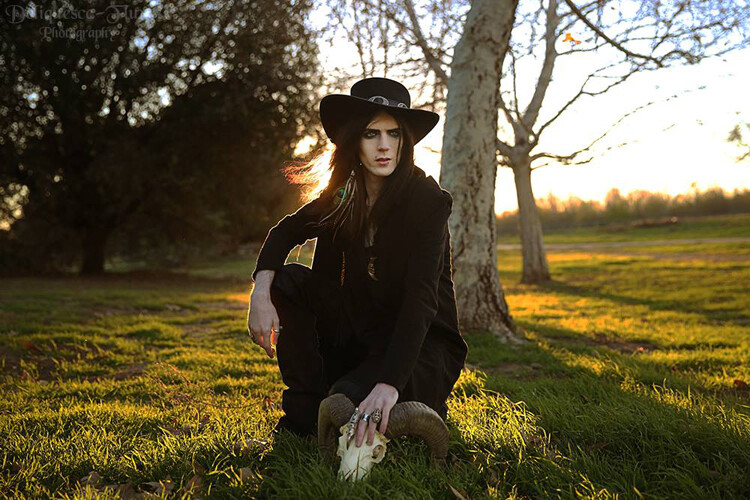
Here’s a typical golden hour photo:

Notice the beautiful yellow hues and unbelievably flattering light? That’s what golden hour offers for photographers.
When is the golden hour?
While the standard definition of the golden hour – see above! – emphasizes the hour or two before sunset and after sunrise, the golden hour actually fluctuates over the year, and its length depends on your geographical location.
If you live near the equator, the golden hour tends to last one or two hours, and the time won’t change too much as you go from winter to summer and back. But if you live closer to the North or South Pole, you’ll notice a massive change in the golden hour timing, and the golden hours often last far longer.
Really, if you’re serious about taking advantage of beautiful golden hour light, I’d just recommend paying careful attention to the sun for a few days. Ask yourself: When does it rise? When does it set? When does the light start to get warm and soft in the evening? And when does the light start to get hard in the morning? While you can calculate exact golden hour times using astronomical charts, it’s often best to simply observe the light; pretty soon, you’ll be very attuned to the sun’s changes, and you’ll know when you can (and can’t) expect magic-hour lighting.
Why is the golden hour so special?
I’ve already emphasized the low, soft, warm light produced by a magic-hour sun – but what makes it so great for photography?
Well, generally speaking, soft light is a photographer’s best friend. It doesn’t create harsh shadows and it tends to decrease the dynamic range of a scene, so the resulting images don’t feature dark shadows or bright highlights.
Plus, the warm color temperature produced by the golden hours can look beautiful and flattering, as shown in this next photo:

And a low sun hits the subject more directly, so there are fewer shadows produced under the subject’s eyes, nose, and chin.
That said, the golden hour isn’t great for all types of photography. While portrait photographers, wildlife photographers, and landscape photographers love magic-hour light, street photographers generally prefer to shoot around midday, when the hard light of the sun produces lots of crunchy contrast and shadows. And many macro photographers prefer to shoot when the sky is overcast; that way, they can capture saturated colors and lots of detail.
So don’t feel like you must work during the golden hour. Just know that it’s a great way to enhance many types of photos. Make sense?
The golden hours vs the blue hour

If you’re just diving into photographic lighting, you may have come across the term “blue hour” in addition to “golden hour.” So what’s the difference?
While the golden hour is the hour after sunrise and the hour before sunset, the blue hour is the opposite: It’s the hour before sunrise and the hour after sunset.
In other words, the blue hour refers to the time when the sun is just below the horizon. During the blue hour, the sky turns beautiful cool colors – blues and purples – which look great in landscape and even portrait photos. Unfortunately, the lack of strong light during the blue hour can cause technical problems, but if you choose the right gear, set your ISO carefully, and/or use a tripod, your photos will be spectacular.
Five key lighting techniques for golden hour photography
The golden hour offers five powerful lighting techniques:
Front light
Front lighting is when your subject faces directly into the sun:

During the golden hours, front light offers a warm, flattering effect that’s perfect for photographing people, wildlife, and birds. (And because the sun isn’t too bright, portrait subjects won’t need to squint!)
Just point your shadow at your subject, let the sun fall over your shoulder, and have fun shooting.
Backlight
Backlight occurs when the sun is behind your subject. And during the golden hours, backlight creates a soft, warm, hazy, glowing effect, like this:

Golden hour backlight works great, but you need to be careful; it’s easy to accidentally underexpose your subject and end up with a partial silhouette. To avoid this problem, make sure to meter off your subject, not the background.
Rim light
Rim lighting is when the sun creates a halo around your subject:

(This halo will be especially prevalent when your subject is positioned against a dark background.)
While you can create rim lighting with backlight, the sun doesn’t need to sit directly behind your subject. The background just needs to be (relatively) dark, and the sun just needs to come from (roughly) a back angle. You’ll have to move around until you find a sweet spot, though getting down low is a good start.
Sun flare
When stray light hits your lens, you’ll often get a sun flare effect, like this:

And during the golden hour, the sun is at the optimal height for beautiful flare.
How does it work? Simply angle your camera and lens so that your subject is partially covering the sun. Then move around (sometimes you only need to move an inch or two left or right) until you can see flare coming out from around your subject:

(Another way to achieve a flare is to position your lens and camera so the sun is just outside of the frame.)
Silhouette
A silhouette is created when your subject is rendered black against a bright background:

It’s pretty easy to achieve a silhouette during the golden hours. Just get down low, and photograph your subject directly against the light. (Make sure to expose for the background, not the subject, and don’t be afraid to add extra contrast in post-processing!)
13 golden hour photography tips
There are quite a few ways to take advantage of the golden hours and achieve consistently stunning images. Here are my best tips to help you out:
1. Observe the sky the day before your photoshoot
As I mentioned in a previous section, the best way to figure out when the golden hour will be at its peak is through simple observation!
So the day before your scheduled photoshoot, look out of the window. See how the sun moves and how the light changes. The sun’s position and timing change very little from one day to the next, so you can assume that two back-to-back days will feature fairly similar lighting angles.
Then make sure you’re on location and are ready to shoot when the light looks its best!

2. Plan your shoot in advance
No one wants to feel stressed, anxious, or rushed when doing photography, so be sure to plan your golden hour photoshoot well in advance.
If you can, begin setting up for your shoot at least 60 minutes before the golden hour starts. That way, you have plenty of time to ensure that your subject is feeling relaxed and your equipment is ready for that perfect moment.

3. Watch out for clouds!
Depending on the level of cloud coverage in the sky, the golden hours can change or even fail to appear. Clouds can enhance the brilliant sunrise and sunset, or they can block the light entirely.
So before you head out, check the weather forecast. And when you’re shooting, be sure to frequently analyze the light. Make careful decisions that take into account the volume of the cloud cover!
(Pro tip: If you’re shooting quickly and the sun keeps passing behind clouds, consider using a semi-automatic shooting mode such as Aperture Priority or Shutter Priority. It’ll help keep the exposure even as the light changes.)

4. Set your white balance to Cloudy or Shade
Your camera’s white balance is designed to correct for color casts – but did you know that you can actually use white balancing to create artistic effects? You see, by shifting your white balance, you can emphasize the warm colors of the golden hour.
Both the Cloudy and Shade white balance settings will add more warmth to your photos. Don’t be afraid to use them to enhance that stunning magic-hour look. (And if you forget to apply a warmth-enhancing white balance setting while shooting, you can always add the effect in post-processing!)

5. Shoot with a wide aperture
Golden hour light can create an incredible background blur (i.e., bokeh). But you’ll need to use a wide aperture, such as f/1.8, f/2.8, or f/4 (which will require a relatively fast lens; here, prime lenses are your friend!).
A wide aperture, combined with the dazzling yellows, reds, and oranges of the golden hour, will produce a rather exceptional backdrop:

6. Use a low ISO
ISO is a camera setting that can seem intimidating, but it’s quite simple once you understand it. It controls the sensitivity of your camera’s sensor to light. In the context of golden hour photography, using a low ISO setting can be beneficial.

Understanding ISO in photography is about knowing that a higher ISO makes the sensor more sensitive to light but can introduce noise or grain into the image. During golden hour, there’s usually plenty of soft, warm light, so a low ISO will suffice.
Choosing the right ISO setting for golden hour depends on the other settings you’re using, like shutter speed and aperture. A lower ISO, like 100 or 200, is typically a good starting point.
Balancing ISO with other settings means you may need to adjust your shutter speed or aperture to compensate for the lower sensitivity to light. But the payoff is a cleaner image without noise!
7. Compose thoughtfully

Composition is the backbone of a good photograph, and during the golden hour, it can transform a nice picture into an extraordinary one.
Understanding the importance of composition is your first step. How you arrange elements within the frame impacts how a viewer’s eye moves through the image. The golden hour’s soft light can emphasize these elements, enhancing their appeal.
The rule of thirds is a handy guideline for golden hour shots. Imagine your frame divided into nine equal parts by two vertical and two horizontal lines. Placing key elements at the intersections of these lines creates a more balanced and visually engaging photo.
Leading lines and visual pathways can guide the viewer through the image. Roads, fences, or streams can lead the eye toward the subject, especially in the glowing light of the golden hour.
Framing the subject using natural elements like trees or windows can add depth. This helps focus the viewer’s attention on the main subject and is accentuated by the warm and soft golden-hour light.
Note that creating balance in a scene involves arranging elements so that no part of the image overpowers another. This can be achieved through symmetry or by placing contrasting elements in harmony, especially in the context of the golden hour.
8. Don’t stop photographing
During the golden hour, the sun is setting…
…and as the sun sinks on the horizon, the light changes constantly.

Light at the start of the golden hour can look wildly different from light at the end – so once you bring out your camera, keep shooting and don’t stop! Pay careful attention to the quality of the light, and try to savor each new moment.
9. Try different angles and positions
The sun flares, colors, and intensity of the light are all affected by how you angle your lens.
So experiment constantly. Try as many different positions as humanly possible. To get the most out of the golden hours, manipulate the light as much as you can!
10. Subtly underexpose to add more vibrance
Did you know that it’s harder to darken an overexposed image than to lighten an underexposed image?
It’s true. It’s easy to recover lost details in a too-dark shot, but if you overexpose dramatically, then you’ll lose lots of detail. Plus, brighter images tend to look washed out.
So if you want to guarantee plenty of detail, and you want to bring out the beautiful vibrancy of sunset or sunrise, then don’t be afraid to subtly underexpose.

11. Explore HDR photography
HDR photography involves capturing multiple exposures, then layering them on top of one another in post-processing. The idea is to preserve detail in the shadows and highlights, and the results can look amazing!
One tip: Make sure you use a tripod, and if you’re photographing people, make sure they remain as still as possible. When you blend together the images, excessive movement can cause major problems.

12. Try long-exposure techniques

Long exposure is a fascinating technique that involves deliberately lengthening the shutter speed so that moving elements – water, clouds, etc – turn into a pleasing blur.
Confused? Don’t be! You’ll first want to understand the basic definition: long-exposure photography is the process of holding the camera’s shutter open for a longer time, allowing more light to hit the sensor.
Using a tripod is essential. A long exposure means the camera needs to be perfectly still; even a tiny movement can blur the image. A sturdy tripod will ensure sharp pictures, allowing you to experiment with different shutter speeds.
The dreamy effect you can achieve on water or clouds is stunning. By keeping the shutter open for a longer time, movement in the scene becomes a blur, giving water a smooth appearance and clouds a streaked look. It’s all about capturing the flow of time.
Note that selecting the right shutter speed is a matter of experimentation. Start with a few seconds and make adjustments until you achieve an effect you like. (Pro tip: Use a remote shutter release or your camera’s self-timer to avoid shake when pressing the shutter button!)
13. Experiment with post-processing
I’ve offered lots of tips and tricks to help you get great results while shooting – but a lot of the magic happens behind the scenes, during the post-processing period.
So use your favorite editing program to enhance the colors in your images. Have fun bringing out hues and adding elaborate color grades!

Ideas for beautiful golden hour photography
Looking for ideas to get started capturing top-notch photos during the golden hours? Here are a few to consider:
1. City skylines at sunset

City skylines during sunset offer an opportunity to capture breathtaking images. Finding the right viewpoint can make all the difference. High ground or rooftops often provide unobstructed views, allowing you to encompass the city’s grandeur.
Reflections in buildings create an added layer of complexity. Glass skyscrapers can reflect the colors of the sunset, and playing with these reflections can yield incredible results.
Emphasize the vibrant colors of the sunset. They can range from deep oranges to soft pinks, and you can use these to create a warm and inviting photograph. Consider adjusting your white balance settings to enhance these colors.
Finally, the transition from day to night is a magical time. By staying at your chosen spot even as the golden hour fades, you can capture the city as it moves into the blue hour, with artificial lights starting to glow and enhance the city’s character.
2. Backlit portraits

Backlit portraits during the golden hour can create dreamy, magical images. Position your subject with the sun behind them, and you can achieve a gorgeous effect – with a halo of golden light around their hair and shoulders.
Using the sun as backlight creates a warm glow around your subject. This glow can lend an ethereal quality to your portraits. Be mindful of lens flare, and try different angles to either include or exclude as needed.
Remember to focus carefully. Backlighting can sometimes confuse your camera’s autofocus, so take your time to ensure that your subject’s eyes are sharp and in focus.
3. Wildlife silhouettes

Wildlife silhouettes during the golden hour can turn an ordinary scene into a stunning work of art. Location is key, so research areas where animals are active during sunrise or sunset.
Time your photography with animal activity. Early mornings or late afternoons may coincide with feeding or other behaviors, adding interest to your silhouettes.
Creating sharp silhouettes requires proper exposure. Underexpose the background slightly to ensure that your subject appears dark and defined. Play with your camera’s exposure settings to get the desired effect.
Emphasize forms and shapes. Silhouettes reduce your subjects to simple, stark shapes, highlighting the elegance of their outlines. Look for moments when animals are in distinct and recognizable postures.
Remember that patience and persistence are often rewarded in wildlife photography. Spend time observing and waiting for the perfect moment to create these beautiful subjects!
4. Seascapes

Seascapes during the golden hour can be incredibly captivating. Timing your shoot with the tides will allow you to work with the natural flow and ebb of the water. Sometimes, low tide reveals interesting rocks and formations while high tide allows for dramatic waves.
Composition plays a key role here. Incorporate rocks, waves, and even pier structures to add interest to your shot. You can create a tranquil image with still water or add drama with crashing waves by adjusting your shutter speed. Capturing reflections on wet sand or shallow water adds an extra layer of beauty.
If you’re aiming for a specific effect, don’t hesitate to use filters. A graduated neutral density filter can help balance the exposure between the sky and the water, while a neutral density filter can help you reduce your shutter speed for striking long-exposure shots.
5. Shadowy street scenes

Golden hour isn’t just for portraits and landscapes; it’s also a fantastic time to capture shadowy street scenes. As the sun lowers, it casts long shadows and paints the streets with a soft, warm glow. You might notice how light plays on the streets, reflecting off windows and creating interesting patterns.
Capturing pedestrians in motion can add life to your photos. A slight blur as they move can contrast nicely with the static surroundings.
Architectural elements, such as old buildings, lampposts, or archways, can become key features in your composition. Think about the mood or atmosphere you want to create. Is it nostalgic? Mysterious? Romantic? The golden hour provides a versatile backdrop for all of these emotions (and more!).
6. Boats and harbors

The serenity and activity of boats and harbors during golden hour offer endless photographic possibilities. Composing your shots with boats, their reflections, and the interplay of water and light can produce some truly stunning images.
Capture the hustle and bustle of the harbor as fishermen prepare or return from their journeys. Focus on the boats at rest, reflecting in the calm water; also spend some time capturing the boats at full sail. The water’s movement, whether calm or choppy, can be used to great effect, echoing the sky’s colors and the sun’s descent.
Including the colors of the sky, especially during sunset, adds another layer of beauty. And at the end of the day, the harbor scene during the golden hour can give you a rich sense of place and time, turning a common scene into something magical.
Capturing golden hour photos: final words
The golden hours are full of limitless possibilities, and no two files will look the same.
So get out during golden hour – and take plenty of shots!
Don’t keep your golden hour experiences to yourself, either; share them with others and encourage fellow photographers to explore this magical time. You might just find that the golden hour becomes your favorite time to shoot. Happy photographing!
How do you plan to use the golden hour? What subjects will you shoot? Share your thoughts – and images! – in the comments below.
Golden hour photography FAQ
What is so special about the golden hour?
The golden hour features a low sun, which produces warm, soft, and flattering light. Golden hour light is a great way to capture stunning silhouettes, beautiful sun flare effects, gorgeous landscapes, amazing portraits, and more!
What time is the golden hour?
The golden hour changes over the year. It’s generally the hour after sunrise and the hour before sunset, but depending on your location, this may occur at 12 PM – or it may occur at 12 AM!
Is the golden hour actually an hour?
Not necessarily. In certain locations – generally closer to the equator – the golden hour does last an hour. But in other locations, such as Alaska, the golden hour lasts far longer!
What is the difference between the golden hour and the blue hour?
The golden hour refers to the time just after sunrise and just before sunset, while the blue hour refers to the time just before sunrise and just after sunset.
