I usually write about tips for Photoshop and Lightroom, but today I’m going to cover more of a workflow solution, solving the problem of duplicate photos on your computer or hard drives.
If you’re like me, from time to time you’ve encountered the problem of duplicate photos. You might have imported a set of photos twice, accidentally duplicated a folder of photos, or you might have totally lost control of your photo collection to the extent that you now have multiple copies of your images and you don’t know where to begin finding, and cleaning them up.
While it’s easy enough to clean up a few duplicate images, if you have a lot of duplicates spread across multiple folders, the problem can be overwhelming. This is where some good software can make a big difference – the problem is finding that software.
There are a number of good quality, free programs that can help you find and delete duplicate photos if those images are in jpeg and tif formats. However, when you throw a folder of raw files at these programs, most of them flounder – they either don’t support raw formats or they don’t support a wide enough range of raw images to be of much use.
One program that can handle a wide range of raw formats and which is well up to the task of handling large image collections is Visual Similarity Duplicate Image Finder from MindGems (NOTE: this program is currently available for Windows computers only). This program comes in three versions – you will need the Professional version ($39.95) which can find duplicate photos, and which supports raw images – the entry level version doesn’t have this feature.
You can download a demo of Visual Similarity Duplicate Image Finder here. The demo is severely limited in its overall functionality, but it is very good for helping you decide if the program will work for you. You can scan folders for duplicates, view the first few that are found, and see a little of how the program will perform day to day.

Once you download and install either the Demo or Pro versions, launch the program and on the right of the screen locate the Folders box. Drag and drop folders of photos that you want to search into the folders box or click Add Folder to browse to select one or more folders. You can select to scan subfolders of these folders if desired as well.

Once you have the folders selected, you need to decide if you want to compare images inside a folder or not – the program refers to this as “self-scan”. If, for example, you think that one or more folders may contain duplicate photos you would select self-scan so the program compares the images inside the folders with each other, as well as making comparisons between all the folders. You may disable this self-scan option if you have a folder of images and you want to import some additional images into that folder but need to check first that you won’t be importing duplicates.

While the developer recommends leaving the program options at the default settings you can, if you wish to do so, change the scan method. The default is Visual Compare, but there are three other options: Hash, File Size and EXIF Date Time Original. If you leave the setting at Visual Compare you can determine the amount of similarity required between images for them to be considered duplicates – the higher the Similarity value the more similar they must be to be considered duplicates. The default is 95%.
If you are using the Pro version you can configure an After scan option so you can, for example, set the program to save the scan results as a project file and then close down the computer. This means you can run the application unattended and have it shut everything down when it is finished the scanning process.

This ability to save the scan results as a project is enormously useful because the scanning process can take some time. By saving the results to a file you can return at any time to work on the duplicates that were found without having to do a new scan. In the Demo version you cannot save and load projects.
If you don’t want to include certain file types or folders in a scan click the Filter button to set a filter to filter out these files. There are other filter options too for file size and age of file.

To start the scan click the Start Scan button and wait until the scan is complete. Depending on the number of files involved this may take some time.
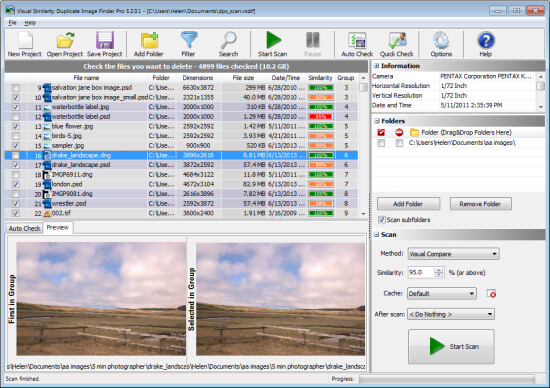
Once the scan is complete you will see a list of the identified duplicates. The list contains the filenames, folders, dimensions and file size as well as the date/time. Each set of duplicates is given a group number which is useful as there may be more than two duplicates. If you selected Visual Compare as the Scan method, then the percentage Similarity is also shown for each image.

In the Auto Check panel you can have the program automatically mark the images for deletion according to rules you set. Options include Images with smaller dimensions, Images with smaller file sizes if dimensions are equal or Images with smaller file sizes regardless of dimensions. You can also choose to mark the images to delete as being those with the Older Dates or Newer Dates. This feature only selects the images and you can undo or change any selection before deleting the checked images.

Click the Preview tab and you can make a visual check to see if the images are indeed identical or close enough that you will delete one of them. In many cases even images which are 99% similar can show significant differences so you will probably want to check all that are not 100% similar to decide what you want to do with them. The Preview panel makes this easy and you can, if necessary, click on an image in the Preview Panel to open it full screen size to check it and those similar to it.

Once you have checked the images to delete, you can delete all of them in one step. You can send them to the Recycle bin, or you can move them to another location and, if desired, you can choose to automatically delete empty folders. It is also possible to delete images one at time by clicking on the file name and pressing Delete.

If you don’t complete all the work on your duplicates in one session, click Save Project to save the project file. Next time, click Open Project and select the project file to load it again and you can continue working immediately without having to scan first.

Visual Similarity Duplicate Image Finder is a professional tool and is designed to help manage large image collections. It has a lot of handy options that will speed up the process of determining what images are potential duplicates and for helping you to manage them according to your workflow requirements. When you consider the time that it will save you in organizing your image collection its purchase price looks like good value indeed.
Do you have other methods of sorting images? Please share your ideas in the comments below.

