It’s hard to evaluate photo-editing software without comparing it to Photoshop. You tend to have preconceptions about what it should be capable of and how it should behave – even how it should look. In terms of functionality, many programs will struggle to compete against Adobe. In this Polarr online photo editor review, you’ll find out what you can get for free. Or not much more than free.

The colorful interface of Polarr. You can create specific effects under “Toning” by setting the hues of shadows and highlights.
Online photo editors work in your browser. They can be sophisticated, but the days of some of them (namely, flash-based programs) are numbered. Adobe will stop supporting flash in 2020, so anything that runs off it is likely to vanish or wither away.
Modern online editors are written in HTML5 code. They load quickly, but they also tend to be more basic than flash-based equivalents. Polarr is different. You can use Polarr online in a browser, or you can download it for offline use. There’s also an app for your phone.
Good first impressions
One of the best things about Polarr is its design. It doesn’t try to be Photoshop, and it’s intuitive to use. With filters on the left and most of the tonal and color tools on the right, there are shades of Lightroom about it, but it has a look of its own. You open Polarr, and you want to use it – or at least I did.
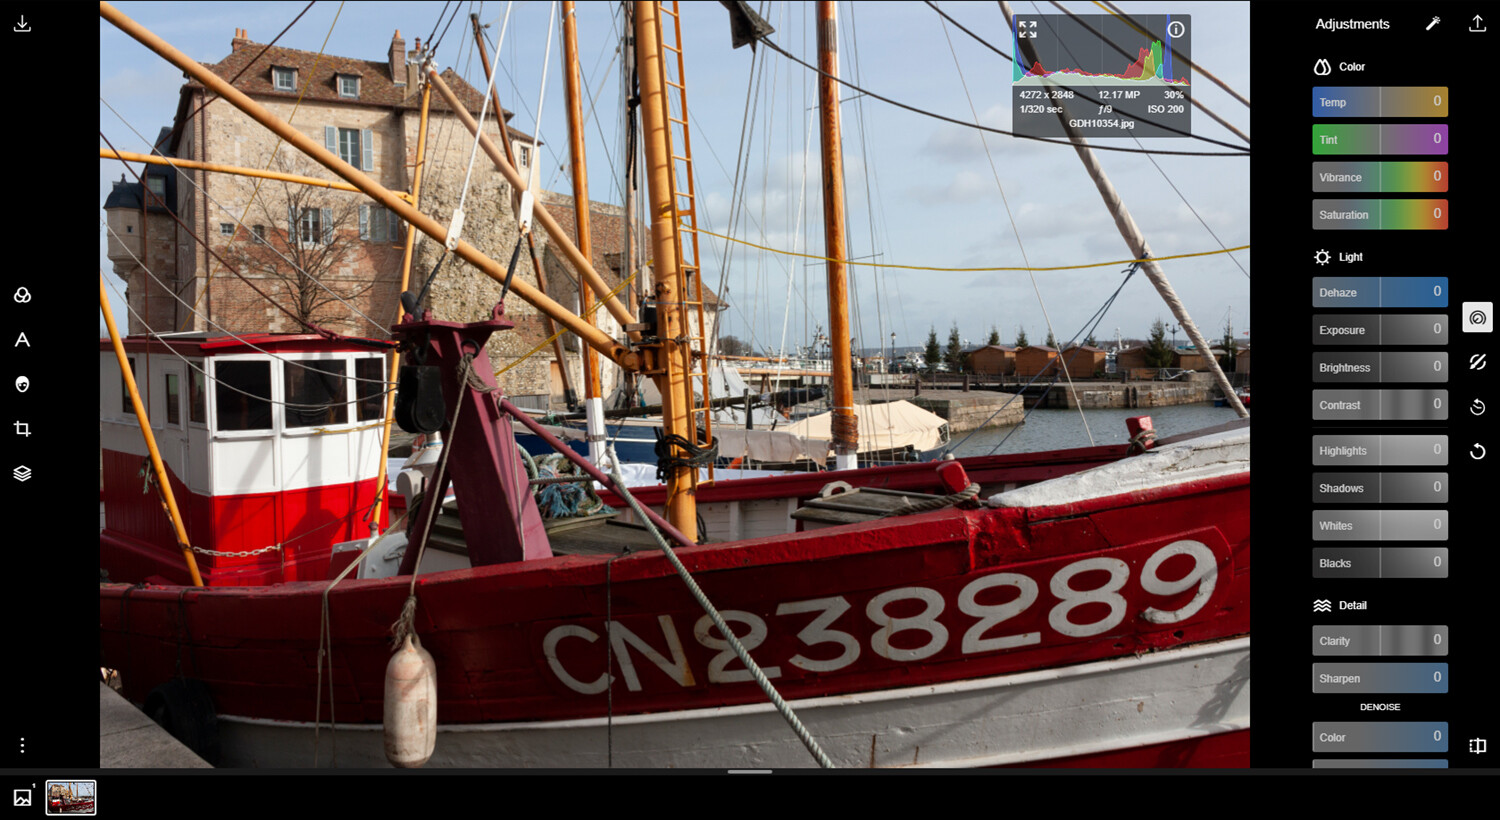
A favorite Polarr feature of mine is its histogram. It’s neater than any other I’ve seen in online editors. It shows a colors histogram by default, which you can expand into separate RGB histograms. In the absence of a clipping display, it’s useful to see what your edits are doing to the image. You can drag the semi-opaque histogram wherever you want in the frame.
Not-so-good things about Polarr
Like most browser editors I know of, you can’t open hefty 16-bit files in Polarr. You’re limited to editing 8-bit JPEGs. This isn’t bad as long as the quality of the JPEG is high and it hasn’t been saved many times before. However, theoretically, you must submit to a lower-quality workflow.
A more limiting aspect of Polarr is that it exports everything in an sRGB color space. This might be a constraint of its coding, but it’s less than ideal if you want to print your files on an inkjet. For the web and online photo labs, it’s fine. In mitigation, it does embed a profile when saving, which some rival products neglect to do. You do know where you stand with it.
Who’s it for?
Polarr has one or two shortcomings, but it’s still a program with a lot of depth. Who would use it? Anyone looking for the following:
- A free or cheap alternative to Photoshop and other costly pixel editors
- Includes built-in special effects and retouching tools so you don’t have to learn complex editing methods or buy plug-ins
- Auto image enhancer often a good quick fix for eye-catching web pictures
- Intuitive to use, especially if you are familiar with sliders in other programs
- No big downloads required and quick startup
- Aesthetically pleasing user interface
- Ideal for editing images for web or online labs
- Backed up by an extensive library of online tutorials at Polarr Wiki
- Option for more complex edits with the Pro version (subscription based, but low cost).

The Polarr Wiki website has had a lot of work put into it and includes many written and video tutorials.
Editing with Polarr
Polarr is nice to look at – clean and colorful – but how is it in use? I set out to learn what it could do. If I couldn’t do things the same way I can in Photoshop, what workarounds could I find? Polarr is sophisticated, so I was confident I could perform the most basic processing tasks and more.
Auto Enhance
I never shy away from hitting “auto” or “auto enhance” buttons in editing programs, because sometimes they give you a better starting point. In Polarr, Auto Enhance is aggressive with the Dehaze slider, and that tends to block shadows. You can tweak the result, of course, with the shadows, blacks and contrast sliders for instance. Auto-enhance does work well with flat, hazy images and can create eye-catching results in a single click.

This was a flat-toned file that has been made quite dramatic by Polarr’s auto enhance feature. The shadows have started to clip, but not anywhere important in this case.
Color and Tone Adjustments in Polarr
Leaving the auto settings and moving onto manual adjustments, Polarr offers Lightroom-style color and tonal controls (the latter called “Light”). It has Temp and Tint sliders for white balance, but no auto-white-balance tool to outrank your eyesight. A Vibrance slider boosts color without clipping.
When adjusting tone, Polarr offers highlights, shadows, whites and blacks sliders, which you move to achieve a full tonal range while watching the histogram(s). This replace a levels adjustment. Whites and blacks adjust large areas on either side of mid-tones. Highlights and shadows adjust only the brightest or darkest parts of the image.

Some basic editing in Polarr (original shown in inset – not part of software). Balancing the exposure a little, warming the color temp and adding some vibrance.
Again, the controls in Polarr are neatly laid out and colored according to their function. The controls haven’t been arbitrarily renamed, so you quickly know what things do if you’ve used other editors. Being mildly obsessive about detail, I miss the clipping display and being able to correct color by numbers (which is what auto-white-balance tools basically do). However, Polarr still has much to offer.
Polarr Curves
Polarr’s curves are modishly minimalistic, and they’re useful for some basic color correction. You have a composite RGB curve for adding contrast, and then there are the separate red, green, and blue (RGB) curves.

Not the finished result, but you can see how the color neutralizes as the histograms align. The left-hand picture is typical of artificial lighting. A blue histogram leaning to the left indicates yellow.
Used in conjunction with the RGB histograms, you can use RGB curves to remove color casts. You do this by adjusting any necessary curves so that the histograms roughly align with each other.
You can place a point in the middle of the curve and pull it up or down, or for shadows and highlights, place a point in the bottom or top corner and pull it along the outer axis. Polarr gives you the input and output RGB values while you work.
Sharpening in Polarr
Sharpening always strikes me as a bit of a dark art in that; whatever method you use, there’ll always be experts out there espousing a better way. In Polarr, you get a clarity slider that sharpens mid-tones and generally adds punch to images (easy to overdo) and a very basic sharpening slider with no radius control. The sharpening might be smarter than I’m giving it credit for, but there aren’t numerous fancy ways to sharpen in Polarr. I’m doubtful that that matters.
Other features and effects
Other useful features I haven’t yet mentioned include an elegant crop tool, a spot-removal tool with heal and clone modes, and distortion correction. Spot removal was a bit frustrating at first with my laggy browser, but it works.

I made the inset darker so you can just about see the original dust spot, which has been cloned over by the right-hand circle.
Polarr also includes film filters, a text tool with various graphics, and a face retouch tool with skin smoothing for flattering portraits. Plus, you’ll find grain, diffuse, pixelate and fringing effects. You can also add frames to your pictures.

One of Polarr’s film filters (M5) looks suspiciously like the teal-orange “movie” effect, which you either love or hate. Once I latched onto that, I started seeing it everywhere (Outlander, recently). Therapy is ongoing.
Pro Version
The Pro version of Polarr is subscription based, but it’s at a price you may not balk at. The Pro features are cleverly integrated into the free version, except you can’t save a photo that includes Pro edits. A pop-up appears asking if you want to upgrade or try the feature. What are the features?
Masks
The chief advantage of Polarr Pro is the inclusion of masks for localized adjustments. They include radial, gradient, color, brush, depth and luminance masking tools. These are all ways to select specific parts of the image for editing, and they work well.

Masking a bronze equestrian statue for some localized editing. Overlapping edges can be tidied up later.
You can use the brush tool if you want to manually select an area for better control. This includes an optional “Edge Aware” aid that, if used carefully, helps avoid overlapping edges when you’re painting areas in for selection. Brush size, compare, hardness, flow, feathering, erase, view mask and invert options are also present with masks.

In this picture, I’ve brought detail out in a near-silhouetted statue. Of course, I can alter shadows without masking, but other edits like clarity, contrast, exposure and saturation are usually universal.
Overlays
Whether with a mask or separately, you have the option of inserting an overlay effect. That might be your own added background or one of the many included ones (e.g., clouds, sky, weather, backdrops). This is all good stuff for people that like to experiment and create digital composites. A choice of blending modes helps you achieve the effect you’re after.

The sky in this photo was a little washed out, so I’ve dropped one of the more subtle Polarr skies in as an overlay.
Noise reduction
In Polarr, you can’t mask off sharpening in large single-tone areas. So, if your images are noisy and you think the noise will show in the final result, the Pro version offers color and luminance Denoise sliders. These are universal edits that don’t currently combine with masks.

The denoise tool is part of the Polarr Pro offering. Here you can see a before and after with quite a lot of luminance noise reduction applied to the right.
Summary
Aside from the sRGB constraint and occasional lag (perhaps my sluggish PC), I enjoyed Polarr. The sRGB thing may be universal among browser editors, and if you think of Polarr as a way of prepping photos for online labs or the web, it’d be hard to beat. Polarr is uncommonly pretty, which seems superficial, but the attention paid to aesthetics invites use. I’d love to know what you think!
Summary
Reviewer
Glenn Harper
Review Date
Reviewed Item
Polarr Online Photo Editor
Author Rating


