Photographing fire can be a tricky thing – in this post Peter Carey shares some tips on how to do it.

All photography needs light. It’s at the heart of the word photography. For the most part that light comes from the sun or from an artificial flash. But today I’d like to talk about the use of fire as the primary source of light. Fire, from a single candle to a raging inferno, presents some great opportunities to stretch your creative side. There are many different forms fire takes and a few different ways to attempt to capture those special images that convey the power, heat, subtlety or warmth that comes from the flame. Let’s take a look at some of the more common practices. Feel free to experiment and post links to your own findings in the comments section below.
Single Flame

Shooting a single flame is one of those tasks that seems simple at first, until it’s attempted. For this experiment you’ll need a candle of just about any type, a dark area to help highlight the flame, a tripod or some sturdy surface to hold your camera and patience. It’s best to use manual focus and focus on the end of the wick. The flame itself will not be in super clear focus as it is producing the light while being a three dimensional object, meaning the intensity and points to focus on it will be varied. If your camera has spot metering, use it and take a reading off the flame itself. This may produce a fairly dark image, so experiment with overexposing a little by slowing down the shutter speed. Make sure there are no drafts around to move the flame if what you’re looking for is the photo at left. Conversely, once you have the basic technique and shutter speed figured out, play around a little by lightly blowing on the flame and attempting to capture its dance. This candle photo was shot at 1/6th of a second at f/8 to help increase depth of field in the candle itself.
Stop or Go
The two photos below are examples of the same basic activity but with drastic differences in presentation. The top photo was taken with a fast shutter speed to stop the action of the fire while the image on the bottom has a much slower shutter speed. Both images are dramatic in their own way; the top image highlights the movement and gives structure to the fire, while the bottom one shows what the action really looks like and trades off clarity.


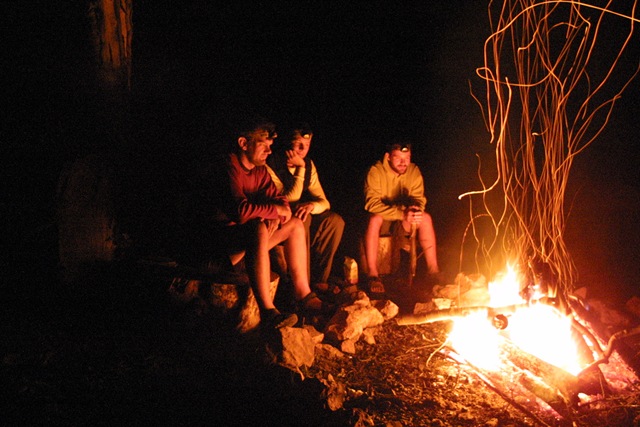
Campfires
Campfires are one of the easiest fire images to take. But the key is in getting the shutter speed dialed in. It’s best to use a slightly longer shutter time to help blur the fire as well as give any sparks a chance to leave a light trail. Campfire shots are great at conveying warmth and calm or a wild party attitude, depending on what the subjects in the picture are doing. If the shutter is left open too long here, the fire will be too bright and the mood lost.

Big Fire
Attempting to capture images of large-scale fire while not losing the feel of the heat can be tough. Most images are understandably taken at a distance far from the flames, which causes the fire to lose impact and scale. Here, safety is a number one concern as wildfires are very unpredictable. The shot below does an excellent job of capturing the ferocity of the fire by waiting until night to add a dramatic effect to the smoke. Being able to highlight the smoke gives a sense of volume and space to the fire beyond its attachment to the ground. Also, shooting at night with a slower shutter speed allows for more intensity in the flames varying color and brightness.

Fire carries with it a lot of impact and variety. Show us how you have captured images of flames, big and small, in the comment section below.
Are you looking for daily photographic inspiration? Peter hosts a Photo Of The Day RSS/Atom/email feed on his site, The Carey Adventures. Get inspiring photos from the world of travel and adventure delivered daily to your mailbox!

Some Older Comments