Have you ever noticed how some of the objects in your pictures look disproportionate or even distorted?
It’s a common photographic problem, and it’s generally due to something called lens distortion.
In this article, I explain all about lens distortion. I share:
- What causes lens distortion
- The key types of lens distortion you should know about
- How you can avoid (or correct) distortion
By the time you’ve finished, you’ll be a distortion expert – and you’ll know how to deal with any and all distortion in your photos.
Let’s get started.
What is lens distortion in photography?
Lens distortion is when elements in a picture look different from how they appear in real life.

For example, a flat subject might appear to bow outward. Or a building’s sides might compress as they extend upward.
There are several broad types of distortion, but the two most common are optical and perspective distortion:
Optical vs perspective distortion
Optical distortion is caused by the construction of your lens. Note that a lens can be plagued by three kinds of optical distortion, which I explore in greater depth below:
- Barrel distortion
- Pincushion distortion
- Mustache distortion
The focal length, the design, the number of glass elements, and other factors together determine the amount and type of optical distortion a lens will produce – so some lenses feature significant distortion, while others are completely (or nearly) distortion-free. Interestingly, some zoom lenses actually produce multiple types of distortion depending on which focal lengths you test.
Perspective distortion, on the other hand, technically isn’t lens distortion (though it often gets labeled as such). Instead, perspective distortion is created by the position of the camera in relation to the subject.
You’ve probably identified perspective distortion in your own photos, even if you didn’t know what to call it; it can get pretty obvious, especially in wide-angle, telephoto, and cityscape photography.
For example, have you ever taken a group selfie and noticed how the person closest to the camera (generally the one holding the phone) looks wider? Or have you ever taken a shot of a tall building and noticed how the building appears to get narrower and narrower as it extends up toward the sky (to the point that it seems like it might fall backward)?
Both of those effects – as well as many others – are caused by perspective distortion.
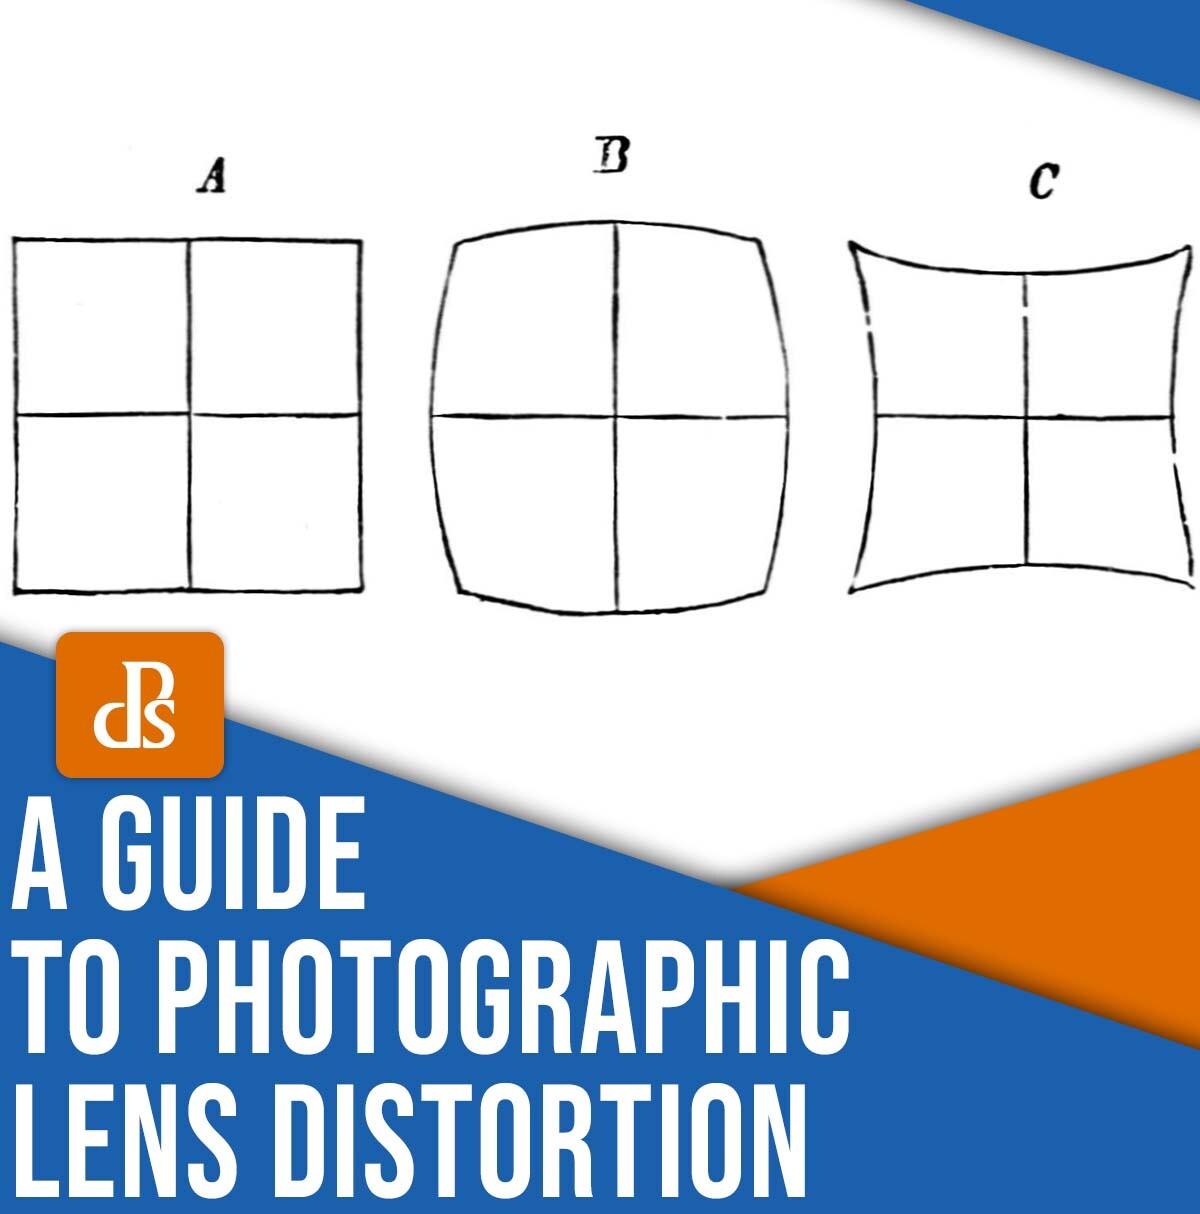
The 3 main types of optical distortion
As I mentioned above, there are three kinds of optical distortion to look for:
Barrel distortion
You know how big barrels have a narrow top and bottom but an expanded center? Well, that’s exactly what happens to straight lines in a photo with barrel distortion.
If you use a lens plagued by barrel distortion to photograph a series of lampposts, the lamps will curve outward:

Barrel distortion is one of the most common lens distortions in photography, and it generally happens when you use a wide-angle lens (or the wide portion of a zoom). Keep in mind that the shorter the focal length, the more pronounced the distortion.
(In fact, the barrel distortion in fisheye lenses is so intense that photographers use it creatively instead of trying to correct it.)
Pincushion distortion
Pincushion distortion is the opposite of barrel distortion. Instead of producing lines that bow outward, pincushion distortion pushes lines inward, like this:

You’ll notice a pincushion effect mostly when you’re photographing with a telephoto lens or when you’re using the telephoto end of a zoom.
Subtle pincushion distortion can be flattering for portraits, which is why telephoto lenses that range from 85mm to 105mm are often used by portrait photographers. But too much pincushion distortion can become problematic, so it’s always a good idea to keep an eye out for pincushion effects!
Mustache distortion
Mustache distortion is the third type of lens distortion. It combines barrel distortion and pincushion distortion for a mustache-like effect:

Unfortunately, mustache distortion is difficult to fix; fortunately, it’s also pretty rare, and if you’re lucky, it won’t affect any of your lenses.
How to avoid optical distortion
If you want to limit optical distortion in your photos, you have a few options.
First, you can photograph with a midrange focal length – nothing too wide or too long (50mm is a good place to start).
Of course, 50mm isn’t suitable for all types of photography. If you need to shoot with a wide-angle or telephoto lens, you can check test charts prior to purchasing new gear and pick lenses with the least distortion, or you can fix the distortion in post-production, which is surprisingly simple:
How to correct optical distortion during post-processing

Optical distortion is easy to deal with, and most professional and semi-professional editing software has a tool that lets you make quick corrections.
In fact, lens manufacturers generally provide software developers with lens correction data. Then, when you import an image into your editing software, the program recognizes your lens type and automatically applies distortion correction (though you’ll generally need to activate this process). Nice, right?
Here are the instructions to deal with optical distortion in a few different programs:
Lightroom
Open the Develop module, then scroll down until you find the Lens Correction panel.
Then simply tick the Enable Profile Corrections box. Lightroom will identify your lens and fix any distortion.
If Lightroom doesn’t recognize your lens or does a poor job correcting distortion, you can always click the Manual option and adjust the Distortion slider until you get a result you like.
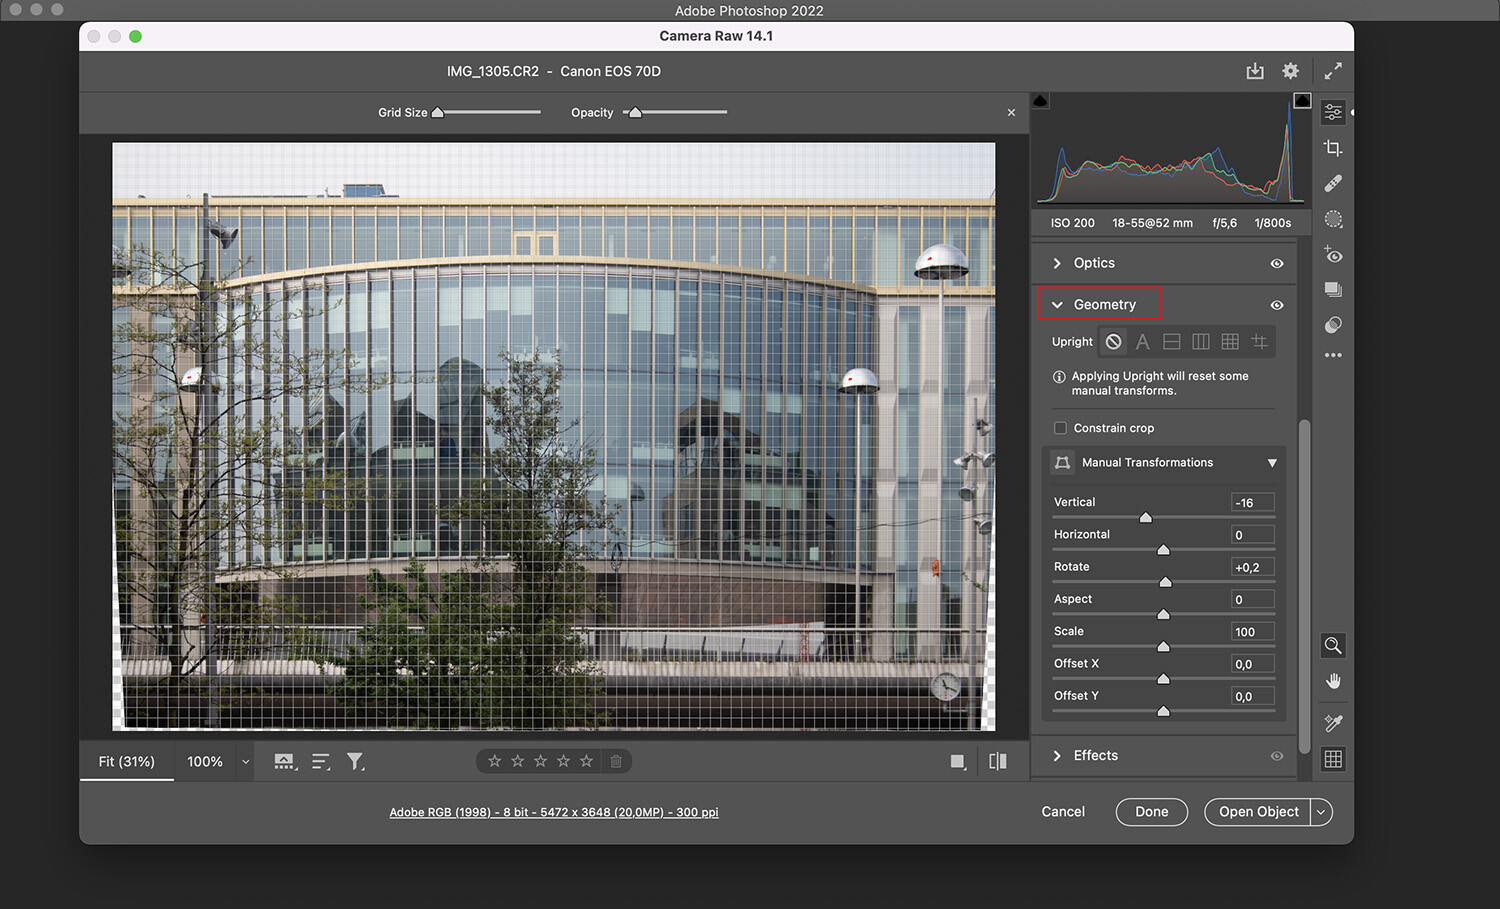
Photoshop
If you try to open a RAW file in Photoshop, it will automatically pop up in Adobe Camera Raw; here, the interface is practically identical to Lightroom, so you can follow the instructions I’ve given above.
If you prefer to correct distortion in Photoshop, however (or you’re editing a JPEG file), then open the Filter menu and click on the Lens Correction option.
Here, you’ll find plenty of tools under Auto-Correction. To fix optical lens distortion, click the Geometric Distortion option.
And if Photoshop doesn’t recognize the lens or you want to correct distortion manually, go ahead and use the Custom tab.
Luminar AI
In Luminar AI, head to the Edit panel and scroll until you reach the Professional section.
Open the Optics panel, then use the Lens Distortion slider to deal with any distortion issues.
If you’re editing a RAW file, you’ll also have the option to use the Auto Distortion Corrections tool.
GIMP
Once you open your photo in GIMP, select Filters>Distortion>Lens Distortion.
Then move the Main and Edge sliders until you’re happy with the result.
The 2 main types of perspective distortion
As I discussed above, perspective distortion isn’t technically lens distortion; instead, it’s caused by the distance between the subject and the camera/lens.
Here are the two key types to be aware of:
Extension distortion
Extension distortion, also called wide-angle distortion, is when objects close to the camera appear unnaturally large (or far apart).
This effect is especially noticeable when using wide-angle lenses, as wide-angle photography often takes place close to the camera. However, it is not directly caused by wide-angle lenses, and you can still get extension distortion when using telephoto lenses.
To see extension distortion in action, grab a wide-angle setup (your smartphone will work just fine!), then put your nose close to the lens and take a photo. See how your nose looks huge in relation to the rest of your face?
Compression distortion
Compression distortion is the opposite of extension distortion, and it’s when objects far from the camera appear unnaturally small (or close together).
Compression distortion is often referred to as compression due to focal length, but this is incorrect; telephoto focal lengths do tend to exhibit more obvious compression distortion, but only because telephoto photography is generally done at a distance.
Compression comes with several pleasing effects, so certain photographers, such as portrait, wildlife, and bird snappers, deliberately try to produce it. For instance, compression helps smooth out backgrounds (which in turn enhances the subject).
How to avoid perspective distortion
You’ll often notice perspective distortion when photographing buildings. Because you’re shooting from the ground up, the bottom of the building (the part nearer to your lens) will expand, while the top of the building (the part farthest from your lens) will compress. Ultimately, the building will appear to converge toward the top.
To avoid this effect, try to shoot from a higher or farther vantage point – perhaps from the opposite side of the street or from a window. Alternatively, you can use tilt-shift lenses. These are capable of producing distortion-free photos (though they do tend to be relatively pricey!).
Selfie distortion is another common issue. To avoid it, try working with a selfie stick; you might also try mounting your camera on a tripod, activating the self-timer, and taking a few steps back. The idea is to get farther away from your camera to prevent your face (or nose) from appearing unnaturally large.
How to correct perspective distortion in post-processing
Some types of perspective distortion can be fixed in post-processing, though note that you’ll lose pixels in the process.
So if you do plan to allow for perspective distortion and only make corrections afterward, aim to compose slightly wider than necessary (to give yourself room to crop at the end).
Also, whatever software or technique you use, make sure your horizon is straight before you do any perspective correction.
Lightroom
To correct perspective distortion in Lightroom, start by opening your image in the Develop panel. Find the Transform section.
You can try clicking the Auto option, or you can adjust the Vertical and Horizontal sliders until you get a nice result.
Photoshop
Correcting perspective distortion in Photoshop is simple:
First, select the entire image (hit Ctrl/Cmd+t) or double click on the background layer to unlock it.
Then go to Edit>Transform>Perspective. Finally, click and drag one of the corners to correct the perspective.
If you’re working with a RAW file, you can also correct the perspective in Adobe Camera Raw. Just follow the instructions I gave for distortion correction in Lightroom (above).
Luminar AI
Open the Essentials panel and find the Composition tool. Under Perspective, you’ll see two buttons.
Use the left button to correct the horizon (do this one first!). Then use the right button to correct the perspective.
GIMP
In the Filters menu, select Distortion>Lens Distortion.
After you use the Main and Edge sliders to correct optical distortion (see above), use the Vertical and Horizontal sliders to fix any perspective distortion issues.
Lens distortion: final words
Hopefully, you now understand the ins and outs of lens distortion.
It’s a complex topic – but with a basic understanding of distortion, you can avoid both optical and perspective distortion in your photos, and you can take steps to correct it when necessary.
Now over to you:
How do you plan to deal with lens distortion? Will you avoid it in camera? Correct it when editing? Both? Share your thoughts in the comments below!
