
Christmas is almost here and like you, many photographers are getting ready to photograph their holiday sessions and are likely using Christmas trees. In this article, we’re going to show you how to add a little more twinkle to your Christmas photos so that you can wow your clients. Even if your trees have lots of lights, this will show you how to create twinkle lights in Photoshop so you can add more cheer to your photos!

Learn how to add twinkle lights to your holiday photo sessions in this article.
Step 1. Create your twinkle lights pattern
In order to add the twinkle lights to the lights and create more lights, you’ll need to first create the brush preset. This isn’t as difficult as it seems. Of course, you could download brush presets online, but there’s nothing like having the perfect brush you’ve created for your photos.
1.1 Create a new document. It doesn’t have to be a large document. Use a predetermined one and make sure you aren’t using artboards and that your resolution is at 300dpi. A white background will help you see what you’re doing.

Create a new document. It doesn’t have to be large since you’ll end up with a brush preset that can be sized after.
1.2 Next, go into Brush Settings. If you don’t see this on the icon menus on the left (or where you have your tools), you can open it by going to Windows -> Brush Settings and the window with the settings will pop up.

Choose the round brush with zero hardness – it should be brush 30 in the brush menu. It’s a predetermined brush.
Here, you’ll want to select the roundness of the brush to around 8%. This will make sure your brush is flat to make the different strokes of the twinkle.
For this tutorial, we’ve made our twinkle with 5 points, but you can get creative with the size and add in additional points if you like.

You can see how the brush is flattened.
1.3 Choose the angles of your brush. Respectively, they are 90-degrees, 180-degrees, 45-degrees, and -45-degrees to make the five points. You can set a ruler to help guide you, making sure the lines intersect in the middle. For this one, I just painted with the brush by eye.

1.4 Once you have all five points or as many points as you want for your twinkle, go back to the Brush Settings and change the roundness back to 100%. With this brush, go to the center of your star and fill in the middle with a couple of clicks to add more to the middle.
This will give the twinkle a little more fullness and make it look like an actual light in the Christmas tree.

1.5 We’re almost done! Finally, we’ll add in a nice Gaussian Blur to the twinkle so it looks more real in the background and the points on the starburst aren’t too harsh when you’re adding them into the images.
Of course, this is preference and you can make one brush with the blur and another brush without so you have options. We’ve added the blur to our starburst. Go to Filter -> Blur -> Gaussian Blur and choose how much blur you want.

1.6 Now you have a nice full twinkle light! From here, we’ll need to create the Brush Preset pattern so that you can use it in the future on any image in Photoshop. Go to Edit -> Define Brush Preset -> Change the name to what you’d like to call it and click OK.


This will create your brush pattern! Now you have your twinkle light brush ready to use and you can change the color and size.
Step 2. Clone lights to make the twinkle lights look more real
If you add your twinkle lights to the photo, it will look oddly out of place. This is because it needs an actual light to shine off of an actual light source. The best way to do this is to clone a light in the original photo to other parts of the tree before using the twinkle light brush.
While you could just paint on dots, they don’t have the same color and gradient as a light that is already in the tree and may look out of place.
2.1 To do this, first create a new layer so that your twinkle lights can become moveable after you’ve added them. Also, this will keep you from cloning and using the brush on the original image in case you need to start over, you can simply delete the layer.

2.2 Now go to the layer of your original image, click on the Stamp Tool. In the menu bar at the top, make sure that you uncheck where it says Aligned. This will make sure to only clone the light as you click on various parts of the layer.

Click on ATL and click a light. Make sure the brush is just large enough for the light tip so you don’t clone too much of the tree/background.
2.3 Once you’ve made your selection of which light you’ll clone, go back to the new layer and click on the parts of the image you see that you want to add the lights in. Don’t worry, you’re not cloning on the image itself, this layer is transparent and that’s why you can see the photo in the layer below. It helps to see where you’re putting the extra lights.

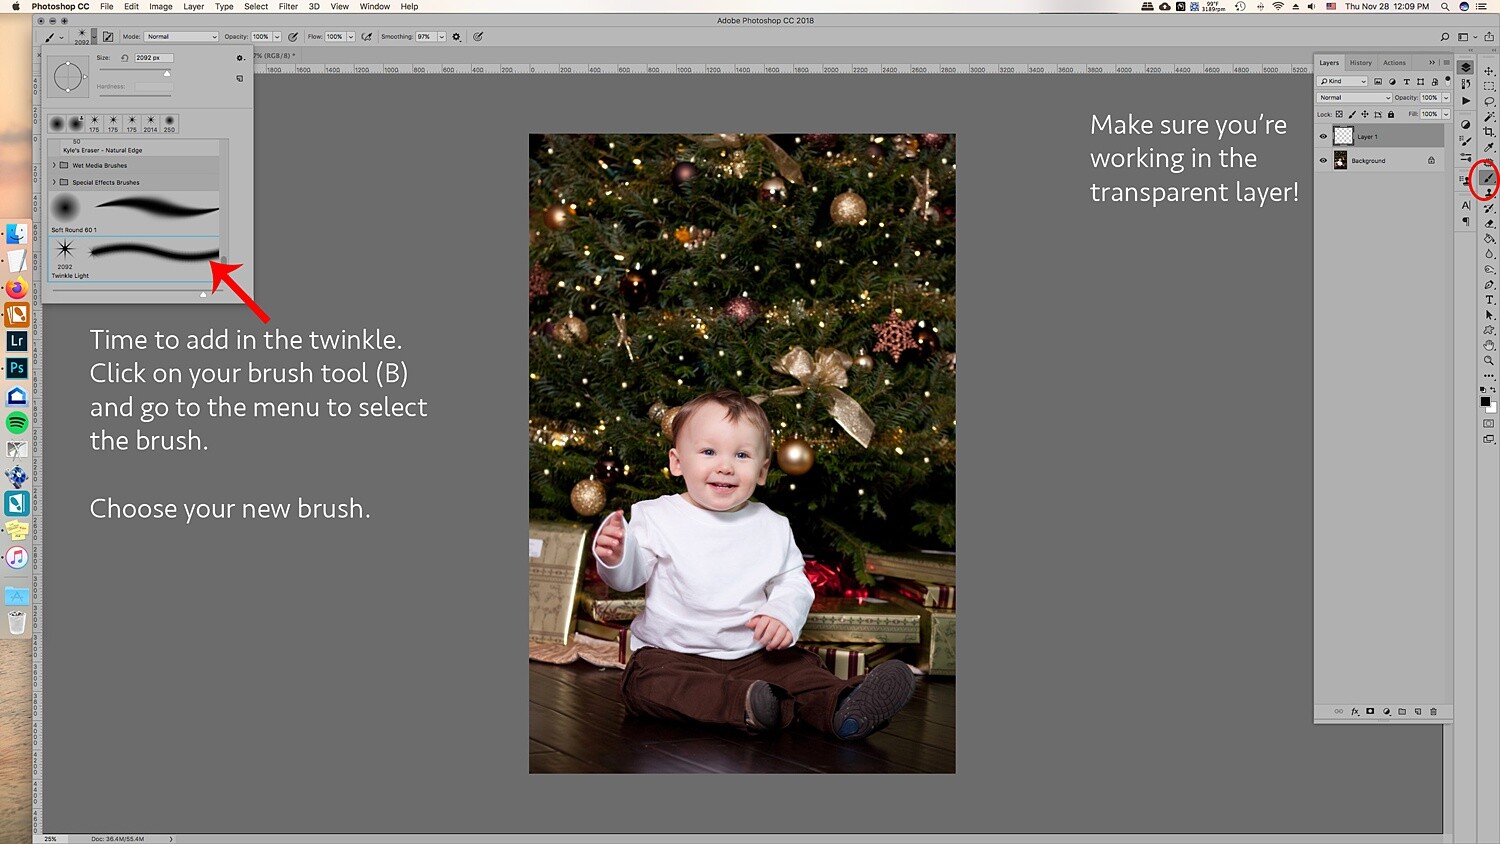
2.4 All right, now that you’ve added more lights to the tree, you are ready to add in the twinkle lights brush! Go to Brush and choose the brush you just created. Usually, new brushes show up at the end of the brush list.
Choose your twinkle light brush. Make sure that the color for your brush is set to white. Alternatively, you can choose the color picker and get a warmer yellow color that matches the lights. It’s your choice! You can also add colored lights if you wish!
Leave the hardness and opacity at 100%, go to your new layer where you’ve cloned the lights on. Go to each light and add in the twinkle onto it. Adding the lights and the twinkle makes the twinkle look real and not too fake.


Change the size for a few of the twinkles so they look more random.

3. Add in additional colors
The great thing about doing the twinkle lights this way is that because you’ve added them onto a transparent layer, you can move them around and resize them as you need.
The amazing part is that you can duplicate the twinkle lights layer, move it around, and add colors to it to create colored twinkle lights. Here’s a break down of how you do that for multiple colors:
3.1 Duplicate the twinkle lights layer.

3.2 Move it around and transform it so that it’s not directly on top of the other twinkle lights. If you’re going to add in more colors, I suggest that you don’t add in too many twinkle lights in the original layer so that you can fill in those empty spots with the colored twinkle lights.
3.3 Go to Layer -> New Fill Layer -> Solid Color. Choose a color. I did blue, green, and red. But you can add in any color.

3.4 You’ll end up with a solid color onto your images. Don’t worry, right-click on the layer and choose Create Clipping Mask to clip it to the twinkle light duplicate layer.


3.5 Go to Blending modes at the top of the layer window and choose Color. This will overlay the color on the twinkle lights and make it look more real.


3.6 A great tip is to merge each color to the twinkle lights layer. Then add a mask so that you can go into the layer with your brush and take out the twinkle lights for that layer without having to deal with the color clipping mask and all that.
It’ll make removing them easier. This is ideal in case you need to remove one from an ornament or face.

You can also add a clipping mask to the original twinkle lights layer to help brush out unwanted twinkle lights as well.

Using a mask on the layer can help you to take out unwanted twinkle lights.
And that’s it! That’s how you add in additional twinkle lights in color to your image!

Before and after with the twinkle lights in color. You can make it more subtle by adding fewer twinkle lights.
Use in non-holiday images as well
Use this tutorial on other images where you’d like to add in some twinkle too! It doesn’t have to just be for holiday sessions, simply just use the brush only with a color set.

Use the twinkle lights brush on other portraits that you’d like to add some sparkle to.
Make sure you’re working on the transparent layer and play with opacity levels and additional colors.

In a new transparent layer, I selected the twinkle lights brush and added the twinkle lights to various parts of the layer in white in different sizes. Then, set the blending mode to Overlay to get the right look. I also lowered the opacity.
Twinkle lights with more than 5 points
The great thing about adding in twinkle lights is that you’re creating your own brush preset! This lets you create different types of brushes, and one might be adding more points to the twinkle light.

Here’s a comparison of no twinkle lights, a five-point twinkle, and a multi-point twinkle light.
Go through all of the steps in Step One, only this time add more angles and add in more points. It also looks great when you change the size within the same brush.

In the close-up, you can see that the brush preset has more points than the five-point twinkle light brush we made previously.
It’s really all about preference, so play around and see what look is the right one for your portraits.
In conclusion

Before and after on another photo. This is more subtle and only uses white twinkle lights.
It may sound complicated the first time you give it a try, but with time it gets easier! Adding in additional twinkle lights can give your holiday photos a little more twinkle and pop that will make your clients very happy to see in their final images!
Will you be using this tip to add in twinkle lights to your images?
Table of contents
Portrait Photography
- GENERAL
- PREPARATION
- SETTINGS
- LIGHTING
- POSING
- COMPOSITION
- GEAR
- ADVANCED GUIDES
- CREATIVE TECHNIQUES
- POST-PROCESSING
- How to Create Twinkle Lights for Christmas Tree Portraits in Photoshop
- BUSINESS
- INSPIRATION
- RESOURCES

