
Have you heard about the new Generative Fill tool in Photoshop? It’s given professional and amateur photographers quite a lot to talk about, and for good reason; thanks to Generative Fill, you can create realistic digital art using simple text prompts.
So don’t stay out of the conversation! Give Generative Fill a go so you can understand the potential and limitations of this new tool.
And if you’re worried about getting started, don’t be. In this article, I’ll tell you everything you need to know to get the tool up and running, plus I’ll give you some examples and tips so you can make the most out of the Generative Fill feature.
Let’s dive right in!
What is Photoshop’s Generative Fill feature?

Generative Fill is a new text-to-image tool that’s available in Photoshop Beta. Type a word or a sentence, and the tool will generate a digital representation of what you wrote.
Not only does Generative Fill produce content on command, but it also matches the lighting and perspective of the existing photo for a much more realistic result.
Generative Fill can also create content without a text prompt. If you don’t prompt the tool and instead leave it blank, it will use information from the surrounding area to generate new pixels, which can be very useful if you want to remove (and replace) a portion of your photo or extend an existing image.
When is Generative Fill useful?

Generative Fill offers four main features: Removing objects, adding objects, creating backgrounds, and expanding images. So when do these options come in handy?
For one, the tool is perfect if you want to create a digital background – anything from artistic bokeh to a landscape with mountains.
It’s also useful if you want to extend an existing photo to fit a specific format or if you need more space to improve the composition.
Generative Fill can also be helpful if you accidentally cut off an important element when photographing; you can use it to recreate the missing part of your subject (and expand the surrounding area).
It’s also a great way to add props or incorporate elements that are missing from the picture. Say you’re taking a photo of a cheesecake with strawberry jelly. Maybe strawberries aren’t in season, but a few strawberries would be the perfect prop to style your photo – so you just add them in with Generative Fill!
Finally, you can generate an entire work of art using just Generative Fill. The tool doesn’t need an existing image to work; you can start with a blank canvas, fire up Generative Fill, and use it until your photo is complete.
How to use Generative Fill: step by step
Now that you’re familiar with the basics, let’s take a look at how you can start using Generative Fill!
Step 1: Download Photoshop Beta

At the time of writing, Adobe hasn’t added the Generative Fill tool to its standard Photoshop program. Instead, to work with it, you need the Beta version of Photoshop (which is a different app that can be downloaded from the Creative Cloud app).
So open the Creative Cloud application on your computer. Then find the Beta apps and install Adobe Photoshop (Beta).
Step 2: Open an image

Now that you have Photoshop Beta on your computer, go ahead and launch it. Simply click on the Photoshop Beta shortcut (its icon is a blue Ps on a white squared paper).
If you’ve spent time working in Photoshop, Photoshop Beta won’t feel much different. If you want to start a project from scratch, choose New File on the left-hand side. Then input the size and resolution, or choose one of the existing templates and click Create.
If you want to enhance an existing photo, choose Open, then browse until you find the file you’re after. You can also select Lightroom photos if you want to fetch one of your images saved in your Lightroom catalog.
Step 3: Make a selection and open Generative Fill
At this point, you should have an image (or a blank canvas) open in Photoshop.
So make a selection on the area where you want to apply the Generative Fill feature. If you’re creating a background, for instance, you would select the entire canvas. If you’re adding some birds to a landscape, you’d simply select the small area of sky where you’d like the birds to appear.
Note that you can create your selection using any of the selection tools offered in the standard version of Photoshop.
Once you’ve made a selection, the floating taskbar will change, and you’ll see the Generative Fill option on the left-hand side.

(If you can’t see the bar, you can enable it by going to Window>Contextual Bar. You can alternatively access the Generative Fill tool from the Edit menu.)
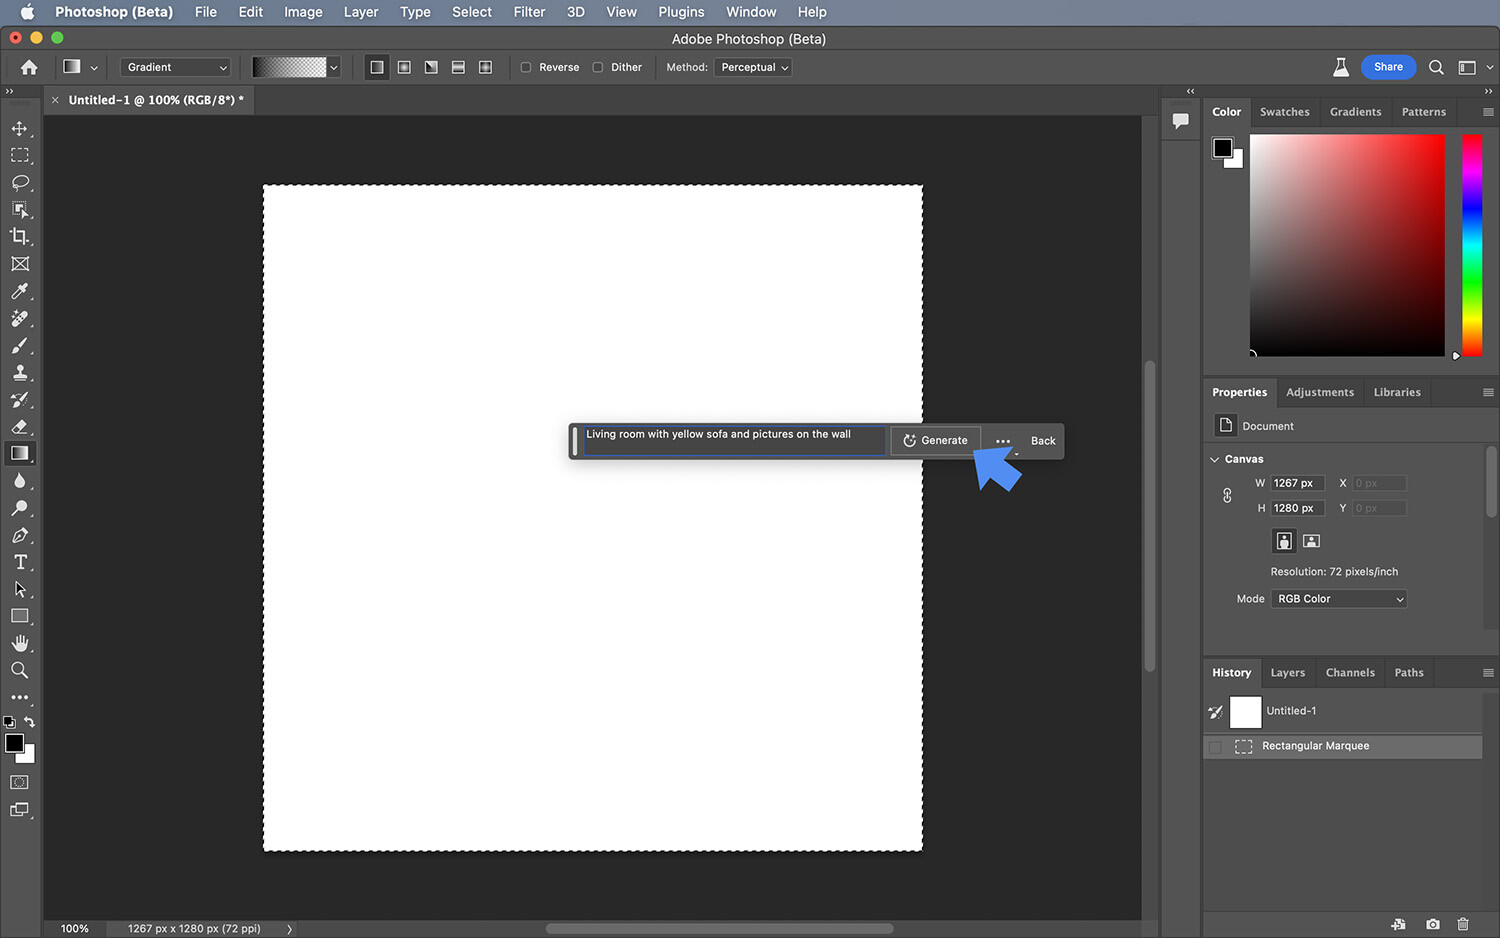
Step 4: Add your text prompt
Click on the Generative Fill option and type whatever you want to create. At the moment, it only works in English.
You can also click on Generative Fill but leave it blank; this will prompt Photoshop to create whatever it wants. Then click Generate or press the Enter key on your keyboard.
Step 5: Choose from the results
Photoshop uses each prompt to generate three variations. To see these options, go to the Properties panel and click on each thumbnail. Choose the one that you like best, and you’re done!

Generative Fill in action: a hands-on example
In this section, I take you through the process of enhancing an image with Generative Fill. I’ve specifically chosen a somewhat boring flower photo, and I give you the exact steps I used to make it far more interesting (while also extending the background).
You can see the original image on the left as well as my enhanced image on the right:

Step 1: Add a subject

When I took this flower photo, I was actually trying to photograph a bee, but it flew away before I could fire the shutter. So my first move will be to add a bee back in.
I’m going to select a piece of the petal, then simply type “bee” in the Generative Fill field, click Generate, and the bee will appear!
Step 2: Fill the background to improve the composition
Now that I have the subject I wanted, I need to fix the composition. The background takes up a lot of the frame, but it’s rather boring.
To fix this, I’ll add some bushes and flowers. I’ll use the Lasso tool to select the area underneath the flower since I don’t have to be very precise, then type “bushes and flowers” into the text field. Once I click Generate, here’s what I’ll get:

Notice how the flowers and bushes match the depth of field in my original image – pretty cool, right? (Also, remember that you get three variations for each Generated element; I’m choosing the third variation because it looks better than the others.)
Step 3: Extend the background

I’ve decided I want the picture in a landscape format, so I’m going to extend the canvas size. (This is simple to do using the Crop tool – you can just drag the edges. Alternatively, you can select Image>Canvas Size.)
Next, I’m going to select the empty areas. In this case, it’s easier to do it with the Rectangular Marquee tool. Make sure you include part of the image in the selection to give the Generative Fill tool enough information to continue the background coherently.
Click on Generative Fill to activate the tool, but leave the text field blank. Click Generate and choose the best variation.
Step 4: Fine-tune the background
I’ve extended the background realistically, but I really feel like it needs some more interesting elements. I’m going to add a lens flare on the left side by selecting the relevant area and typing “lens flare” into the prompt.
And for a finishing touch, I’m going to add some more plants on the right side where the empty branches are now:

For comparison’s sake, here’s the original and the enhanced image once again:
A few quick tips for using Generative Fill
The Generative Fill feature is still in Photoshop Beta, so it’s not perfect – yet. Here are a few tips to get better results:
1. Include pixels in the selection

In most cases, it’s important to create selections as precise as possible. You don’t want to include anything from the surrounding areas when you’re compositing or masking.
But when you’re using Generative Fill, forget about all that! This AI tool benefits from having some data to work with – so including pixels in the selections from the surrounding areas will yield better results. This is especially true if you’re extending the background or merging images.
2. Be as precise as you can with your text prompts

Whenever you’re typing a text prompt in the Generative Fill field, be as specific as possible. For instance, instead of typing “beach sunset,” type “sun setting in the background of a sandy beach with ocean waves crashing on the wharf.” And instead of just typing “flower,” type “blooming red rose” and so on. This will save you a lot of time by generating images that fit your creative vision more precisely.
This only works, of course, if you have something clear in mind. Otherwise, you may appreciate the tool’s randomness, and you can be deliberately vague just to see what you get.
3. Build upon the original variation

If you type in a prompt and you don’t get a perfect result, don’t be discouraged. In fact, Generative Fill is very rarely flawless (at least at this stage of the tool’s development).
So instead of starting over with a new text prompt or simply quitting the project, build on the best variation you have.
Let’s say you want to generate a portrait of a woman. Maybe the hair doesn’t look the way you imagined – you wanted short curls, but you got long, straight locks instead. Simply select the hair, then type in a new prompt instead of trying to generate an entirely new portrait from scratch.
The same goes for the obvious errors. Generative Fill still has problems with fingers and teeth, plus it can also create patterns or include random pixels that don’t fit. In such cases, you can select the area and try a new text prompt, or you can try it without a prompt. (If you do the latter, it’ll work as a content-aware fill tool and correct the issue.)
Generative Fill in Photoshop: final words
Generative Fill is a powerful method of enhancing your photos, and it’s likely only the beginning. However, before I sign off, I’d like to mention one more thing: legalities.
It’s quite complicated to talk about the legal implications of AI usage in photography at this point. However, there’s one thing that’s very clear when using this new Photoshop feature: It can’t be applied to your commercial work. This and other important considerations are stated in the Adobe Generative AI Beta User Guidelines, so I encourage you to check them out!
Now over to you:
Now that you know how to work the Generative Fill tool, let us know what you use it for! Share with us your images, and let us know if you have any other tips for better results!
