
Did you know that Photoshop has grids and guidelines? If you’re eyeballing your lines every time you’re correcting a building’s perspective, straightening a horizon, or placing a logo on a photo, then Photoshop’s grids and guides can make a huge difference. (And that’s not even taking into account everything you can do with the tools if you create flyers or do any other graphic design work.)
In this article, I offer a quick overview of Photoshop’s positioning tools. I explain what grids and guides actually are and how to create them, plus I share some tips and tricks for consistently great results.
Let’s dive right in, starting with the basics:
What is a grid in Photoshop?
A grid is a series of horizontal and vertical lines that covers Photoshop’s canvas, like this:

Grids are designed to make it easier for you to locate specific points on the screen. You can use grids to create symmetrical designs and align multiple elements, among other things. It’s worth noting that a grid is just a visual aid inside Photoshop; the gridlines aren’t saved or printed on the image.
What are guides in Photoshop?
Guides are individual lines that you can draw across the Photoshop canvas:

Guides can be used to create designs, straighten elements, control spacing, and much more. They can be horizontal or vertical lines, and like grids, they are only visual aids inside Photoshop; if you save your image without first removing your guides, the lines won’t appear in the final file.
How to create a grid in Photoshop
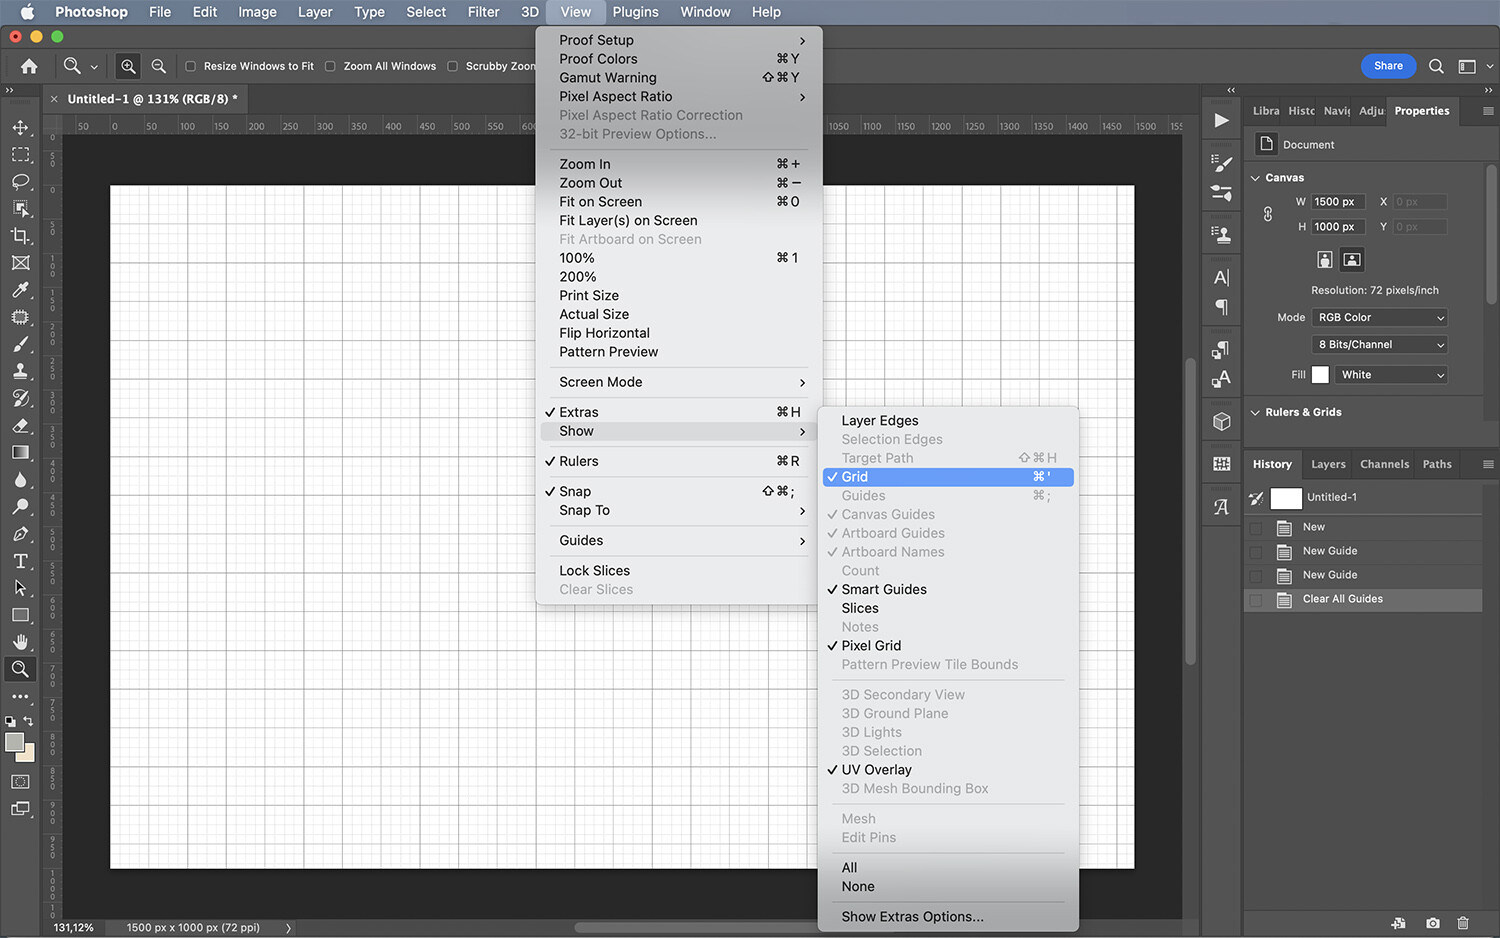
Creating a grid is easy. Simply head into the Photoshop menu, then select View>Show>Grid. Take a look at your image, and you should see a series of lines crisscrossing the page.
(Note: Once you’ve enabled grids, if you select View>Show, you’ll see a checkmark next to the Grid option. If you’re ever unsure about whether grids are enabled, simply go to View>Show and look for that checkmark!)
Photoshop’s grid has clear horizontal lines, which look like the graphing paper kids use in math class. By default, gray gridlines will appear every two centimeters with four subdivisions:

However, these settings can be modified. In fact, you can create as many or as few gridlines as you want! Simply go to Photoshop>Preferences>Guides, Grid & Slices. Once there, you can change the color of the gridlines, the type of gridlines, the separation between gridlines, and the number of subdivisions.
A grid can act as a visual aid that helps you manually place elements on the canvas – but it’s also a great way to align existing elements by snapping them together. You see, Photoshop grids offer a snap feature. Simply select View>Snap to>Grid. Then whenever you move an element across the canvas, it’ll align with the closest gridline!

It’s important to remember: The grid won’t print. It’s a visual aid only, so you don’t need to worry about disabling it at the end of your project. (But it can be helpful to look at your final piece without a grid; that way, you can accurately analyze the end result.)
To disable the grid, simply choose View>Show>Grid. Your existing grid will disappear, and if you head back to the menu, the Grid option will be unchecked.
How to create a guide in Photoshop
As I explained above, guides are lines that you manually add to the Photoshop canvas. You can choose to cover the whole canvas with guides, but you can also create a single guide. In other words, you can create guides on an as-needed basis.
(Of course, you can always create both a grid and a few guides. In fact, you can use a grid to better position your guides! Also, note that guides, like grids, won’t be printed.)

To create a guide, you need to first have the rulers enabled, so go ahead and select View>Rulers. (You can also use the keyboard shortcut Ctrl/Cmd+R).
Once you’ve done this, you should see one ruler on the left and one on top of the canvas. To create a horizontal guide, click and drag from the top ruler; to create a vertical guide, click and drag from the left ruler.

Drag your guide into position, then let go of the mouse. The guide will remain in place, and you can continue on with your work (or you can choose to create additional guides). If you misplace the guide or wish to move it later on, activate the Move tool from the toolbar. Then hover over the guide until you see the cursor change into a double line with arrows. Click and drag to move the guide to a new position.

It’s also possible to create a new guide that appears directly on the Photoshop canvas. Select View>Guide>New Guide, which will open a pop-up dialog box. In it, you can set the line’s orientation, position, and color.
You can even use guides to create a custom grid. Head to View>Guide>New Guide Layout. A pop-up dialog box will appear, where you can indicate the number of columns and rows you want to create. You can also set the size, gutter, and margin. And the best thing about this option is that you can save each new layout as a preset and load it in future documents.

Note: Since you can move guides with the Move tool – which you can use to move other objects – they can be moved by accident. To prevent this, make sure you lock your guides in place. Just create all the guides you need, then select View>Guides>Lock Guides.
The guides also have a snapping feature, which you can use to accurately position elements on the canvas. Enable it by selecting View>Snap to>Guides.

If you wish to erase a guide, just drag it back to the ruler. Alternatively, you can click on the guide, then choose View>Guide>Clear Selected Guide. And if you want to delete every guide, click View>Clear Guides.

Creating grids and guides in Photoshop: final words
Photoshop may not be a dedicated graphic design program, but it does have many design-focused tools to improve your workflow – including, of course, grids and guides!
Plus, grids and guides aren’t just useful for graphic design; you can also use them to help you scale images, make photo composites, correct perspective, and more.
So practice creating a grid. Have fun with guides. And see what you can produce!
Now over to you:
How do you plan to use grids and guides in your photo-editing and/or design work? Share your thoughts in the comments below!
