Looking to create a beautiful infrared effect in Photoshop, but you’re not sure how to start? You’ve come to the right place.
In this article, I explain everything you need to know about Photoshop infrared effects, including a simple, step-by-step plan that anyone can use to go from an image like this:

To an image like this:

I also include several infrared photography examples, so you know exactly what to expect!
Let’s dive right in, starting with:
What is a Photoshop infrared effect?
Infrared photography is all about capturing infrared light with a camera – but doing real live infrared photography is cumbersome, not to mention expensive. You need a special camera, special filters, or special film, and the process can be finicky.
However, infrared photography creates a very specific look, which you can replicate in Photoshop. No, you won’t be producing true infrared photos, but you’ll be creating a realistic infrared effect:

As you can see in the image above, the infrared effect looks both very red and very surreal. Why is this? In basic terms, anything that reflects a lot of infrared light will appear red in an infrared image, and photosynthetic organic matter – such as vegetation – reflects a lot of infrared light. So trees, plants, and grass turn red, which is why IR photography is so popular among landscape photographers; it’s a way to capture unique shots of more standard subjects.

How to create an infrared effect in Photoshop: A step-by-step approach
In this section, I show you how to mimic the distinct surrealistic effect of in-camera IR photography. Note that you will need Photoshop (or an equivalent program, like Affinity Photo) to produce the infrared effect. You cannot create a similar look in Lightroom, Luminar, or many other RAW editors (at least as far as I know!).

Step 1: Pick your image and open it in Photoshop
First, you must select an image for the infrared treatment.
Not every image is suitable for an infrared Photoshop conversion. As I mentioned above, photosynthetic organic matter – trees, bushes, grass – all work great for infrared conversions, but other landscape subjects, including mountainscapes and seascapes, tend to produce lackluster results.
Of course, you don’t always need an ultra-powerful IR conversion. Subtler infrared images can look nice, too, so if you like the idea of a more restrained effect, simply pick an image with less greenery. Sometimes, less can be more!
(By the way, if you convert an image and you don’t like the result, or you don’t see much change, that’s okay; you can always find another image and try again!)
Next, open your file in Adobe Photoshop. If Photoshop is already open, you can tap File>Open, then browse for your image.
Step 2: Duplicate your image layer
Once your image is open in Photoshop, you’ll see it as a layer in the Layers palette. Make sure that the image layer is selected, then tap Layer>Duplicate Layer or use the shortcut Ctrl/Cmd + J.
Double-click on the new layer name, and type in Infrared:

Step 3: Invert the new layer
Next, you’ll need to invert the colors of your “Infrared” layer (while the original image – the bottom layer – remains untouched).
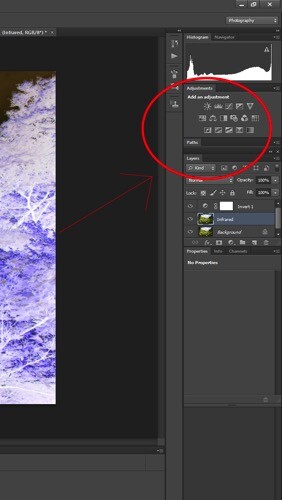
Select the Invert adjustment layer, which should be located in the Adjustments panel:

The layer will instantly invert, creating an image just like a color negative:

Step 4: Use blending modes to adjust the image tones
Next, select the Invert adjustment layer in the Layers palette, then change the blending mode to Color:

This will prevent the Invert adjustment layer from affecting the image tones but will allow the color adjustments to shine through. Your image should now have a nice orange and blue tone:

Step 4: Adjust the colors with the Channel Mixer
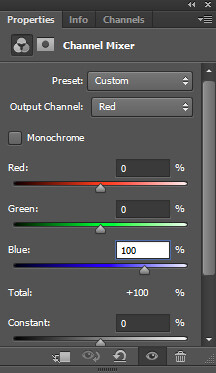
Now it’s time to really dive in and mess with your image colors! Create a Channel Mixer adjustment layer by selecting the Channel Mixer icon from the Adjustments panel. You’ll see a Channel Mixer panel appear:

Set the output channel to Red (see above) and move the Red slider to 0. Move the Blue slider to +100.
Then set the output channel to Blue. Boost the Red slider to +100 and move the Blue slider to 0:

Change the output channel to Green. Here, you probably won’t need to make any changes; just check to be sure the Green slider is set to +100:

The image will now look a lot more natural (though still quite surreal!). Oranges will look bluer, while purples will look redder:

Step 5: Adjust hues and saturation
This step is going to vary depending on the photo you selected, but the overall goal is the same: isolating the pink/red colors and converting them to white/yellow colors.
Create a Hue/Saturation layer, then select the Reds:

Decrease the Saturation slider until the result is almost gray.
Next, adjust the Hue slider, watching the image carefully until you get a hint of yellow. At that point, you can move on to the next step, though feel free to play around with the other channels until you get a result you like. My example image now looks more faded and subtle:

Step 6: Add some finishing touches
You’ve already created an infrared effect in Photoshop, but if you want to refine your image further, then go wild! You might consider adding a vignette, shifting the colors around further with another Hue/Saturation or even a Color Balance layer, or adding a Photo Filter to produce a filmic effect.
You can also use a Curves adjustment to boost image contrast; that’s what I did to get this result:

Then save the image as a JPEG, and you’re done!
Photoshop infrared conversion examples
Now that you know how to create an infrared effect in Photoshop, I’d like to share a few examples of my own conversion efforts.
This next image started out with barely any blue tones, so the final version looked rather monochromatic and subtly yellow:

Inorganic material isn’t often as affected by the IR treatment, so only the grass and plants in this next image took on a surreal hue:

How to create an infrared effect in Photoshop: final words
Well, there you have it:
Simple, step-by-step instructions for a stunning Photoshop infrared effect!
Once you’ve gone through the process a few times, it’ll become pretty fast, and you can have fun testing it out on all of your photos!
So open Photoshop, find a nice shot or two, then do some of that infrared Photoshop wizardry!
Now over to you:
What type of images do you plan to convert in Photoshop? Share your thoughts – and photos! – in the comments below.

