
If you want to capture flattering portraits, then you must master lighting. Fortunately, this is pretty easy, thanks to lighting patterns – that is, simple portrait lighting setups you can consistently use for nice-looking images.
In fact, portrait lighting patterns are great for beginners and advanced shooters alike; as an experienced portrait photographer, I use these patterns all the time in my own work.
Below, I share six useful photography lighting techniques that every portrait artist should know. I also include lighting diagrams, so you know exactly how to replicate the pattern in your own studio.
Are you ready to take your portrait shots to the next level? Let’s get started.
1. Split lighting
Split lighting looks the way it sounds; it splits the face into equal halves, like this:
Because this half-shadow effect is pretty dramatic, especially when the light is hard, it’s often used to create moody shots of musicians and artists.
To achieve split lighting, simply put the light source 90 degrees to the left or right of the subject (you can even move it slightly behind their head). In true split lighting, the only part of the “shadowed” face that should be lit is the eye (as shown in the photo above). Here is the simple split lighting diagram, though note that you can always spruce up a split-lit image with fill lights, rim lights, and background lights:

Also, make sure at least one of your subject’s eyes contains a catchlight (a bright spot of light that reflects from the light source). Otherwise, the eyes will appear lifeless, and the entire shot will likely be ruined.
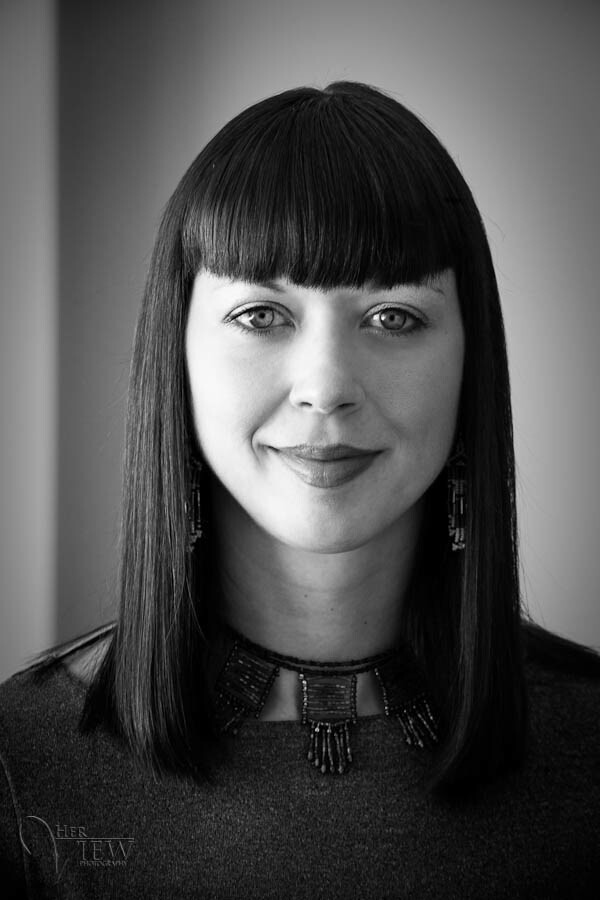
2. Loop lighting
Loop lighting positions a small shadow from the subject’s nose across their cheek. Look at the photo below; see how the nose shadow falls slightly to the right of the nostril?

Loop lighting is probably the most common lighting pattern you’ll encounter in portrait photography. Why? It’s easy to create, plus it flatters most people! That’s why some photographers consider it the absolute best lighting for portraits (especially if you’re a beginner).
Note that, in loop lighting, the shadow of the nose and the shadow on the cheek do not touch. That’s a different lighting pattern, as I discuss in the next section. Instead, keep the shadow small and pointing slightly downward (though don’t put the light source too high; otherwise, you’ll create odd shadows and lose the essential catchlights). Here’s another example, with a soft shadow falling to the right of the viewer:

To create loop lighting, place the light source slightly above eye level and about 30-45 degrees from the camera. The exact angle depends on the person’s face, so feel free to turn on your modeling lamp (if your light has one) or take several shots with the strobe positioned in different places. Over time, you’ll get better at reading people’s faces, and you’ll be able to identify the perfect loop-light position from the get-go.
The diagram below models the lighting conditions for the couple image I’ve shared above:

Note that the black backdrop represents the bank of trees behind the subjects. The sun is coming over the trees, and I’ve placed a white reflector at camera left to bounce light back into the subjects’ faces. In a standard studio setup, you would position a strobe instead of the reflector, though in this situation – with the natural light from the sun – a reflector works just fine!
And remember: Your light should be slightly above the subject’s eye level. Beginners mess this one up a lot by putting the light down low and angled upward. That lights the bottom of your subject’s nose, and the result isn’t so flattering.
3. Rembrandt lighting
Rembrandt lighting gets its name from the 17th-century artist Rembrandt, who used it in his painted portraits. It’s identified by a clear triangle of light on the subject’s cheek, like this:

Note that the shadow of the nose and the cheek do meet, which creates that little triangle; this is different from loop lighting, where the shadows shouldn’t touch. Also note that Rembrandt lighting is more dramatic than loop lighting, so use it for moodier portrait sessions and not for standard family photoshoots.
To create Rembrandt lighting, place the light off to the subject’s side, and ask your subject to turn slightly away from the light. The light should be above their head so that the nose shadow falls down toward the cheek. Here’s a Rembrandt lighting diagram, with a window instead of a strobe (though you can, of course, use any type of light source):

Not every person’s face is ideal for creating Rembrandt lighting. If they have high or prominent cheek bones, it’ll probably work – but if they have a small nose or flat nose bridge, it may be difficult to achieve.
Keep in mind that you don’t always need to create this pattern exactly; as long as your subject is flattered and you get the mood you’re after, then the light is working.
4. Butterfly lighting
Butterfly lighting is named for the butterfly-shaped shadow that is created under the nose, like this:

The result is a very glamorous photo, with shadows under the cheeks and chin, so you’ll often find it in fashion magazines and shots of movie stars. It is also flattering for older subjects as it deemphasizes wrinkles, as well as slim-faced subjects (whereas subjects with round, wide faces look better with loop lighting or split lighting).
Butterfly lighting is super simple to create. Just place the light source directly behind the camera and slightly above eye or head level of the subject:

If the shadow under the nose is too strong, you can place a reflector directly under the chin (your subject can hold it, if need be).
This pattern is tough to create using only window light or a reflector. You’ll often need a hard light source – such as the sun or a flash – to produce the more defined shadow under the nose.
5. Broad lighting
Technically, broad lighting isn’t a portrait lighting pattern; it’s a portrait lighting style, which you can use with loop lighting, Rembrandt lighting, or split lighting. However, it’s a useful lighting setup that’s often grouped with the patterns discussed above, and I definitely recommend you master it.
You get broad lighting when the subject’s face is slightly turned away from the camera, and the side of the face turned toward the camera is illuminated by the light, like this:

This type of lighting makes a person’s face look broader or wider (hence the broad lighting moniker) and works well when photographing subjects with very slim faces. But most people want to look slimmer, not wider, so this type of lighting would not be appropriate for someone who is heavier or round faced.
To create broad lighting, turn the face away from the light source, as shown in the diagram below. Notice how the side of the face nearer to the camera receives light, while the far side of the face remains in shadow.

6. Short lighting
Short lighting is the opposite of broad lighting; the side of the face turned toward the camera is shrouded in shadow, while the side of the face turned away from the camera is brightened.

It’s a useful lighting pattern for darker, moodier, and even low-key portraits. Note that short lighting puts more of the face in shadow, is more sculpting, adds 3D qualities, and is very slimming and flattering for most people.
To create short lighting, ask your subject to turn slightly toward the light source, so that the shadows fall on the side of the face closer to the camera:

Portrait lighting setups: putting it all together
Once you can quickly create each of the different lighting patterns, you can start to learn when to apply them in your portrait sessions. You’ll eventually be able to determine the best portrait lighting simply by studying your subject’s face. And you’ll learn, over time, how different lighting patterns change the mood of the final shot.
Technically, you can create these setups with any type of light: window light, natural light, speedlights, continuous lights, or strobes. But note that it’s much easier to change the lighting pattern if you can move the light source, so it pays to begin with a portable studio light.
(Though if you can’t move the light source, you can always ask your subject to rotate in relation to the light.)
Portrait photography lighting patterns: final words
Now that you’ve finished this article, you’re well equipped to create beautiful portraits. Simply practice the lighting tips I’ve shared, learn to quickly form each lighting setup, and you’ll be good to go!
Now over to you:
Which of these lighting patterns is your favorite? Which style do you plan to use in your next photoshoot? Share your thoughts in the comments below!
Table of contents
Portrait Photography
- GENERAL
- PREPARATION
- SETTINGS
- LIGHTING
- 6 Portrait Lighting Patterns Every Photographer Should Know
- POSING
- COMPOSITION
- GEAR
- ADVANCED GUIDES
- CREATIVE TECHNIQUES
- POST-PROCESSING
- BUSINESS
- INSPIRATION
- RESOURCES


Some Older Comments