 If you’re looking to create a shallow depth of field in post production today food blogger Danny Jauregui from Food Bloggers Unite! shares some tips on how to create this effect.
Food photography is currently dominated by rich images of mouth-watering food within blurry and atmospheric backgrounds. Shallow depth of field is all the rage, and in this tutorial I will show you how to re-create this effect using PhotoShop filters and masks. This technique is especially applicable to food photographers but is equally beneficial to portrait and still life photographers wanting to shift attention away from distracting backgrounds.
Why Use This Technique?
Below are a few reasons to try this technique:
- You want to soften a busy and distracting background of a portrait
- A food photograph lacks spatial depth
- The photograph is missing visual emphasis
- You want to add atmospheric mood to a photograph
Sometimes when shooting with small F-Stop numbers the inherit shallow depth of field isn’t enough to give you the desired effect, and that is when this technique can be a life saver!
Creating Depth Of Field With Filters and Masks Tutorial
In the tutorial below, I use this technique to blur out the foreground and background of the image, leaving only the macaroons in the center in perfect sharpness. The photograph needed spatial depth since I wanted to create the illusion that the row of macaroons continued forever.
Step #1 – Duplicate Layer
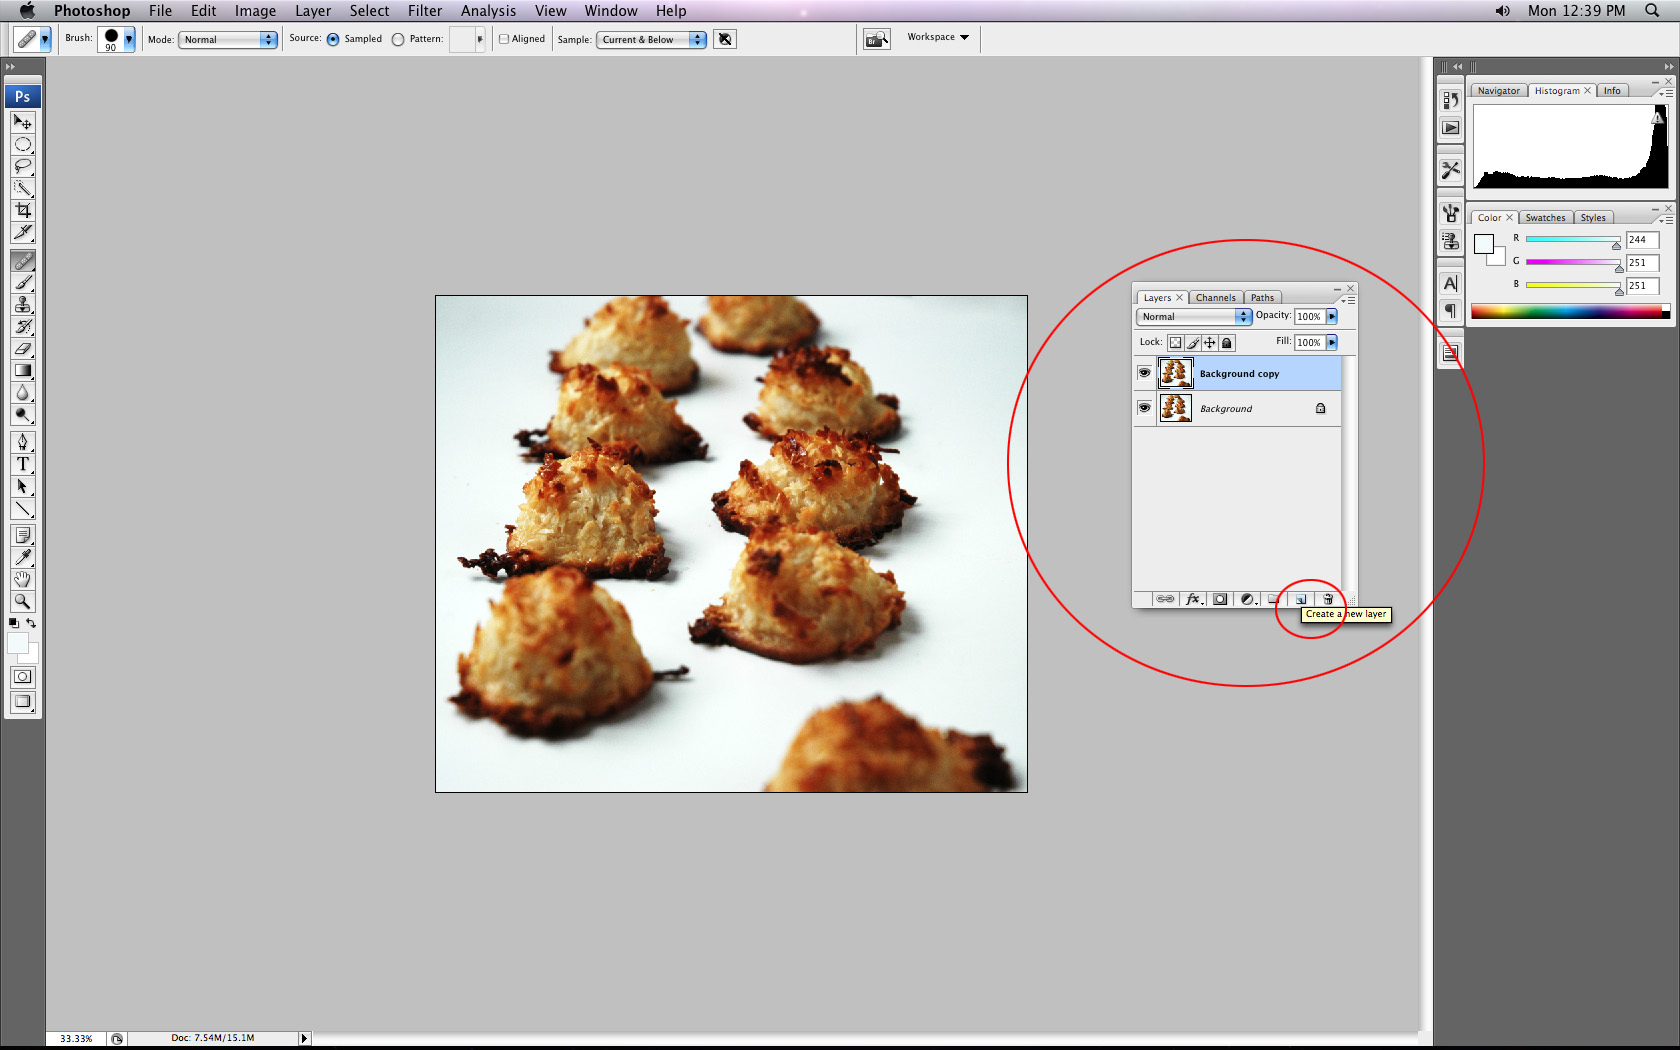
Open your image in Photoshop and duplicate the background layer. You can do this by going to Layer > Duplicate Layer in the top menu. You can also click and drag the Background Layer into the “New Layer” icon at the bottom of you Layers Palette.
Step #2 – Blur Duplicated Layer Using Lens Blur Filter
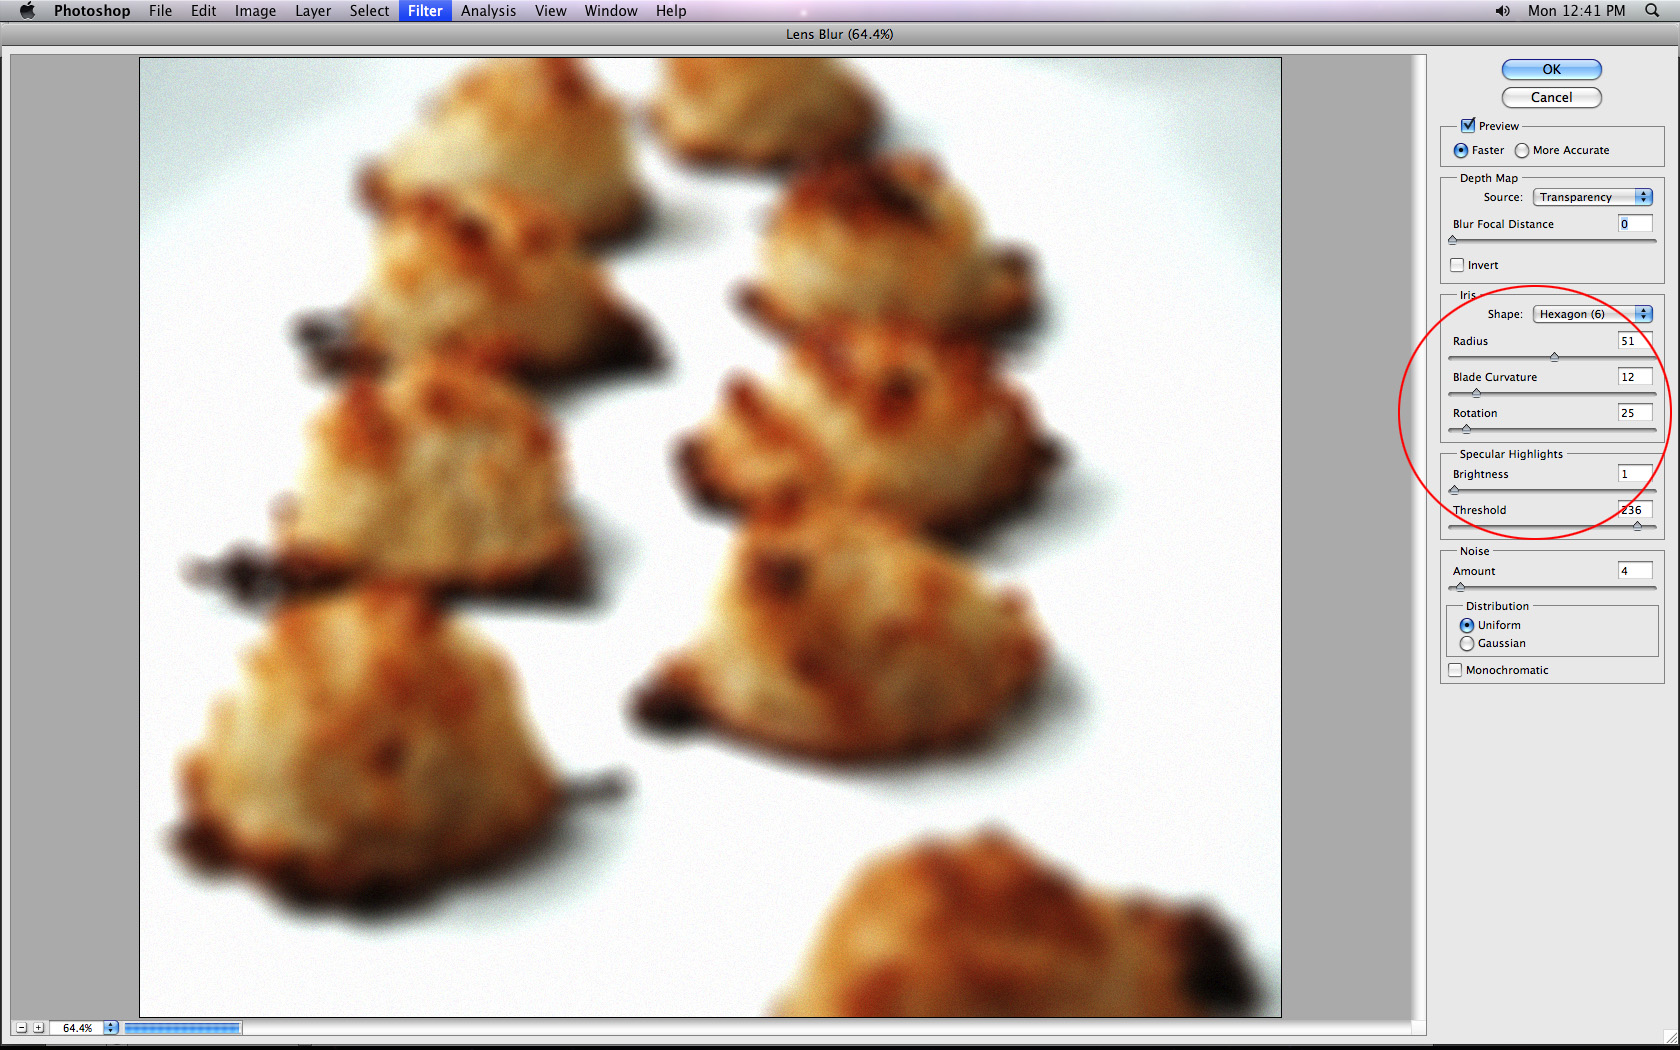
Making sure that the duplicated layer is highlighted in the layers palette, go to Blur > Lens Blur. This will open up a new filter window. This filter dialogue box has many variables. The source should be set to “none”. Here are other important variables:
Radius: Controls the amount of blur
Brightness: Controls the brightness of the highlights
Threshold: Controls how much of the image turns into highlights
Noise: Adds texture and film grain to the image
Depending on what affect you are after, try different amounts of blur, highlights and noise. The greater amount of blur you add, the more dramatic your image will become. Once you are happy with the results, hit ok. Your entire image will now be blurred. The blurred layer should be on top of your original sharp layer.
Step #3 – Apply Layer Mask To Blurred Layer
Make sure the blurred layer is highlighted in the layers palette. Next, add a layer mask to the blurred layer by clicking the “Add Layer Mask” button at the bottom of the layer palette. Layer masks work by using the color white to reveal the active layer and the color black to hide the active layer.
For this technique we want to hide certain parts of the blurred layer so that the sharp image below is made visible. We will do this by using the paintbrush tool.
Step #4 – Add Black To Layer Mask
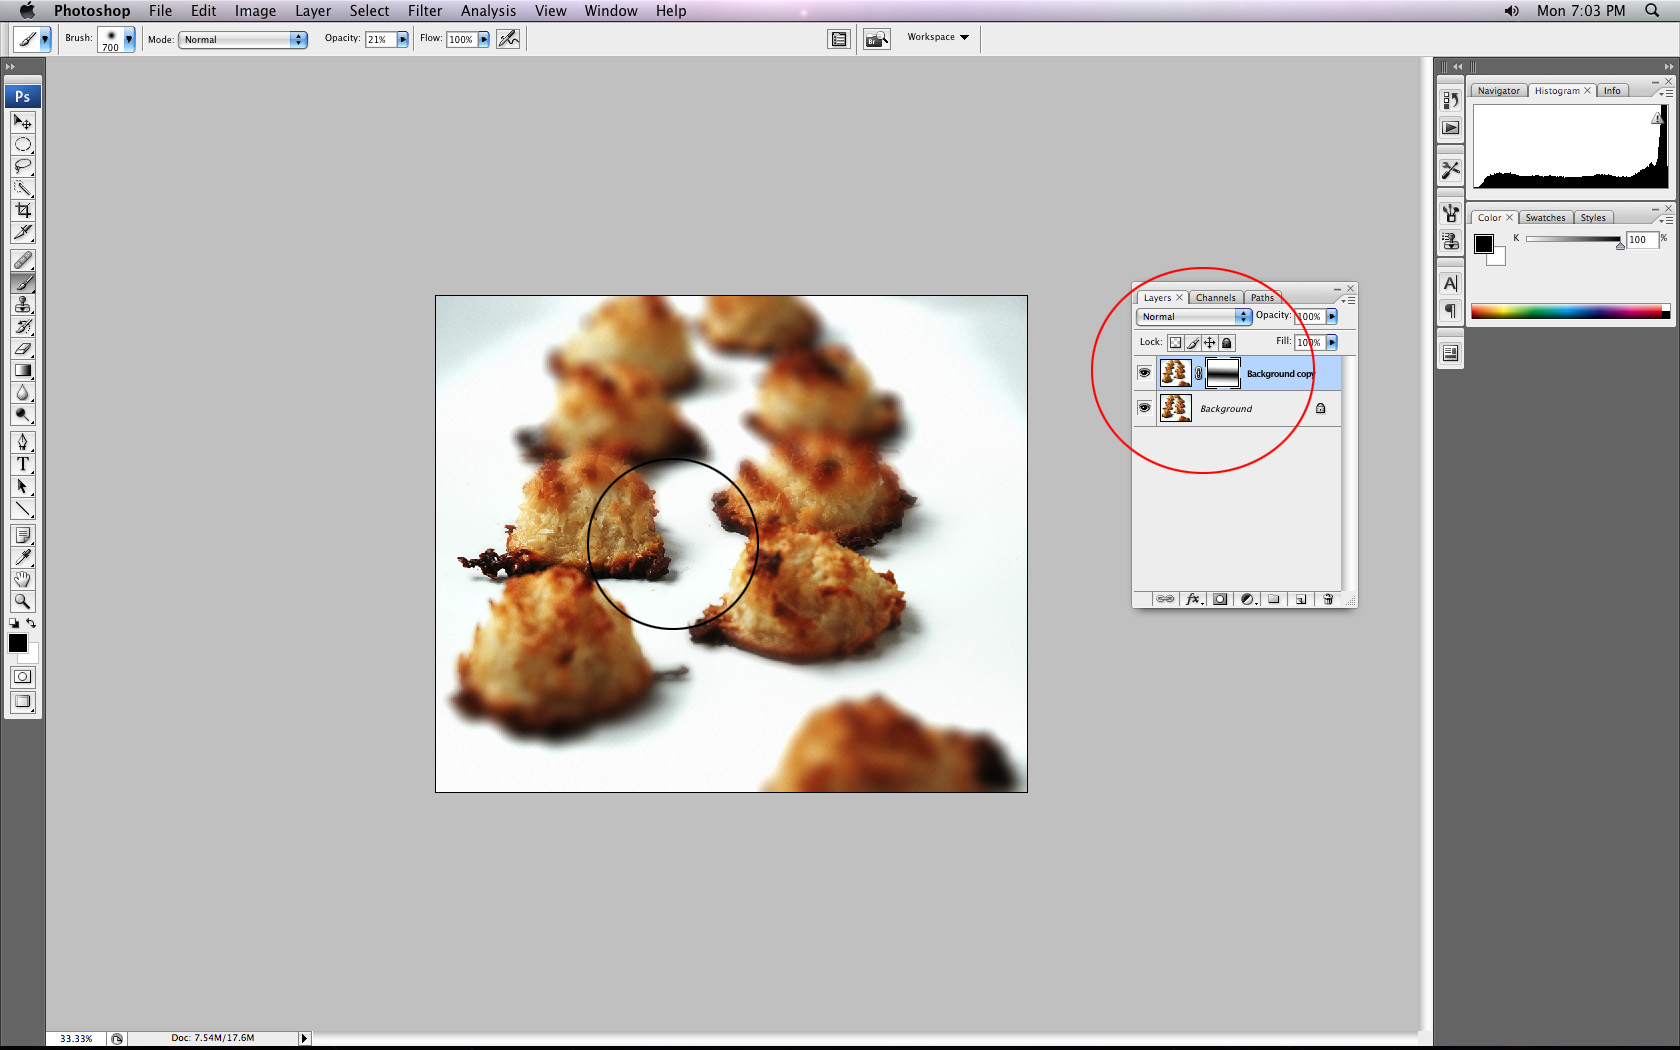
Select a large, soft paintbrush from the toolbar. The brush should be large enough to cover the area you intend to keep sharp. In the macaroon photograph for instance, I chose a brush size that was equal to the size of the macaroons in the center. Next select black as the foreground color in the color palette and change the opacity of the brush to 30% in the options menu near the top.
Before painting with the brush, choose which area will be in focus and which will be out of focus. In the macaroon photograph, I wanted only the macaroons in the center to be sharp, so making sure the layer mask thumbnail was selected, I painted from left to right in the center of the image, creating a thick horizontal band of black.
The area in the blurred layer that was painted black allowed the sharp layer from underneath to be shown….and voila! Shallow depth of field!
Step #5 – Finishing Touches
You might need to use a smaller brush to properly delineate edges that have not been fully hidden. These edges, if not properly hidden, can result in a ghost like edge. Once all of the painting is complete, select and highlight the sharp layer below and apply a small Unsharp mask, thereby sharpening the bottom layer and intensifying the effect. Once you are happy with the results, flatten the layers and you are done!

Danny Jauregui is Los Angeles based food blogger. His new blog, Food Bloggers Unite! is a one-stop resource for beginning food bloggers. His recipes and food photographs can be seen at www.overthehillandonaroll.com


Some Older Comments