Often times when looking at an image, people will ask “Was that Photoshopped?” or “Did that scene REALLY look that way?” They say this as if the camera, left to its own devices, is going to display an unedited, “truthful” image. The truth is, that any image coming out of one of today’s digital cameras has been manipulated. The only question is how.
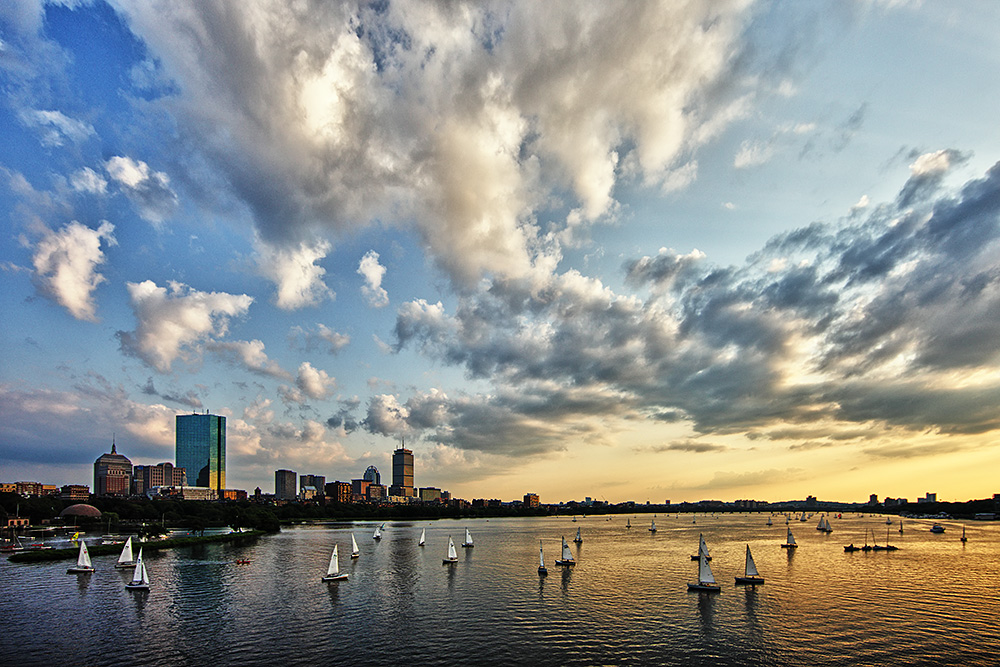
Boston Skyline shot from Longfellow Bridge. This was a difficult exposure due to the darker foreground and bright sky. Processing in a RAW development application gave me the flexibility to get the image in line with what I was seeing.
I’m not talking about cases where things have been moved, or added to an image after capture. While that certainly has a place, that becomes more the realm of a graphic designer or illustrator. The manipulation I’m discussing refers to color, contrast, saturation, and white balance. Photoshop, and other image editing tools certainly make the adjusting of those things much simpler than in the past, when a darkroom, chemicals, and paper was required, but they don’t change the fact that it all starts in-camera. Photography starts with the push of the shutter button. It doesn’t end there, and it never has.
First of all, understand that all digital images are manipulated in some way. Just because one takes the JPEG files straight from the camera, and never even opens a photo editing program, does not mean that image has been manipulated. Digital imaging sensors record only the brightness data for each pixel. The color is interpreted either in-camera in the camera’s image processor, or using RAW processing software such as Adobe Camera Raw. A Bayer filter, composed of a repeating pattern of two green light filters, one red
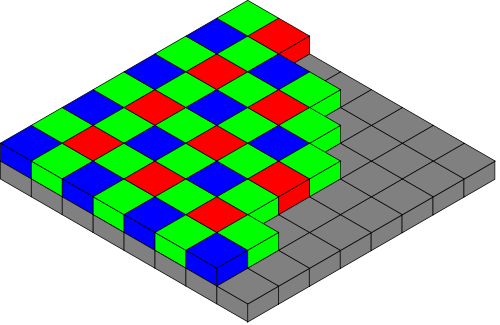
The typical bayer filter lays over the imaging sensor to allow the camera to determine the color of each pixel. The camera then "debayers" the image in its image processor.
light filter, and one blue light filter, overlays the imaging sensor. Through the image processor, the colors each pixel represents is determined through this filter. Color intensity values not captured by the pixel are guessed, or interpolated, by the image processor using the color values of neighboring pixels. For JPEG files, this information is baked into the file. RAW files store this color information separate from the brightness data, making it available for manipulation in RAW processing software.
So before you even remove the memory card from the camera, if you’ve shot JPEG files, the camera’s image processor has decided what color each pixel is. In addition, it’s finalized settings for contrast, white balance, saturation, and sharpness for the image, using the camera’s built-in image styles such as Standard, Portrait, Landscape, Neutral or others. While the user may not have used an image editing program, the image was still edited according to the camera settings.
If you shoot RAW files, you’ve left yourself some room to play, because those settings are able to be adjusted. The image will display in the software based on the camera’s settings at the time of exposure, but settings such as White Balance, Contrast, Saturation, and Sharpness are all adjustable via the RAW processing software.

The dark foreground and brighter sky again proved difficult, but by manipulating the image in Adobe Camera RAW, I was able to achieve a result that pleased me.
None of this is really any different than traditional film photography. The major difference is the point at which certain decisions are made. With film, many decisions must be made prior to shooting. The choice to shoot black and white or color, the choice to shoot with a vivid color film such as Fuji Velvia, or something more natural such as Kodachrome 64, all had to be decided before focusing the lens. Now these choices can come after. In addition, things such as contrast and saturation could also be manipulated using masks, dodging and burning, and even by choosing different types paper.
Want an example? One of the best examples is one of the most famous photographs in the world- Ansel Adams’ “Moonrise, Hernandez, NM”. The negative was not an easy one to print, and Adams pulled out all the stops in working with it to achieve the finished masterpiece. His discussion of the process, as well as his finished print, and the contact print, can be found HERE. It’s quite easy to see how much work actually went into the final print when comparing the contact print with the finished version.

By adjusting the white balance in Adobe Camera RAW, I was able to warm up the sun to give it the soft golden glow it had when I was shooting
The bottom line is that the creative process in photography does not end when the shutter button is depressed, and a knowledge of the process can only enhance your images. All images go through some form of processing. It’s just a question of whether you make the decisions yourself, or you allow the camera to choose for you. I’m a huge advocate for shooting RAW files and allowing yourself the choices the RAW format requires. It’s much like working with a negative in the darkroom. The skill needed in Photoshop is no less than the skill required in the darkroom, it’s just different.
So the answer to “Was that Photoshopped?” is up to each individual photographer to choose how to answer. Mostly, the answer will be “Yes, to some extent” for all images. Ultimately, let your creativity drive you. Unless you are a photojournalist, where realism is key, the only limits are your creativity, your skill with the camera, and your skill in the digital darkroom.


Some Older Comments