
This article was updated in February 2024 with contributions from Jeb Buchman, Natalia Robert, and Lily Sawyer.
Interior architectural photography is a sought-after skill; you can use it to create eye-catching real-estate shots, images of businesses, breathtaking shots of cathedrals, and even historical documentary photos. But shooting interiors isn’t exactly a walk in the park. It comes with plenty of challenges, including cramped spaces, low light, and difficult camera techniques.
Fortunately, I’ve spent years honing my interior architectural shooting skills, and in this article, I share my top tips to ensure success. I discuss:
- The best focal lengths for interior architecture
- The equipment item that you absolutely must own
- Easy ways to improve your compositions
- Simple editing steps for refined results
- Much more!
So if you’re ready to level up your interior shots, then let’s dive right in.
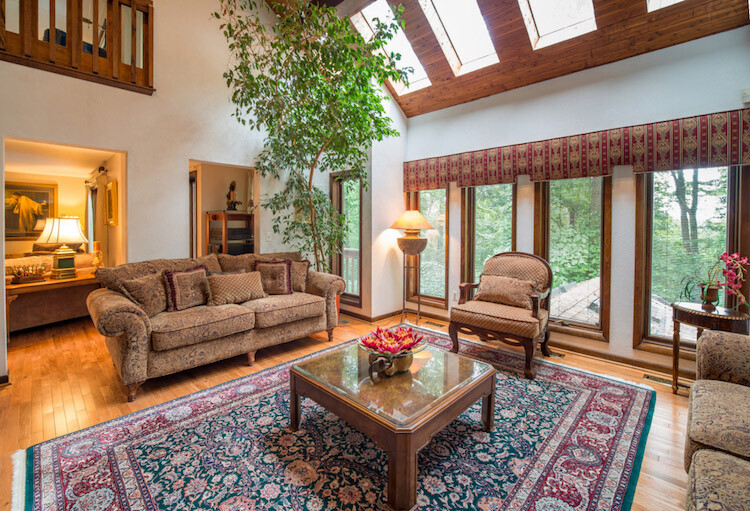
1. If possible, prepare the space
If you’re photographing the interior of a house or a business, I highly recommend you set the stage by taking the time to de-clutter and open up the space. Clear all flat surfaces and floor areas. Open all blinds and curtains. Clean any dirty dishes in the sink and put them away. Be sure to clean the space much more so than you would for yourself. We get used to clutter and become blind to it, but a bit of clutter in a photo will be instantly obvious.
Once you’re done, the space should feel inviting, like the kind of place you can imagine yourself living or working. But if you’ve finished cleaning and you’re still not impressed, you can create those feelings in your photos by adding personal touches.

If there’s a dinner table, set it for two and place a vase of fresh flowers in the center. Transform an empty breakfast nook into a great spot to lounge by adding a newspaper, coffee cup, and a plate or bowl of light (and pretty) snacks. Hang a fluffy bathrobe on a hook next to the bathtub.
If there’s a desk, consider adding a work laptop and a book (or three). When it comes to decorations or color palettes, you want to either fill the space with personality to play up its uniqueness or keep everything neutral with pops of bright color.
2. Always use a tripod

Whenever you shoot architectural interiors, you absolutely must use a tripod. This is for a few main reasons:
First, a tripod will stabilize your camera/lens setup, which dramatically reduces the possibility of camera shake. Since interior shots tend to be taken at narrow apertures and slow shutter speeds, keeping your camera on rock-solid support is essential.
Second, if you use a tripod, it’s much easier to make sure your camera is level. (While I discuss the importance of a level camera later on in this article, it’s a fundamental part of pretty much all architectural photography.)

Additionally, there’s no good reason not to use a tripod when photographing interiors. Sure, if you were tracking subjects or needing to constantly change your position on the fly, a tripod would be a hindrance. But architectural photography is slow and deliberate; since your subject matter is buildings, you can always count on it to sit nice and still while you set up your camera, dial in various settings, and fine-tune your composition.
Note that interior photoshoots tend to involve very little wind, rushing water, or rain, so you can often get away with using a cheaper tripod (though there are also reasons to invest in a good sturdy model, including gear safety, so make sure you choose your model very carefully!).
3. Start with natural light
One of the advantages of architectural photography, especially interior architectural photography, is that nothing moves. You can leverage this by playing with your settings, especially the shutter speed.
With the camera rested on a tripod, you can dial in very slow shutter speeds to capture all the ambient light, even in very dark corners. If some lamps and lights add to the overall ambiance of the room, include them and take advantage of slow shutter speeds and long exposures.
It is important to remember that for interiors, you should aim for balanced lighting; in other words, there should be no overly dark shadows or overly bright highlights. You want to see the detail in dark areas but not blow out the light areas altogether. And think about which times of the day best feature the interior space. Early morning and late afternoon light are very soft, though overcast days also produce soft light.
On the other hand, bright super sunny days produce harsher light, especially around midday. Therefore you may want to take into consideration shadows produced in the interior from harsh outside light. If you’re creating fine-art images, you can use these shadows as artistic elements, but if you’re doing commercial photography, this may not be appropriate.
4. Whenever possible, use a flash
In the previous tip, I emphasized the value of natural light. But while you should aim to get as much natural lighting is possible, if you shoot a room without a flash, you’ll typically get shadows scattered around the room (caused by artificial lighting positioned along walls and at various places across the ceiling). This often doesn’t look great and can be difficult to handle from an exposure perspective, so I encourage you to use a bit of flash. You only need one or two speedlights or strobes, and they’ll help balance the exposure across the entire frame.
Here’s what I recommend:
Make sure your flashes are mounted on separate tripods or stands (they shouldn’t be on your camera!), and place them a few feet off to the side and a foot or so behind your camera. (If you’re using two flashes, make sure they’re on opposite sides.) Aim the flashes so they point toward the ceiling and slightly away from the room you’re shooting.
Set the flashes manually at half power (a stop below full power) and fire away. Given the angle, the light from the flashes will illuminate the room indirectly (i.e., bouncing off the ceilings and walls), and you’ll get a soft, even fill light for the room you’re shooting.
I always encourage you to review the resulting image on your camera’s LCD and make changes accordingly. Watch for strange shadows, too-bright walls, dark corners, and reflections from the flash in windows and other glass objects.
5. When shooting whole rooms, don’t go too wide
When I first started taking architectural interior shots, I used the widest-angle lens I could get my hands on. I thought that with an ultra-wide lens, I could get more of the room in the frame – but while I was technically correct, more isn’t always better. I soon noticed a high level of distortion toward the edges of the frame, especially in smaller rooms, and I determined that ultra-wide focal lengths (i.e., 14mm) make the sides of the frame look oddly stretched and off the horizontal plane, even when corrected in post-production.

So I experimented with different focal lengths and found that an effective focal length between 21mm and 28mm gives you a very nice balance; at 25mm, you get limited distortion and a wide-enough frame to capture the character and presence of the scene.
One option is to grab a 24mm prime, which can be very cost-effective when you’re just starting out (most manufacturers offer a high-quality 24mm lens for cheap). Alternatively, you might invest in a 24-70mm zoom – yes, it will cost a lot more, but it’ll offer extra flexibility and even allow you to capture some nice detail shots in the 50-70mm range. If you do prefer a wider perspective, you could look into a 16-35mm zoom instead.
By the way, if you’re in a situation where 21mm won’t capture enough of the scene, a panorama is always an option. Speaking of which:
6. Try panoramas for ultra-wide shots
Panoramas are a great way to capture an entire room, especially if you’re using a longer lens or you’re dealing with a cramped interior. But how can you create one?
Start by setting up your camera vertically on the tripod. Many photographers think it’s best to do panoramas horizontally, but the vertical orientation will give you a taller image.
Then do your best to pivot your camera while taking a series of images. Determine your start and end point in advance, and make sure that you have plenty of overlap between compositions. Using a tripod is essential, and it’s important that you rotate your camera on a perfectly level horizontal plane – with the pivot point being roughly where the lens meets the camera). Note that, if the pivot point is too far forward (i.e., somewhere on the lens) or too far backward (i.e., on the body of the camera), the panorama will appear distorted.
For the picture below, the pivot point was on the body of the camera, which is behind the ideal spot. As a result, the shot has a weird sort of convex distortion:

7. Whenever possible, try to shoot only one or two walls
Beginner interior architectural photographers sometimes try to squeeze too much into the frame by including three or even four walls – but when you use this approach, the shot will often appear rather awkward-looking (if you aren’t extremely careful with the composition, that is).
Instead, go for a one- or two-wall shot, which will give the viewer the most geometrically pleasant image to view:

The shot displayed above is a generic two-wall scene with the walls meeting at a standard 90-degree angle. Looks nice, right? Well, I also took a second shot, where I backed up several feet to deliberately include the third wall on the left edge of the frame:

I don’t know about you, but to me, the third wall makes the photo look compositionally awkward and disorienting. I much prefer the two-wall version, and I recommend you pay careful attention to the number of walls you incorporate into your photos.
That said, including three walls in a shot is sometimes okay, provided that everything is geometrically aligned:

8. Strike a balance
When composing your shot, focus the viewer’s attention on where you want it to go. If you can, consider using staged items to add depth and interest in the foreground. Avoid flat-looking photos by contrasting different elements in the foreground, midground, and background. Remember to aim for balance, not distraction.
Using the background to show a connecting room is also a great way to give the viewer a sense of space. This will add interest and make the viewer feel like they can visualize walking through the building.

9. Make sure your camera is perfectly level
When shooting any form of architecture, and especially interiors, this is a big deal:
You should work as hard as possible to ensure your camera isn’t tilted up, down, left, or right when shooting. Even the slightest tilt will require post-production cleanup, and you’ll lose pixels in the process.
Here’s an example of what I’m talking about:

See how slanted the windows are? They lean outward, which is a sign of perspective distortion. Clearly, this is not an accurate depiction of the room; instead, it’s the result of the camera being tilted ever-so-slightly downward.
But once we get the camera nice and level, here’s the result:

As you can see, keeping your camera level makes a huge difference. Happily, there are a couple of ways to help you get your camera perfectly straight when you compose your photos. Most cameras have a built-in level (with the built-in level activated, when you look into the viewfinder, you’ll see lines across the focusing screen that tilt when the camera tilts). If you’re not sure whether your camera has this option, take a peek at the manual or do a bit of Googling.
You can also use a bubble level that slides onto the camera’s hot shoe. (When the little bubble is centered, it means your camera is level.) You can buy one of these levels at just about any photography store for just a few bucks, and it’s my preferred solution because it tends to be more accurate than built-in camera levels).

10. Get the white balance right
This is tricky and the nemesis of many photographers. Most non-photographers are oblivious to white balance. (This is especially obvious in wedding photos where the bride’s dress looks blue and people’s faces register as magenta, yet hardly anyone notices!)
When I sold my house a few years back, the real estate agents who boasted of great property photography sent a photographer to my house to take some professional pictures. She arrived with a camera on the tripod and a flash head pointed slightly upward. The lens used was very wide – I’d guess around 10mm or 14mm. When the photos were uploaded, I was dismayed to find that the images were all very blue. My home felt so cold, and one of the reasons for that was the incorrect white balance.
Personally, I prefer to add a warm feel to all my photos, so I tend to add that during editing. You can go for a neutral look – and it can help to use a gray card when on site – or you can emphasize warmth, but if you try the latter approach, do be careful that the whites still look white and not yellow or cream.
Bottom line: Always remember that what often draws people to an image is a feeling or emotion. Your image becomes all the more powerful if it reminds the viewer of a sentiment, experience, or something that resonates with them. White balance is key in helping achieve this kind of engagement with your viewer.
11. Carefully edit your interior images
Without editing your architectural photos, the results will be lackluster. Therefore, I encourage you to edit each and every image that you plan to share!
Start by importing your photos to your favorite editing program and follow these basic editing steps to create more refined results. (Note that I reference Lightroom Classic, but you can achieve the same effects in pretty much any editor.)
Straighten out the lines
Doing this will instantly polish up your photos. If you shot at a height of roughly five feet from the floor and kept the camera level, the amount of straightening you have to correct should be minimal. In Lightroom, you can find straightening options in the Lens Corrections panel.
Fill in and even out the light
Before making any adjustments to the brightness or exposure, be sure to correct any lens vignetting. (This is when the corners of the image are a bit darker and is especially common with wide-angle lenses.) Lightroom offers lens profiles that will automatically take into account your lens’s optics and make automatic corrections; just make sure that Enable Profile Corrections is checked in the Lens Corrections panel.
And if you don’t like Lightroom’s automatic adjustments, you can always head into the Manual tab and use the sliders to achieve the effect you envisioned.
Once your corners are corrected, use a Brush to correct the exposure in bright or dark areas. This is your time to dodge and burn. I find that erring on the side of overexposure lends a more natural feel to the space. I recommend pushing the overall exposure up slowly, and when it feels too bright, start pulling back.
You can also lighten dark areas slightly with the Shadows slider in the Basic panel. However, be careful not to lighten the shadows so much that you bring out grain (noise) or that the image looks fake.
Perform color corrections
Adjust the overall color temperature as needed. If you like a warmer effect, as I do, aim for warmth, not obvious yellow.
Also, bump up the Vibrance slider a bit instead of messing with the Saturation slider. Added Saturation can quickly make a photo look too fake, while Vibrance is a more subtle tool that helps give the color a little extra kick. Again, play with the sliders on these settings; seeing what your eye is comfortable with will go a long way toward honing your color-correcting skills.

Adjust the clarity and sharpness
Boost the Clarity slider, but do it slowly. Clarity is a great way to polish up a photo without going overboard on contrast, plus it gives the photo an overall crisp look. Depending on the image, you may want to simultaneously play with decreasing the Blacks slider a bit, too.
You may also want to add a bit of sharpening (in the Details panel). Be careful not to push the Amount slider too far, however; you want an image that looks detailed, not an image that’s full of unpleasant haloing.
Clean up the scene with cloning and healing
Use your editing program’s healing tools to remove any dust spots or other anomalies that may have gotten onto the photo.
Lightroom offers a few options: Clone, Heal, and Content-Aware REmove. Healing is a great option when correcting small spots, as it will have a softer blend to it, but I like to use the Clone tool to remove any glares or reflections. You can also use it to remove address numbers if needed.
By the way, while I typically use Lightroom for editing photos, my personal preference for cloning is Photoshop’s Stamp tool. It seems to allow for more control over the brush itself, therefore making it easier to clone in a way that looks natural.
Interior architectural photography tips: final words
Shooting interiors often comes with difficulties, and getting good at interior photography isn’t always easy.
However, with the tips I shared above plus some practice, you’ll be capturing stunning photos in no time at all! Just remember that you should never rush your images. One of the great things about architectural photography is that your subject will never move, so you have time to really slow down and deliberately refine each shot.
Now over to you:
Which tips do you plan to use first? Do you have any additional advice for capturing stunning interior images? Share your thoughts in the comments below!
Table of contents
Architectural Photography
- GENERAL
- 6 Helpful Tips for Doing Interior Architecture Photography
- 1. If possible, prepare the space
- 2. Always use a tripod
- 3. Start with natural light
- 4. Whenever possible, use a flash
- 5. When shooting whole rooms, don’t go too wide
- 6. Try panoramas for ultra-wide shots
- 7. Whenever possible, try to shoot only one or two walls
- 8. Strike a balance
- 9. Make sure your camera is perfectly level
- 10. Get the white balance right
- 11. Carefully edit your interior images
- Straighten out the lines
- Fill in and even out the light
- Perform color corrections
- Adjust the clarity and sharpness
- Clean up the scene with cloning and healing
- Interior architectural photography tips: final words
- PREPARATION
- SETTINGS
- LIGHTING
- COMPOSITION
- GEAR
- ADVANCED GUIDES
- CREATIVE TECHNIQUES
- POST-PROCESSING
- INSPIRATION

