
Are you a minimalist in terms of your photography? Do you crave simple composition and clean lines in your images? There are many wonderful articles on minimalist photography and simple imagery. In fact Valerie Jardin has a fantastic article on Minimalist Photography – 4 Tips To Keep It Simple right here on Digital Photography School.
This article encourages you to take that approach a step further into post-processing to achieve a clean, timeless look to your imagery. A clean, crisp image always stands the test of time. You don’t have to look very far, just dig into your own image archives from prior years and see which images appeal to you the most.
As a photographer, your greatest achievement is when you are able to capture images exactly as you envision them or see them with your mind’s eye. When you import your images to your computer and the SOOC (Straight Out Of Camera) image simply takes your breath away, you know you’ve got what it takes. While all of us aim for that exact moment of shining glory, sometimes we need to add just a little bit of oomph to the image, simple adjustments that take the image from great to awesome.
Here are some post-processing tips on achieving a great look using simple adjustments. These are all done in Lightroom 5 – a great processing tool for you – using only the Basic and Lens Corrections Panels. The Basic Panel in LR contains adjustment sliders like: Temperature and Tint which adjust White Balance, Exposure and Contrast, Highlights, Shadows, Whites and Blacks which adjust Tone and Clarity, and Vibration and Saturation which adjust Presence. The Lens Correction Panel in LR primarily contains profile corrections for various Lenses.

Another point to note is: Use RAW format for your images if your camera has the ability to record images in that format. This type of file format has a lot more leeway in terms of post-processing adjustments. There are several articles in the Digital Photography School’s archives that discuss RAW file formats in great detail.
Post-Processing Steps for Minimalist
1) Enable the Lens Correction
Certain lenses, particularly wide angles, introduce some distortion in the images, especially around the edges of the frame. This is generally more obvious in images that either have horizontal lines, curved lines or the horizon in the frame. Lens Correction can be done in the Profile tab where you can Enable Profile Corrections. Selecting that box, should bring up the profile of the lens used for that particular image. With each new version of LR (we are currently in LR 5.6) more and more lens profiles are being added to the software.
Note: if you cannot find your lens you can try looking on the manufacturers site or use one that is similar.
In the Profile mode, LR automatically detects the lens used and corrects the distortion. Finer adjustments can be done using the sliders under the Lens Profile. You may have to drop down the list and find your particular lens. Enabling Profile Corrections first eliminates the distortion and sometimes brightens the images just a tad – which might be just what the image needs. For more control, switch to the Manual tab for individual profile correction adjustments.

The left image is SOOC; the right has Lens Correction adjustments done (notice the wood panel in the top of the image)
2) The Basic Adjustment Panel is your BFF (best friend forever)
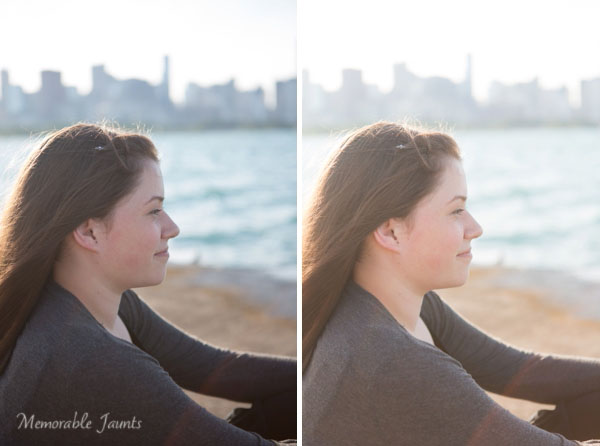
80% of all minimalistic adjustments happen in the Basic Panel. White Balance (Temperature and Tint) are the most commonly used sliders. Most adjustments are quite minimal. A few stops up or down generally gives you exactly what you are looking for. Take note that small adjustments are very subtle. If your photograph has people, be cognizant of skin tones and colors as they can vary a lot among people and hence the WB slider numbers will also vary. Other variables that affect white balance are; the type of light (artificial versus natural) as well as the time of day (morning, high noon, or dusk). If your camera has the ability to do custom adjust white balance in camera, you can use that to further reduce this adjustment step. Photographing in Auto White Balance versus Custom White Balance is a personal choice.

The left image is SOOC; the right has Lens Correction and White Balance (Temp/Tint) adjusted.
3) Exposure and Contrast go hand-in-hand
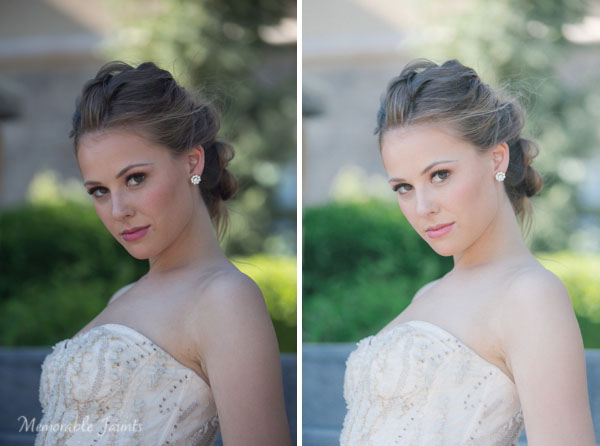
The easies way to explain exposure is its ability to brighten or darken an image. Moving it to the right (+) adds brightness to the overall image and moving it to the left (-) reduces brightness. Often times when adjusting exposure more than half or one full stop (i.e. adding more brightness) the overall contrast of the image is affected. The Contrast slider adds more definition between the darks and the lights in the image. Play with the contrast sliders (Contrast and Clarity); they provide an additional pop to the colors in the image that are generally blown out when exposure is drastically increased.

The left image is SOOC; the right has Lens Correction and White Balance (Temp/Tint) adjusted.

The left image is SOOC; the right has Lens Correction, White Balance, and Contrast adjusted.

The left image is SOOC; the right has Lens Correction, White Balance (Temp/Tint), Exposure, and Contrast adjusted.
In most cases, minimalistic editing is done at this point. Highlights/Shadows/Whites and Blacks can be adjusted to taste depending on the image. With Portraits, you can also adjust the Clarity slider a bit just to smooth out the skin. For more information on Clarity Slider check out Peter West Carey’s article Lightroom’s Clarity Slider – What Does it Do? in the dPS archives. The easiest thing to remember about the Clarity slider is that it adjusts the edge contrast in only the mid-tones of the image. Go easy with this slider because a little does go a long way and too much clarity, particularly on skin, can provide a very plastic looking skin.
The left image is SOOC; the right has Lens Correction, White Balance (Temp/Tint), Exposure, Contrast, Clarity and Highlights adjusted.
The left image is SOOC; the right has Lens Correction, White Balance (Temp/Tint), Exposure, Contrast, Clarity and Highlights adjusted.
As always, the amount of post-processing you do to an image is a personal choice, including the minimalistic option; but it definitely provides for a faster workflow – less than a few minutes per image. In most cases of minimalistic post-processing the adjustments are very subtle. Less time in front of the computer equals more time spent perfecting the art of photography to get those nearly perfect images right out of the camera.

