Photoshop, Lightroom and Photoshop Elements: How do you Vignette?
Adding a vignette to an image involves adding a subtle (or not so subtle) edge effect to it. A popular vignette technique involves darkening the edges of your image – it gives the image a slight border which helps keep the viewer’s eye in the photo. This is an effect which has been popular for years and which was is a feature of some classic film cameras such as the Holga (click to enlarge image below).
Nowadays many photographers and digital artists use vignettes as a way to finish their images. There are lots of ways to add a vignette to an image and here are some of them. I’ve included methods that work with Lightroom, Photoshop and Photoshop Elements. The latter process will work with most photo editing programs.
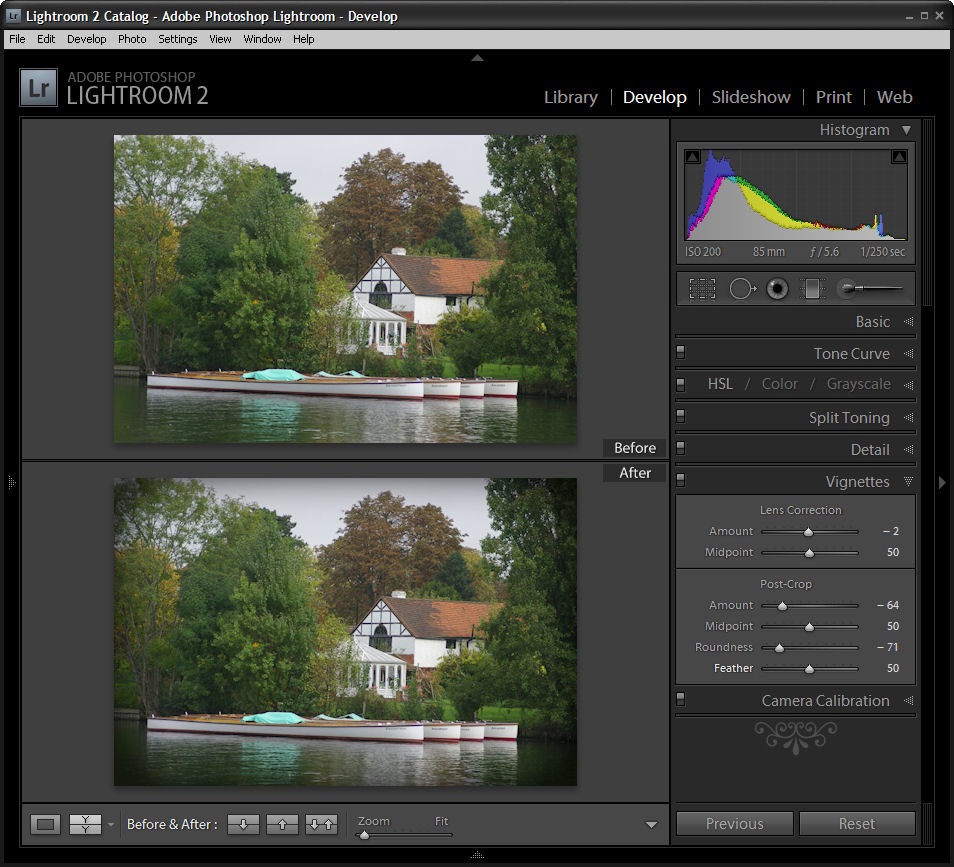
Lightroom 2
To add a vignette in Lightroom, move to the Develop module and choose the Vignette options. Set the Post Crop Amount value in a negative value to darken the edges. Set the Roundness to a low value such as -70 to get a rectangular vignette and set the Feather to around 50 so it is soft but not too soft.
Photoshop #1
A simple way to add a vignette in Photoshop is to use the Lens Correction filter. Choose Filter > Distort > Lens Correction and adjust the Vignette amount to the Left to a negative value and the Midpoint to the left to bring the vignette into the image more.
Photoshop #2
Another way to add a vignette in Photoshop is to use a Layer style. This has some benefits and one is that the method works on just about any size image and it’s simple to do once you have the Style created.
Make the background layer a regular layer by double clicking it and click Ok. Select the Add Layer Style icon at the foot of the Layer palette and choose Inner Glow. Set the Color to Black, set the blend mode to Darken or Multiply and adjust the Size so you can see the edge. You can save this as a style preset and you can then record the process of adding the style to the layer as an action so that you have a one click vignette solution.
Almost any photo-editing software
If your software supports layers and layer opacity then this method should work just fine in most photo editing programs. I’ve used Photoshop Elements and you should check your program’s help if you are unsure how to perform these tasks in your software.
Add a new layer using Layer > New > Layer and use the Rectangular Marquee to select around the inside border of this layer leaving a small margin. Choose Select > Inverse to invert your selection so the border area is selected. Now use the Paint Bucket to fill the area with black or dark brown. Choose Select > Deselect.
Choose Filter > Blur >Gaussian Blur and use a high radius value to blur the edge and soften it. Adjust the Layer Opacity to blend this edge into the image underneath and, if desired, set the Blend Mode to Darken or Multiply.
Tags: Lightroom, Photoshop, Photoshop Elements, Vignette


17 Responses to “Photoshop, Lightroom and Photoshop Elements: How do you Vignette?” - Add Yours
May 1st, 2009 at 7:53 am
Just wanted to note that when using LR 2 it is best (provided you did not do any cropping to your image) to use the “lens correction” sliders above the “post crop” sliders.
Your vignette will come out cleaner and more natural.
May 1st, 2009 at 8:22 am
If you want to add a cheesy white “haze” vignette in LR2, just slide the OTHER direction, into the positive numbers. It’s like Sears Portrait Studio retouching at your fingertips :P
May 1st, 2009 at 8:47 am
I know vignetting has its place (photos that are trying to look like they were taken in 1904) but I offer a word to the wise: if you want professional photographs, VIGNETTE SPARINGLY! By all means use the graduated neutral density filter option in Lightroom to knock back the lightest edges of your image (usually the sky), but vignetting is a gimmick that usually makes it look like you’ve used a cheaper lens than you’ve got.
Why buy a really wide, expensive lens and then darken the corners? If anything, you should be using the lens correction feature in Lightroom for what it was designed for: to lighten the corners slightly back up to the same f/stop as the rest of the image.
May 1st, 2009 at 10:27 am
to “fin c”: vignetting a photo is about accentuate attention on the center of the photograph, it has nothing to do with making a perfecto shot “technically” speaking. you can do both. besides a top notch lens its not just clear even in the corners. its sharper, its color rendition is superior.
about vignetting: using photoshop i prefer a more flexible way to do vignetting:
-create a black layer
-change its blend mode to Soft Light
-choose a middle gray brush (128,128,128)
-change its size to fit the whole image and make it really soft (0%)
-then just start clicking on the picture to clear away the darkness and make the vignette anywhere you want :P
May 1st, 2009 at 12:12 pm
Since I’m already making extensive use of curves (masked and unmasked) for other post processing purposes in Photoshop, I virtually always use a curve layer to create a vignetting effect. I select the center of the image with a oval selection, feather the edges (often 250 pixels, but this can vary), invert the selection, and then use a curve to selectively darken the corners. In addition, in some cases I may add a sort of “inverse vignetting” by repeating the process with an uninverted selection and creating a curve that somewhat brightens the central area of the image.
Dan
May 1st, 2009 at 12:28 pm
I usually just make a feathered selection around the edges and darken with curves in Photoshop. But all these are great tips too! Thanks!
May 1st, 2009 at 2:39 pm
When I want to vignette the edges I use the Photoshop RAW plug-in, it’s perfect. Of course, this only works if you shoot RAW, and if you don’t have any other editing to do to your images.
May 1st, 2009 at 8:28 pm
@ Amandalynn
Someone the photoshop options you can make the RAW window come up for JPGs as well.
May 1st, 2009 at 8:39 pm
The PSE method sugested here is bad. You will get a much more realistic effect if after selecting the whole area you first Modify>contract your selection, then feather by a very large ammount, say 250 px, then invert your selection and fill.
May 1st, 2009 at 10:40 pm
Just to throw another Photoshop method into the works, here’s what I do.
Select the Lasso tool set feathering between 85-100px and draw a very rough oval selection over your image.
Than cmd + Shift + i to invert your selection. Go to Layer > New adjustment layer > Levels and bring your white output levels down to around the 220-230 mark.
I find that using adjustment layers gives me much more control over the final image. As each layer can be tweaked. Using layer styles in PS will get you a square Vignette, which isn’t how the light would naturally behave through a lens.
May 1st, 2009 at 11:27 pm
As Melissa said, it’s highly advisable to use the camera correction vignetting rather than the post-crop in Lightroom 2. The camera correction darkens the colours beautifully, by underexposing and keeping the rich saturation. Post-crop just puts a mucky grey around everything. Matt Kloskowski has an good video on this difference here, which I discovered the other day:
http://www.lightroomkillertips.com/2009/video-tip-the-truth-behind-vignetting-and-edge-darkening/
May 1st, 2009 at 11:44 pm
How do you do a color vignette? For example, if your sky is a light blue, I’ve seen where the corners are made a darker blue, rather than a black vignette. Thanks for your help?
May 2nd, 2009 at 12:54 am
@Stephanie
Adjusting your levels will darken colours as opposed to masking them.
May 6th, 2009 at 4:33 am
@Pete Morley
Thank you for the help! I will give this a try! Thanks again!
May 8th, 2009 at 4:08 pm
I use outerglow all the time but never thought to change the color to black and use it this way. I think it’s going to be me new favorite trick!
Thank you!
July 5th, 2009 at 3:22 pm
As a follow up post to this tried and true method of sorting the truly creative from the uninspired gimmick abusers I suggest the next “lesson” be focused solely on the “lens flare” filter.
After that all that is missing is the post on the Tobacco and Soft Focus Cokin filters.
July 6th, 2009 at 10:11 am
Oh this is so great. Thanks for posting this. I had one of those “why didn’t I think of that” moment when I read the inner glow portion of the article.
Leave a Reply