It can be extremely hard to predict when and where the peak colors of falls will hit. If you’ve ever been a week or two early you’ll know the frustration of seeing little splattering of color when you were hoping for full on peak color. Well, using a little bit of post-production magic, you can add some life to those early fall shots and get it closer to the vision you’d hoped mother nature would’ve given you in the first place. Let’s see how we can fake fall color using the HSL tab in Lightroom!

As a side note: I do want to mention that while this article is about faking the colors to create a vision that didn’t exist in the first place, a lot of these techniques can be applied to enhancing fall colors that do exist. Even if you’re completely against the idea of changing the world in post-production it might be worth reading through it to see how you might be able to use these techniques in a way that retains a more true to life look in your image.
What is the HSL tab
 The workhorse of the manipulations you will see today is the HSL tab in Lightroom. It allows you to control the Hue, Saturation, and Luminance of your photograph on a color by color level. This gives you the ability to modify reds separately from oranges, blues from greens and so forth.
Each of the HSL controls have a unique slider for the eight different color tones that make up an image and as you’d expect, each of the HSL controls allow you to modify different aspects of that color.
- Hue – Controls the tonal range of the color that you’re modifying. For example greens can be anywhere from yellow to aqua.
- Saturation – Controls the intensity of the color that you’re modify. More saturated means deeper and more intense color, less saturated and you’ll have muted or even no color for the selected color.
- Luminance – Controls the brightness of the color you select. Moving a slider to the right will brighten the selected color, while moving to the left will darken it.
As you can see there is a wealth of specialized controls built into the HSL tab. I hope the walkthrough below gives you some ideas on what you can do with it. Remember it’s not just limited to faking the colors of the fall season.
Fake perfect fall colors with Lightroom
To get started you’ll need a photograph to work with. It is going to be important that you choose your images carefully here as not every photograph will work for this kind of post-production.
For example – you’ll want to make sure that the trees you’re featuring do in fact change color in fall (evergreens do not), and, that the other surrounding features of your photograph are outside of the green/yellow spectrum that you’ll most-likely be changing, or you’ll be altering them as well as your trees.

Once you have a great shot and you’ve completed some of the basic post production steps then you’ll want to hop over to the HSL tab in your Lightroom develop module.
As you’ll be working with trees that have yet to change color you’ll mostly be working with greens and maybe some yellows or reds. Again, this is why it’s important that the photograph you’re modify doesn’t contain any non-leaf items in these color ranges – or you’ll change them too – and that might looking more unnatural than the fake fall colors you’re creating.

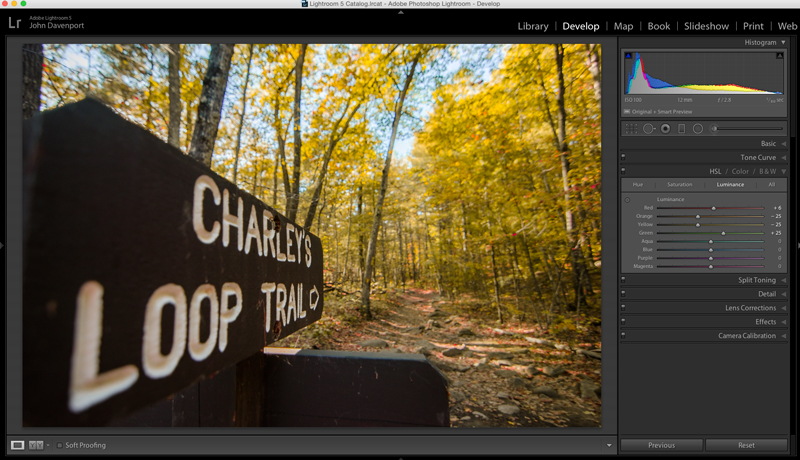
As you saw above, the shot I’ve chosen for this article contains mostly green leaves with just a few hints of fall color. The first step is to remove the greens from the image by moving the green’s hue slider all the way to the left. This effectively changes the green colors in the image to yellow giving a more fall like look the the photograph, but we’re not done just yet!
Next you can experiment with moving the reds and yellows sliders around to try and see how they effect the image. Different color tones will come to life that you may not even realize were there in this step so it’s important to take it slow and look at the entire photograph as you make the changes. In this image the leaves on the ground took on a rusted red look while the trees themselves got a deeper orange look.

Once you’ve got the Hue the way you like it you may want to move into the Luminance and Saturation tabs of the HSL tool. This will allow for further modifications of the colors tones by effecting the richness and brightness of the colors you’re presenting.
Remember the color tones are still the same as they were in the Hue slider, so even though the greens appear as yellow, moving the green Luminance slider to the right brightens the trees a bit, while the orange and yellows sliders effect their respective color tones.
Another idea that you might want to toy around with is modifications of the white balance. Adding more yellows with the Temp slider or more magenta with the Tint slider can add even more dimension to the shot giving the colors a more dynamic feel.

However, it is extremely important to be careful with the white balance sliders when you’re doing these manipulations as bad things can happen very quickly if you’re too aggressive with the changes!

After you’ve set your color tones and adjusted the white balance of the image it’s time to give the entire photograph a good, close, once over.
For this demonstration image the lettering on the sign started to take on a reddish/yellow tint after the white balance tweaks were performed. To fix this an adjustment brush was added to the sign which reduced both the Temp slider (to remove yellows) and the Tint slider (to remove the magenta colors). Also at this point the sign was given a little more definition with the adjustment brush by increasing the clarity and fine tuning the exposure.

All in all using the HSL tab in Lightroom can be a fun way to create that fall color when it might have been just out of reach. Of course, this doesn’t compare to the real thing so, the best way to get fall color is to go find it in person. Therefore don’t let this stop you from getting out and planning your next hiking trip – the unpredictable nature of the fall season is one of my favorite parts about it!

Watch this technique in action
Do you have any other fall photography or post-processing tips to bring out those great colors? Please share in the comments below.

