Of all the portrait lighting tools at our disposal, none are quite as versatile as the the five-in-one reflector. The concept itself is extremely basic. In the hands of a photographer comfortable with common lighting principles, the reflector helps us bounce light into or onto those areas that aren’t getting enough light, regardless of whether we are using natural, ambient, or studio/strobe lighting. A reflector placed directly opposite a main light can act as a hair light, creating separation between the subject and background. Placed in front of a back-lit subject, we can negate the silhouette effect, using available, natural light to balance the exposure between our subject and background. Held at a ninety-degree angle to a subject’s chest, we can toss some light up on the subject’s face and neck, eliminating troublesome shadows caused by foreheads and chins when using overhead or mid-day lighting.
The possibilities really are nearly endless, and– just as importantly– affordable. While there are many options available, at about $40.00, The Westcott 40″ 5-in-1 Reflector meets (and often exceeds) my needs, in terms of price, size, durability, and versatility. But dropping $40 on a reflector and adding it to your bag of tricks is only half the battle. Like the name says, you’ve got five-in-one. While technically not all five are actually reflectors, knowing which of the five to use and under what circumstances is essential to successful photographs.

5-in-1 Reflector surfaces are attached to or removed from the outer ring with zippers.
Silver
The silver panel is one of the most useful, and is best for beginners first getting their bearings with reflectors. Since the silver reflects the most amount of light of the five, it is a great choice for low-light situations or those scenarios where you need a strong fill light. Since it doesn’t change the color of white-balanced flash or studio lights, it is perfect for both indoor and outdoor portraits. Another reason it works so well for beginners is that most first-timers make the mistake of not placing the reflector close enough to their subject. The silver reflector’s ability to shine more light than the gold, for instance, allows it to be placed further away from the subject than we typically want, without sacrificing results. One word of caution, though– the fact that the silver is the strongest of the five is an advantage, but it can also be too strong in already bright light unless it’s feathered. Take some time to experiment with proper and effective placement.
Gold
The gold reflector is great for outdoor portraits because it matches the warm color tones of sunlight. The gold reflector is actually at its best when it is reflecting sunlight, casting a warm glow on the subject. It’s easy to turn normal skin tones overly yellow, however, if you aren’t careful. This is also why the gold reflector is also not recommended for studio or flash work. It not only changes the color of the white light that hits it, but can cast uneven color tones on the subject.
White
Under most circumstances, this one is my favorite. The white panel may not reflect quite as much light as the silver or gold, but when used properly it can still bounce just enough light onto the subject to overcome shadows and add subtle dimension opposite larger light sources. Since it is soft, clean light, it works well both in the studio and outside when there is ample light. While effective, the white reflector won’t do you much good at all in low-light situations. It is also important to remember, though, that for the white reflector to do its job, you’re doing to have to get it very close to your subject. Wedding photographers love the white reflector because it doesn’t change the color of the light– or the dress.
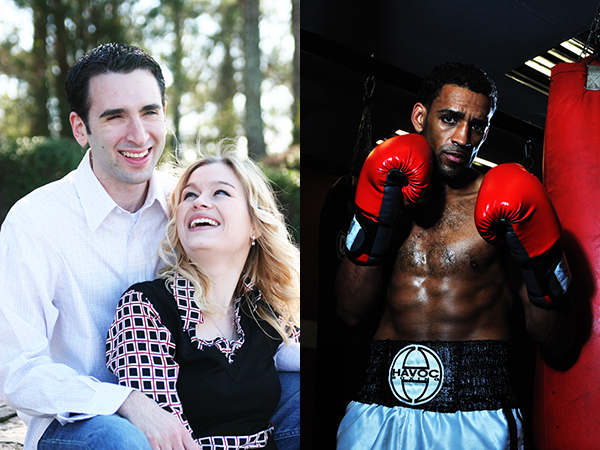
In the outdoor portrait on the left, a white reflector adds just enough light to open up the shadows, while a silver reflector casts some dramatic light across the boxer on the right.
Black
This one is pretty much the “anti-reflector.” Black, as we know, absorbs light, which helps to cut down on the reflections from shiny, reflective surfaces– one of the reasons it is used so often in jewelry photography. When placed properly, the black panel also creates shadows when light falls too evenly across the subject. The benefit of this “negative fill” is that it allows you to create shadows rather than overcome them.
Using the black “reflector” in a small space helped me achieve split lighting, which I usually create with a silver reflector in a larger area.
Translucent
When all of the other reflection panels have been removed, the translucent is left. While technically not a reflector, this panel works great as a shoot-through diffuser for flash or location lighting, or as a diffusion panel between the sun and your subject. Since larger light sources provide softer light, using the translucent panel as a large diffuser gives you a very large, easily portable light source. While a large enough translucent reflector can also be used as an impromptu background for a head shot, the translucent panel will almost always be between your subject and the light source.

Using the translucent panel above the subject’s head, we spread the light and softened it.
Conclusion
The 5-in-1 Reflector can one of the most versatile lighting tools in your entire workflow. Taking full advantage of its capabilities, though, won’t be possible until you know what color reflector to use for which lighting scenario. Remember, though, that photography rules were made to be broken once you’ve learned them, so be sure to experiment with color and placement.

