Introduction
This tutorial has been transcribed from the SLR Lounge Lightroom 4 Workshop on DVD, a 14 hour Lightroom 4 A – Z guide with over 130 tutorials for mastering Lightroom from start to finish. The Digital download can be purchased from SLR Lounge while the physical copy is available through Amazon Prime.
Overview
In the first and second part of this three part series we went over basic post production of a portrait, as well as how to use Lightroom for some more advanced portrait retouching. We showed you how to use the Spot Removal Tool to remove blemishes, as well as how to use the Adjustment Brush Tool to create a skin softening mask. In this final article, we will show you how to enhance detail and contrast in areas of the image such as the hair and eyes. This will add the final touches to your portrait to really make it pop. We will also show you how to create an effect that replicates the High Pass filter found in Photoshop. This gives your image a very contrasty and grungy look that has become rather popular recently, particularly with street photography.

Enhancing and Brightening Eyes
Depending on where the light is coming from, as well as how the subject is facing the camera, most often one eye will be brighter than the other. This is exactly what is happening in this portrait. When enhancing the eyes, we want to make sure to follow the natural lighting that already exists in the image. It can be very easy to take this effect overboard and create an unnatural look, so be sure not to be too heavy handed with eye enhancements.
To get started we will select our Adjustment Brush by hitting “K” on our keyboard or simply selecting it from our Adjustment Tool Bar above the Basic Panel.
![]()
We will reset our current brush settings by holding “alt” on a PC, or “opt” on a Mac and clicking “Reset” which appears in the upper left hand corner of the Adjustment Brush drop down panel.

Lets dial in our settings for the brush we will use to enhance and brighten the eyes. We are going to bring the exposure up to +.39, the contrast up to +11, and lastly clarity up to +7. Don’t worry about getting it perfect now, just dial in a setting, then we will adjust the settings of the brush after we paint in our mask.

Now we will zoom into our image three to one. You can select this in the Navigator Panel on the upper left hand corner of your Develop Module. Once the image is zoomed in, use your mouse, which will appear as a hand, to navigate around the image by clicking and draging. ![]()

We will paint in this effect on the eye, trying to follow the way the light is naturally hitting the eye. You can see your mask by hitting “O”. You can also refine or remove any part of the mask by holding down “alt” on your PC, or “opt” on a Mac while your brush is over the image.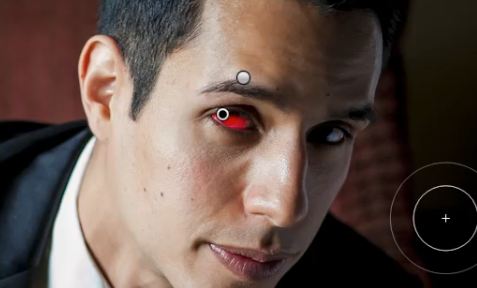 As you can see from the image below, the eye which is further from the camera only has detail in the white of the eye. We decided not to enhance this eye because only brightening the white of the eye would create a very unnatural look. Also, since the look of this image is very dark and dramatic, I think it works well to have one of his eyes rather dark in the shadows.

Enhancing Hair Detail
Now we will continue on to enhance the detail and contrast in the hair. I often like to use the Adjustment Brush to add contrast and sharpening t0 hair which works to make the hair detail really pop. Lets select our Adjustment Brush once again, and reset out the current settings once more. We will then change our Clarity to +30, and our Sharpness to +11.

With these brush settings we will paint over our hair, being careful to not go over any of the skin. Once again you can see your mask by hitting “O” and remove the effect by holding “alt” or “opt” while painting. Using this hair enhancing technique works particularly well on fashion photography with female subjects.

Detail Enhancing
After we have enhanced both the eyes and the hair, we would like to really bring out some additional detail and add some contrast to the rest of the image. In this example we are going to apply an Adjustment Brush over the entire image, then simply remove it from the skin and hair. Lets create a New Adjustment Brush by hitting “New” in the Adjustment Brush Panel. This will create another brush and mask to which you can apply different settings.

Once you have selected a new brush, we can dial in our settings for the detail enhancement brush. We are going to bring our Clarity to +35, our Shadows to -11, and our Sharpness to +13. This creates a very contrasty look that is similar to using a High Pass Filter overlay in Photoshop. Now adjust our brush to a very large brush and paint over the enitre image. We will then show our Mask Overlay by hitting “O” and remove the effect off of the skin and hair by holding down “alt” or “opt” and painting over the skin.

Hit “O” once more to remove your Mask Overlay and you will see your effect As with all post production, this is subjective, and you can find your own style based on each individual image. Below you will see the image with the detail enhancents applied which does a nice job of bringing out texture and colors in his clothing and in the chair’s cloth pattern.
Below is our final retouched portrait of our male subject.

Creating a High Pass Filter Look with Lightroom 4’s Clarity
This last effect is completely optional and subjective. We simply want to show you the technique. Street photographers have recently made the “grunge” look quite popular. This look is typically done in Photoshop by using a High Pass Filter layer over the original image. However, with Lightroom 4, we can now mimic this effect with the new adjustments that have been made to the Clarity slider.
This effect is going to amplify mid-tone contrast in the image and will give it a very “grungy” look and feel. We definitely do not recommend this effect on women’s portraits unless there is a very specific look you are trying to achieve. In fact, we sort of say that this “grunge” look is kind of a “manly man” kind of look. Keep in mind that I would not use this effect for images we actually plan to deliver to wedding/portrait clients. Most clients won’t appreciate you making them look all grungy. However, it is a cool effect when it comes to editorial photography.
When using this effect on a portrait, we always recommend that you only apply this after you have done basic adjustments, as well as retouching. This is becuase this effect amplifies everything in the image, including the flaws such as acne or wrinkles. When you are ready to apply the effect it is very simple. While in the Basic Panel, simply bring up the Clarity slider to whatever you feel is appropriate. For this image we brought it up to +61. Below you will see our image with the High Pass effect by using the Clarity in Lightroom 4.


The SLR Lounge Lightroom 4 DVD Guide
Stay tuned for Part 3 of the Advanced Portrait Retouch Series where we will go over how to enhance and brighten a subjects eyes, as well as enhance detail and contrast in hair and other parts of the image! If you enjoyed this tutorial then we know you will love the SLR Lounge Lightroom 4 Workshop on DVD featuring 130 tutorials and nearly 14 hours of training covering Lightroom 4 from A – Z, nearly half of which is devoted strictly to image processing techniques.
eDVD Digital Download available at SLR Lounge
Physical DVD available for purchase at Amazon Prime


Some Older Comments